
Best OBS Mic Filter Settings: Clear Voice Without Distortion (2026) — complete guide
Best OBS Mic Settings for Clear Voice Without Distortion
For a clear OBS microphone, use a simple chain—noise suppression, noise gate, compressor, then limiter—and tune each threshold while speaking at your normal distance. Keep the input out of the red, use mono for a single mic, and treat copied presets as starting points rather than guaranteed settings for every room or microphone.
Why Default OBS Mic Settings Fall Short
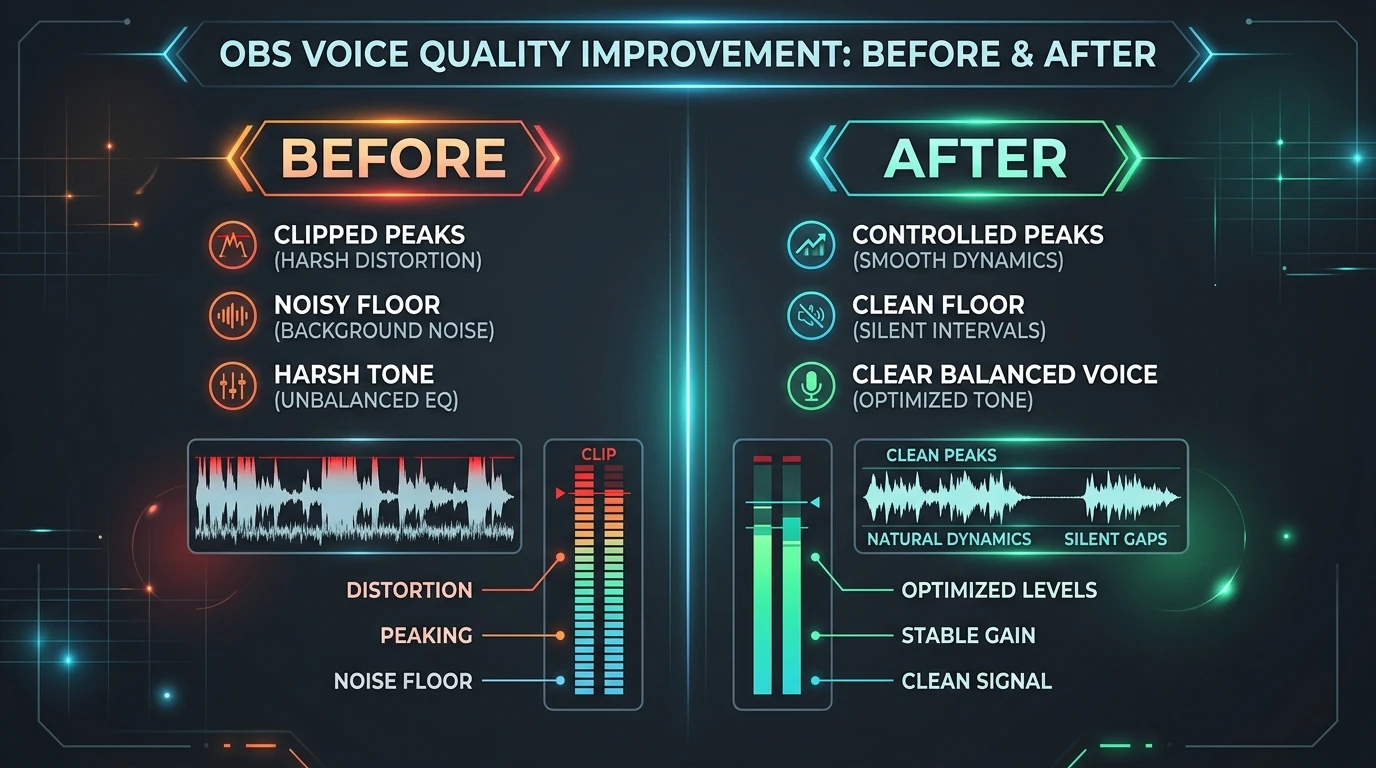
OBS captures raw audio from your microphone input without any processing. That means:
- No noise reduction applied
- No compression to tame volume spikes
- No EQ to shape your voice
- No limiter to prevent clipping
The result? Your audience hears every keyboard click, room echo, mouth pop, and volume inconsistency. Worse, if your gain is set too high at the source, you'll clip the signal before OBS even processes it — creating permanent digital distortion that no plugin can fix.
The solution isn't buying a more expensive microphone. It's properly gain-staging your signal and applying the right OBS filters in the correct order.
Understanding Gain Staging in OBS
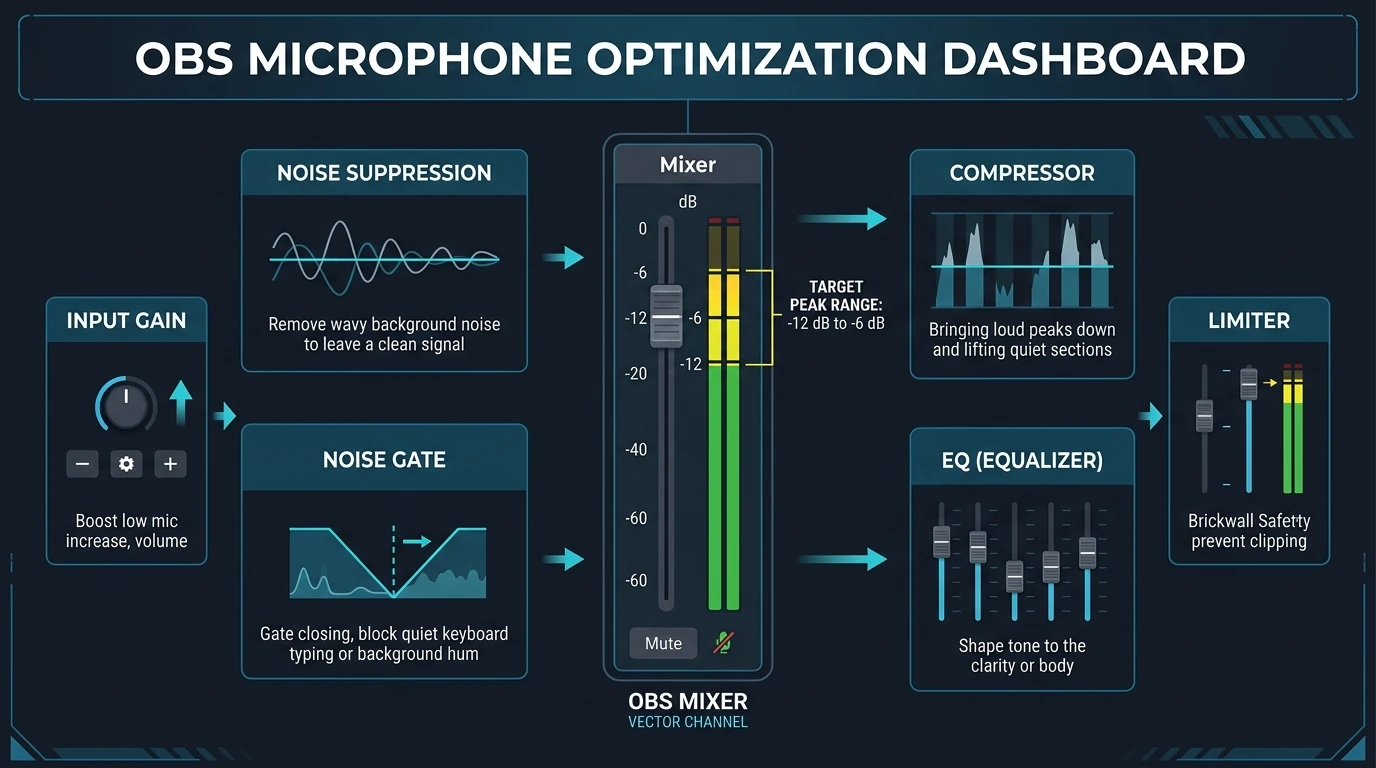
Before touching any filters, you need to set your input level correctly. This is the single most important step for avoiding distortion.
What Is Gain Staging?
Gain staging means setting the volume of your audio signal at each stage of the chain so it's loud enough to be clear but never so loud that it clips (exceeds 0 dB).
How to Set Proper Gain in OBS
- Open OBS and go to Edit > Advanced Audio Properties
- Look at your mic/aux input channel
- Speak at your normal volume into the mic
- Your level meter should peak between -12 dB and -6 dB (the yellow zone)
- If it's hitting red (above -3 dB), reduce your mic gain at the hardware level first
Key rule: Always reduce gain at the source (interface, mixer, or mic gain knob) before reducing it in OBS software. Reducing digitally after clipping at the input won't recover lost information.
The Ideal OBS Mic Filter Chain (Order Matters)
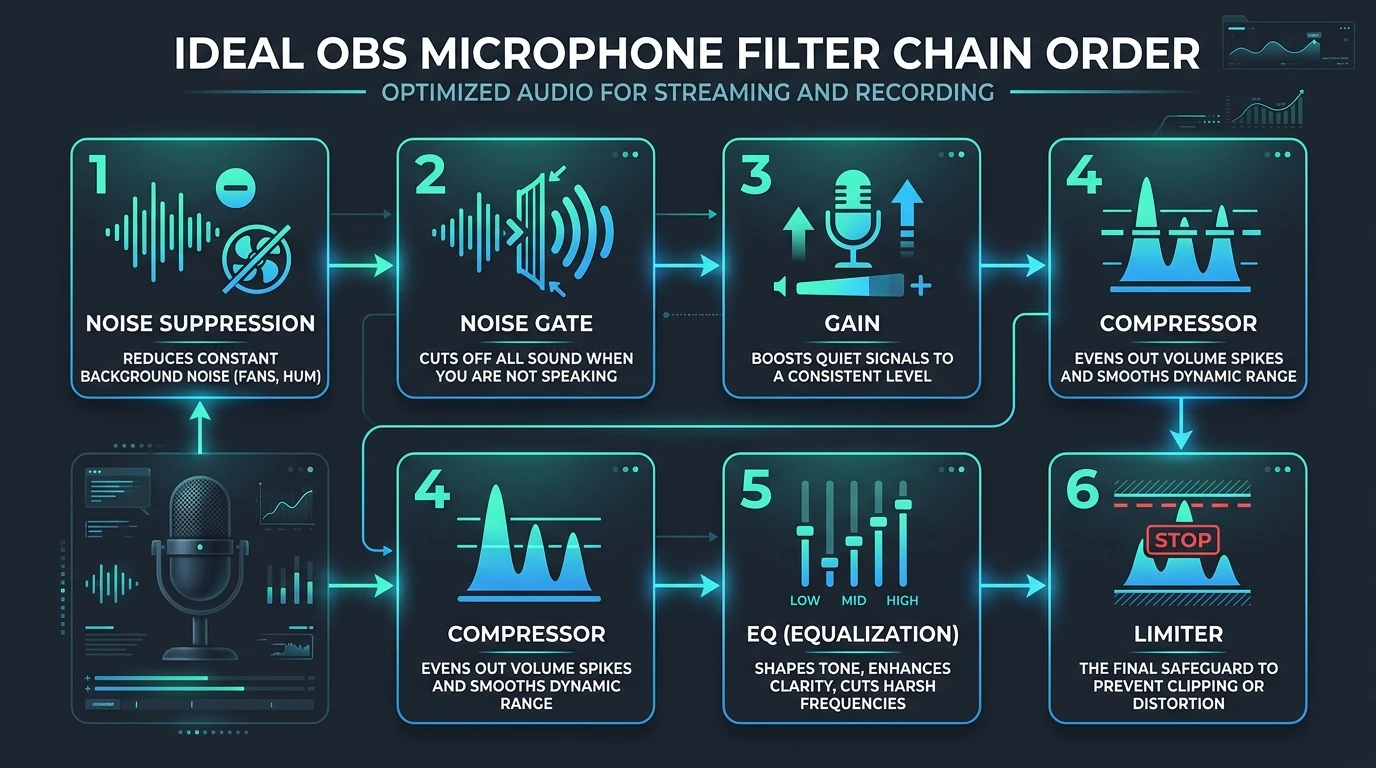
The order in which you apply OBS audio filters dramatically affects your final sound. Here's the optimal chain:
- Noise Suppression — removes constant background noise
- Noise Gate — cuts audio below a volume threshold
- Gain (if needed) — boosts quiet signals after noise removal
- Compressor — evens out volume differences
- EQ (via Virtual Studio Technology (VST) standards or built-in) — shapes tonal quality
- Limiter — prevents any signal from exceeding 0 dB
Step-by-Step OBS Mic Settings Workflow
Here's a practical workflow you can follow right now. Each step includes what you should hear or see after completing it.
Step 1: Set Hardware Gain Correctly
Action: Adjust your audio interface or USB mic gain knob until OBS meters peak at -12 dB to -6 dB during normal speech.
Expected Result: Meters stay in the green/yellow zone. No red peaks. Your raw voice is audible but not loud.
Step 2: Add Noise Suppression (First Filter)
Action: Right-click your mic source > Filters > Add > Noise Suppression. Choose RNNoise for most systems (low CPU, effective). If you have an NVIDIA RTX card, use NVIDIA Noise Removal for even better results.
Expected Result: Constant background noise (fan hum, AC, street noise) disappears. Your voice remains natural and unaffected.
Step 3: Add Noise Gate (Second Filter)
Action: Add Noise Gate filter with these starting values:
- Close Threshold: -35 dB
- Open Threshold: -30 dB
- Attack Time: 6 ms
- Hold Time: 150 ms
- Release Time: 100 ms
Expected Result: When you stop talking, audio cuts to silence. No residual room tone between sentences. Your voice opens naturally without being cut off at the start of words.
Step 4: Add Gain Filter (If Needed)
Action: If your voice is too quiet after noise suppression, add a Gain filter. Boost by +2 to +5 dB maximum.
Expected Result: Voice level increases to a comfortable listening volume without introducing noise (since noise suppression already cleaned the signal).
Step 5: Add Compressor (Fourth Filter)
Action: Add Compressor with these settings:
- Ratio: 4:1
- Threshold: -18 dB
- Attack: 3 ms
- Release: 80 ms
- Output Gain: 4 dB (makeup gain)
Expected Result: Loud moments (laughing, shouting) are tamed. Quiet moments are brought up. Your voice sounds consistent in volume — no jarring spikes or whisper-quiet drops.
Step 6: Add EQ (Fifth Filter — Via VST Plugin)
Action: Add a VST 2.x plugin filter and load a parametric EQ (like ReaEQ from Reaper, which is free). Apply:
- High-pass filter at 80 Hz (removes rumble and plosives)
- Slight cut at 300-400 Hz (-2 to -3 dB) to reduce muddiness
- Gentle boost at 3-5 kHz (+2 dB) for presence and clarity
Expected Result: Voice sounds clearer, more present, and less boomy. Words are more intelligible without sounding thin or harsh.
Step 7: Add Limiter (Final Filter)
Action: Add Limiter with threshold set to -3 dB and release at 60 ms.
Expected Result: No audio ever clips above 0 dB. Even unexpected shouts or mic bumps are caught before distortion occurs. Your stream/recording is safe from digital clipping at all times.
Comparison Table: Common OBS Mic Settings vs. Optimized Settings
| Parameter | Default / Common Setting | Optimized Setting | Why It Matters |
|---|---|---|---|
| Input Gain Level | Peaks at -3 to 0 dB (too hot) | Peaks at -12 to -6 dB | Prevents clipping at the source |
| Noise Suppression | None | RNNoise or NVIDIA | Removes constant background noise |
| Noise Gate Close | -40 dB or lower | -35 dB | Cleaner cutoffs without eating words |
| Noise Gate Open | -26 dB | -30 dB | More natural voice onset |
| Compressor Ratio | Not used or 2:1 | 4:1 | Effective volume leveling |
| Compressor Threshold | -10 dB (too high) | -18 dB | Catches more dynamic range |
| EQ High-Pass | Not used | 80 Hz cutoff | Removes rumble and plosives |
| Limiter Threshold | Not used or 0 dB | -3 dB | Safety headroom against clipping |
Mini Case Study: Twitch Streamer "DarkVoxGaming"
Background: A Twitch variety streamer with 2,400 followers was losing viewer retention. Average watch time had dropped from 14 minutes to 8 minutes over two months. Viewer feedback consistently mentioned "audio sounds harsh" and "hard to listen to for long."
The Problem: They were running a Blue Yeti at maximum gain, no filters, with OBS mic volume at 100%. Peaks were hitting +3 dB regularly (full clipping). The compressor was placed before noise suppression, amplifying room noise.
Changes Made:
- Reduced Blue Yeti gain to 40% (from 100%)
- Set OBS input to peak at -9 dB
- Applied the filter chain described above in correct order
- Added high-pass EQ at 80 Hz to eliminate desk vibration rumble
Results After 30 Days:
- Average watch time increased from 8 minutes to 17.3 minutes
- Chat mentions of "audio" complaints dropped from 12 per stream to 1 per stream
- Gained 380 new followers in the month (vs. 95 the previous month)
- Stream VOD replays increased 62%
The only change was audio quality. Same games, same schedule, same overlays.
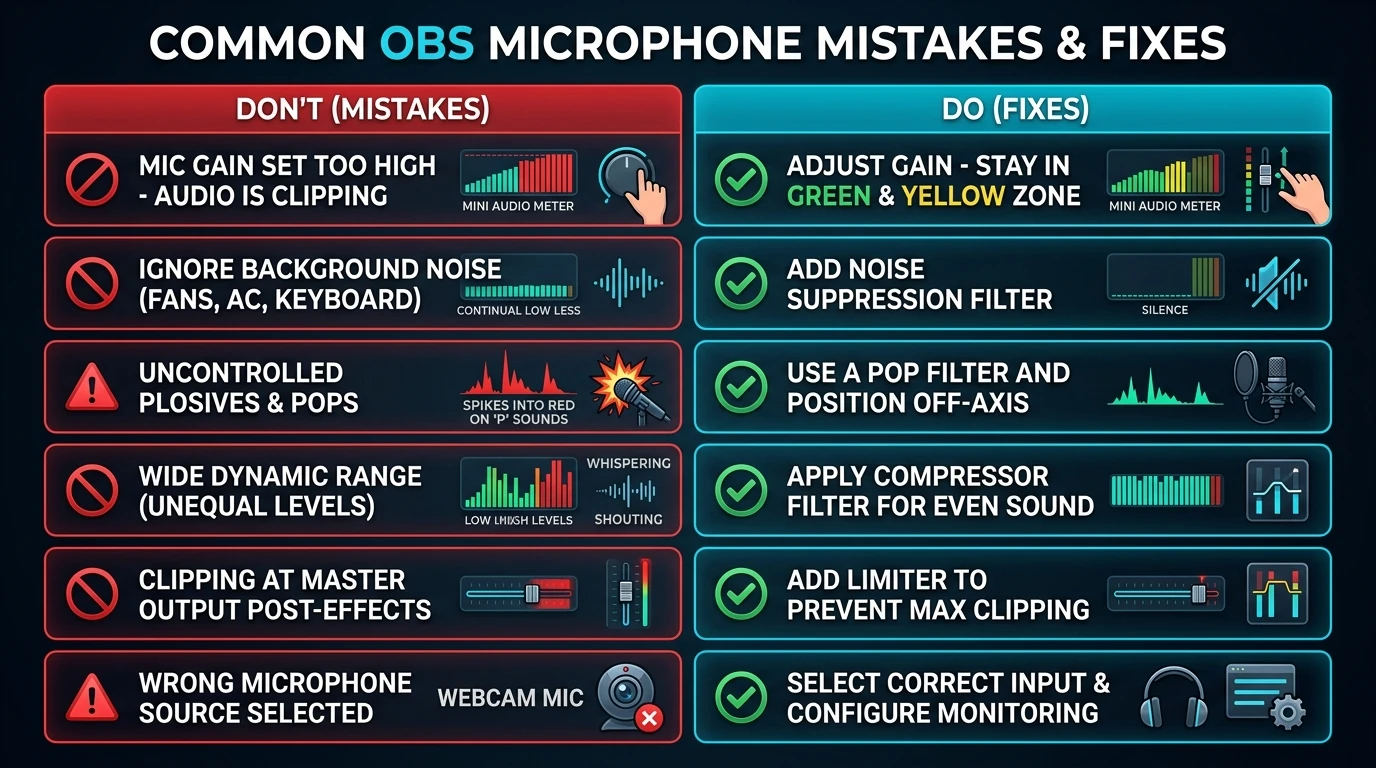
Common OBS Mic Mistakes and How to Fix Them
Mistake 1: Gain Too High at the Source
Symptom: Constant clipping, crackling on loud words
Fix: Turn down your interface/mic gain until peaks stay below -6 dB in OBS
Mistake 2: Wrong Filter Order
Symptom: Compressor amplifies noise, gate sounds choppy
Fix: Always place noise suppression first, gate second, compressor after
Mistake 3: Noise Gate Too Aggressive
Symptom: First syllable of every sentence gets cut off
Fix: Raise the open threshold closer to the close threshold (narrow the gap to 5 dB)
Mistake 4: Compressor Threshold Too High
Symptom: Compressor barely engages, volume still inconsistent
Fix: Lower threshold to -18 dB so it catches normal speech dynamics
Mistake 5: No Limiter as Safety Net
Symptom: Random loud moments (sneezes, game scares) cause full distortion
Fix: Always add a limiter as the last filter in your chain at -3 dB
Mistake 6: Using OBS Monitor Instead of Recording Test
Symptom: "It sounds fine to me" but recordings reveal issues
Fix: Record a 60-second test, play it back in headphones, then adjust
Pros and Cons of OBS Built-in Audio Processing
Pros
- Completely free — no additional software purchases needed
- RNNoise suppression is surprisingly effective for most environments
- Low CPU usage compared to running external VST hosts
- Filter chain is straightforward to configure and reorder
- Settings save with your OBS profile for consistent results
Cons
- Built-in EQ options are limited (requires VST plugin for proper parametric EQ)
- No visual feedback on compressor gain reduction (hard to see what it's doing)
- Noise gate can sound less natural than expansion-based alternatives
- No built-in de-esser (need VST for sibilance control)
- Advanced users may outgrow the built-in tools and need external processing
When to Consider External Processing
OBS built-in filters handle 90% of use cases well. But consider external tools if:
- You need a de-esser for harsh "S" sounds
- You want multiband compression for detailed voice shaping
- You're running multiple microphones with different processing needs
- You need real-time visual metering to monitor your chain
- You're producing content where audio quality is the primary product (podcasts, ASMR)
Free VST options like ReaPlugs (ReaEQ, ReaComp, ReaGate) integrate directly into OBS and give you professional-grade control without spending money.
Recommended Settings by Microphone Type
USB Condenser (Blue Yeti, HyperX QuadCast, Elgato Wave)
- Set mic gain to 30-50% on the hardware
- Use RNNoise suppression (condensers pick up more room noise)
- Set noise gate open/close tighter (-28/-32 dB) since condensers are more sensitive
- High-pass at 100 Hz (USB condensers often have proximity rumble)
Dynamic (Shure SM7B, Rode PodMic, Audio-Technica AT2005)
- Set interface gain to achieve -9 dB peaks in OBS
- Noise suppression may be optional (dynamics reject background noise naturally)
- Can be more aggressive with presence boost (4-6 kHz) since dynamics are naturally darker
- High-pass at 60-80 Hz is sufficient
- If you're ready to upgrade to a professional XLR microphone setup, see our roundup of top XLR condenser microphones for vocal recording in 2026.
Headset Microphone (HyperX Cloud, SteelSeries Arctis)
- Reduce Windows mic level to 80% first, then adjust in OBS
- Noise suppression is critical (headset mics pick up breathing and room noise)
- Use compressor more aggressively (6:1 ratio) since headset mics have narrow dynamic range
- Cut 200-400 Hz by 3-4 dB to reduce nasal quality common in headset mics
Testing Your Settings Properly
Never assume your settings sound good based on the OBS meter alone. Follow this testing protocol:
- Record a 90-second test clip — include normal talking, whispering, laughing, and a loud exclamation
- Play back through headphones — not speakers (you need to hear detail)
- Listen for: clipping on loud parts, words being cut off, background noise between sentences, unnatural pumping from compressor
- Adjust one parameter at a time — change, record, listen, repeat
- Test in context — play game audio or music simultaneously and check if your voice still cuts through clearly
FAQs
1. What sample rate should I use for my mic in OBS?
Use 48 kHz. This is the standard for video production and streaming. Ensure your Windows audio settings, interface, and OBS all match at 48 kHz to avoid resampling artifacts.
2. Should I use mono or stereo for my microphone in OBS?
Use mono. A single microphone produces a mono signal. Setting it to stereo wastes bandwidth and can cause phase issues. OBS will center your mono mic in the stereo output automatically.
3. Does the order of OBS audio filters really matter?
Absolutely. Each filter processes the signal from the previous one. If you compress before removing noise, you amplify the noise floor. If you gate before suppression, the gate has to work harder. The order in this guide is specifically designed for optimal results.
4. How do I know if my mic is clipping in OBS?
Watch the audio meter in the OBS mixer. If it hits the red zone (above -3 dB) or reaches the very top of the meter, you're clipping. You'll also hear crackling or harsh distortion on playback. Reduce source gain immediately.
5. Can I use these settings for podcast recording in OBS?
Yes. These settings work for any voice recording in OBS. For podcasts specifically, you might want slightly less aggressive noise gating (longer hold time of 200 ms) so natural pauses don't feel artificially silent.
6. Why does my voice sound robotic after adding noise suppression?
This happens when noise suppression works too hard — usually because your background noise is extreme. Reduce the noise at the source (close windows, turn off fans) so the suppression doesn't have to over-process. If using RNNoise, there's no strength setting — it's all or nothing. Consider NVIDIA Noise Removal if you have an RTX GPU, as it handles extreme noise better.
7. What's the difference between a noise gate and noise suppression?
Noise suppression continuously removes steady-state background noise (hum, hiss) while you speak. A noise gate completely cuts all audio when you stop speaking. They serve different purposes and work best together — suppression cleans during speech, the gate silences between speech.
8. How much CPU does the OBS filter chain use?
The full chain described here (RNNoise + Gate + Gain + Compressor + Limiter) uses approximately 1-2% of a modern CPU. Adding a VST EQ plugin adds minimal additional load. You won't notice any performance impact on streaming or gaming.
Related Internal Guides
- How to Remove Background Noise from Audio Without Making Voice Robotic — Deep dive into noise reduction techniques beyond OBS built-in tools
- Why Your Voice Sounds Thin After AI Noise Reduction — Detailed frequency guide for shaping any voice type
- The Shure SM7B Cloudlifter Trap: Do You Really Need a Preamp? — Helps you decide if your hardware is limiting your sound before you optimize software settings
Final Thoughts
Clear voice audio in OBS isn't about expensive gear — it's about proper gain staging and a well-ordered filter chain. Set your levels conservatively, apply filters in the correct sequence, and always test by recording and listening back.
The settings in this guide give you a professional starting point. From there, small adjustments based on your specific voice, microphone, and room will get you to broadcast-quality audio that keeps viewers engaged and listening comfortably for hours.
Start with the workflow above, test methodically, and your audience will notice the difference immediately.
Transparent Disclosure: The author is the Founder of Audio Forge Pro. Recommendations reflect genuine relevance to this topic. Core audio processing is free with no login required.