
Remove Background Noise Without Robotic Voice (2026 Guide) — complete guide
You finish recording a 45-minute podcast episode. The content is solid. The delivery is natural. Then you apply noise reduction at full strength and hit play. The hiss is gone - but now your voice sounds like it is coming from inside a tin can submerged underwater.
That is the exact problem this guide exists to fix.
Learning how to remove background noise from audio is straightforward. Learning how to do it without destroying voice quality is where most people get stuck. After processing hundreds of audio files across podcast productions, voiceover projects, and remote interview recordings, the pattern is always the same: the noise removal tool is not the problem. The settings are.
This guide covers the full workflow - from identifying your noise type, to choosing the right tool, to applying safe reduction settings that eliminate noise without making your voice sound robotic. It works for beginners starting with free tools and for advanced users working inside professional DAWs.
Why Background Noise Removal Goes Wrong
Before touching any settings, it helps to understand what is actually happening inside a noise reduction plugin.
The Robotic Voice Problem Explained
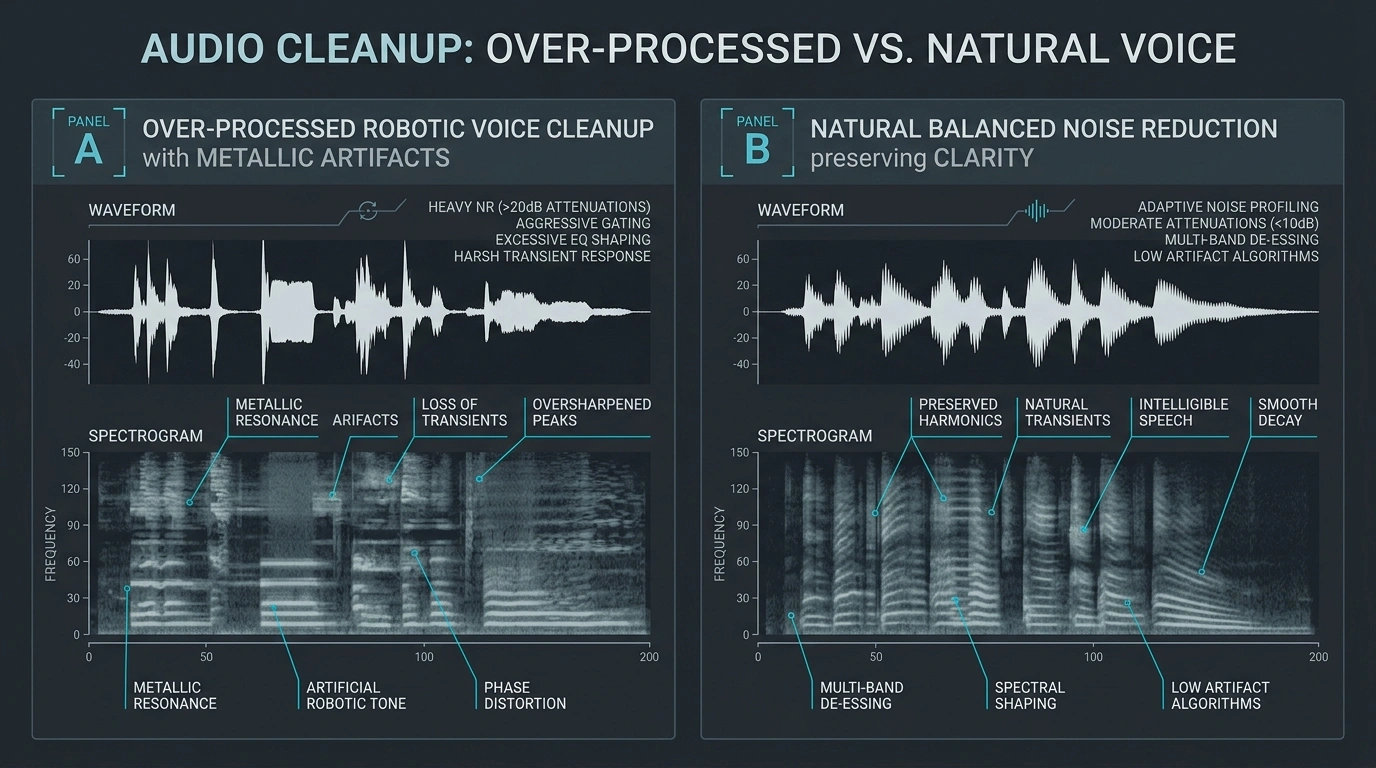
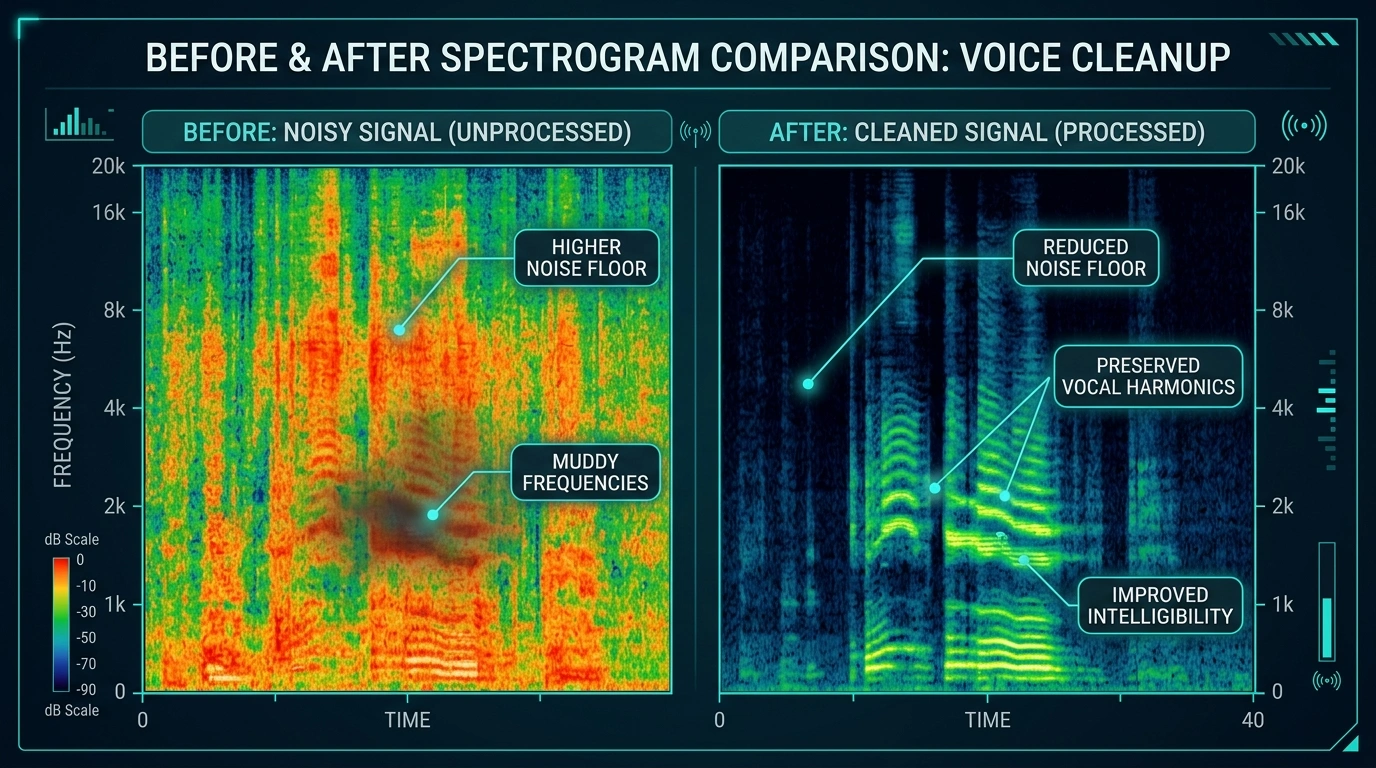
Noise reduction software works by analyzing a section of audio that contains only noise, then suppressing those frequencies across the entire recording. The problem is that your voice and background noise often share overlapping frequency ranges. When you push the reduction too hard, the algorithm starts eating into your voice harmonics - the formants and overtones that give a voice its warmth, texture, and humanity.
The result is what engineers call spectral artifacts: a warbling, watery, or metallic quality sometimes described as the "underwater robot" effect. The technical term is musical noise, and once you hear it, you cannot unhear it.
The key insight is this: noise reduction is a dial, not a switch. The goal is never to reach zero noise. It is to reach an acceptable noise floor while keeping the voice completely intact.
The 3 Most Common Mistakes Beginners Make
Mistake 1: Setting reduction to maximum in a single pass. Every noise reduction tool has a dial that goes to 100 percent. Almost no recording situation requires it. Going above 70 to 80 percent on most spectral subtraction algorithms engines is where artifacts begin. The outcome is a clean noise floor paired with a destroyed voice.
Mistake 2: Skipping the noise profile step. This is the most consequential mistake. If you do not give the software a clean sample of the background noise before your voice starts, it guesses. A guessed noise profile produces imprecise reduction that clips voice frequencies it was never meant to touch.
Mistake 3: Using noise reduction on intermittent noise. A car horn, a dog bark, or a keyboard click are not constant. Spectral noise reduction is designed for constant broadband noise like hiss or hum. Trying to remove intermittent sounds with it produces obvious holes in the audio. A noise gate handles intermittent noise correctly.
Types of Background Noise - Identify Before You Treat
Matching the right tool to the right noise type is the single biggest skill upgrade a beginner can make. Treating them all the same is how you end up with processed audio that sounds worse than the original.
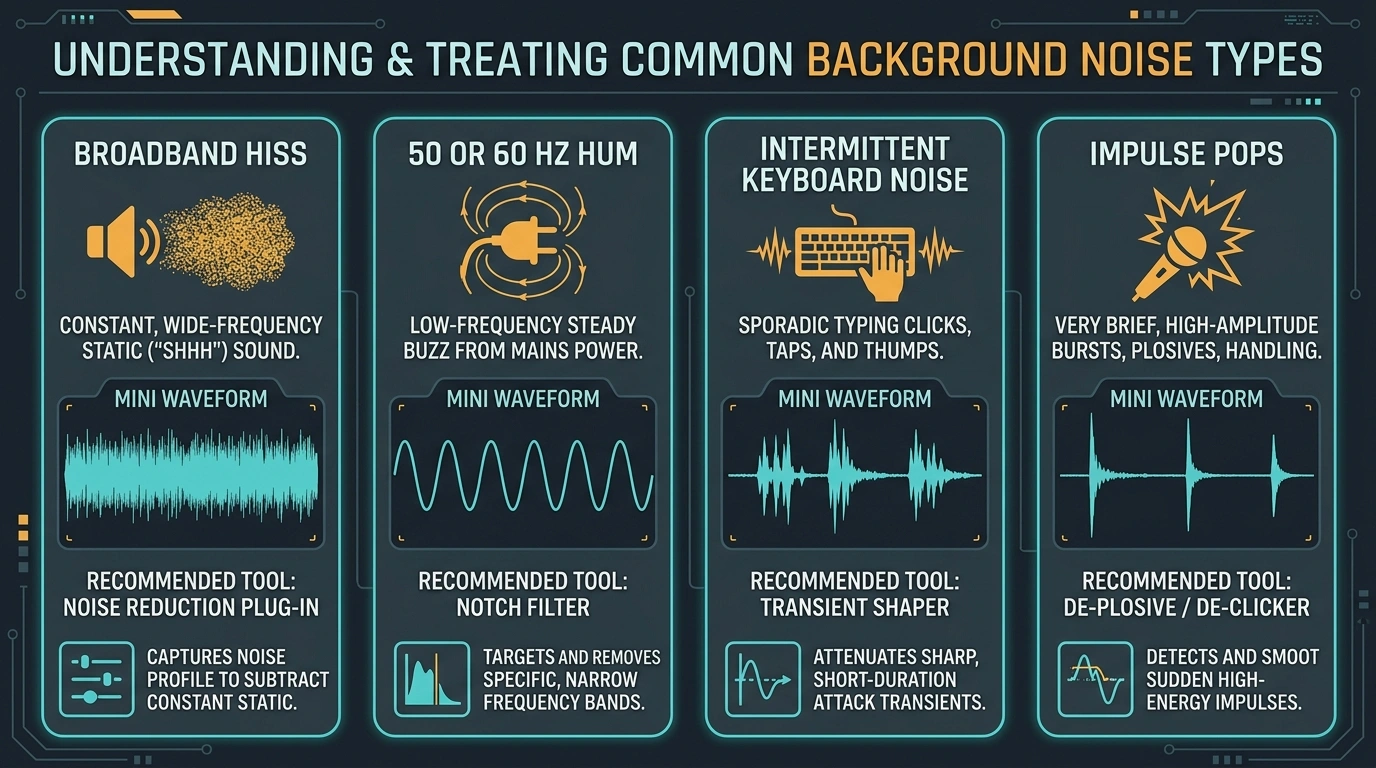
Broadband noise (constant hiss, room tone, fan noise, ventilation hum) is best treated with spectral noise reduction. This is the most common problem in home studios and remote recordings.
Tonal or narrowband noise (50Hz or 60Hz electrical hum, monitor buzz, ground loop interference) needs a notch EQ filter placed precisely at the fundamental frequency and its harmonics.
Intermittent noise (traffic passing, a door closing, keyboard typing, HVAC cycling on and off) is best handled with a noise gate or manual editing. Spectral reduction cannot remove these without leaving obvious holes.
Impulse noise (mic bumps, pops, crackle, digital clipping) requires a dedicated de-click or de-crackle tool like those found in iZotope RX.
According to audio production research cited in multiple mixing forums and tool documentation updated in 2024 and 2025, broadband noise is the most commonly reported audio problem among home studio users and podcasters, appearing in an estimated 70 to 80 percent of unprocessed home recordings.
Tools That Work in 2026 - Honest Pros and Cons
There is no shortage of noise removal tools. Here is an honest breakdown of what each does well and where it falls short.
Free Tools
Audacity Noise Reduction documentation Pros: Free, works offline, no account needed, good for simple broadband noise, widely documented with tutorials available for every level. Cons: The spectral subtraction engine is dated compared to AI-powered alternatives. Artifacts appear quickly above 15 to 18 dB of reduction. No real-time processing. Not suitable for complex noise environments. Best for: Beginners, podcasters on tight budgets, one-off fixes.
Adobe Podcast Enhance Pros: AI-powered, browser-based, completely free, produces clean results quickly on voice recordings, handles most broadband noise situations well. Cons: Requires uploading your file to Adobe servers, which raises privacy concerns for sensitive recordings. You have limited control over the output. Not suitable for music or audio with significant background content. Best for: Fast turnaround, remote workers cleaning up Zoom recordings, content creators who need results in under two minutes.
DaVinci Resolve Fairlight (Free Tier) Pros: Professional-grade noise reduction built into a free video editing platform. The Voice Isolation AI feature added in recent versions is genuinely impressive. Cons: Steep learning curve. Heavy on system resources. Requires installing a large application for what may be a simple task. Best for: Video creators already working inside DaVinci Resolve who want to avoid a separate audio workflow.
Paid Tools
iZotope RX 11 Pros: Industry standard for audio repair. The Spectral De-noise module is precise and highly controllable. The Dialogue Isolate module uses machine learning to separate voice from background with remarkable accuracy. De-click, De-crackle, and Spectral Repair tools cover every noise type. Cons: Expensive (ranging from approximately $399 for Elements to over $1,000 for the full suite in 2025 pricing). Significant overkill for simple podcast production. Learning curve is real. Best for: Voiceover professionals, broadcast editors, podcast engineers working on premium productions, anyone dealing with difficult or layered noise problems.
A client once sent a file recorded in a hotel corridor with an HVAC unit running directly outside the door. Nothing touched it until iZotope's Dialogue Isolate module at a 50 percent blend setting pulled the voice almost completely clear. That module alone justifies the cost for anyone doing regular client work.
Krisp AI Pros: Real-time AI suppression that works across every application on your computer. Excellent for calls, streaming, and any live situation. Consistently rated highly by remote workers and streamers. Cons: Subscription model (approximately $8 to $14 per month as of 2025). No post-production editing capability. Works only in real-time. Best for: Remote workers, streamers, online educators, anyone who cannot control their recording environment.
NVIDIA RTX Voice or Broadcast Pros: Real-time suppression with low perceptible latency. Free for RTX GPU owners. Integrates cleanly with OBS, Discord, and Zoom. Cons: Requires a compatible NVIDIA RTX graphics card. No use case for post-production editing of recorded files. Best for: Gamers, streamers, Discord users who already own RTX hardware.
Quick Tool Comparison
| Tool | Price | Real-Time | Best For | Artifact Risk |
|---|---|---|---|---|
| Audacity | Free | No | Beginners | Medium-High |
| Adobe Podcast Enhance | Free | No | Quick cleanup | Low |
| DaVinci Resolve | Free | No | Video creators | Low-Medium |
| iZotope RX 11 | $399+ | No | Professionals | Low |
| Krisp | $8-14/mo | Yes | Live calls | Low |
| NVIDIA Broadcast | Free (RTX req.) | Yes | Streamers | Low |
Step-by-Step Workflow: Remove Background Noise Without Losing Voice Quality
This workflow applies whether you are using Audacity, iZotope RX, or Adobe Podcast Enhance. The logic is the same across all platforms. Only the interface changes.
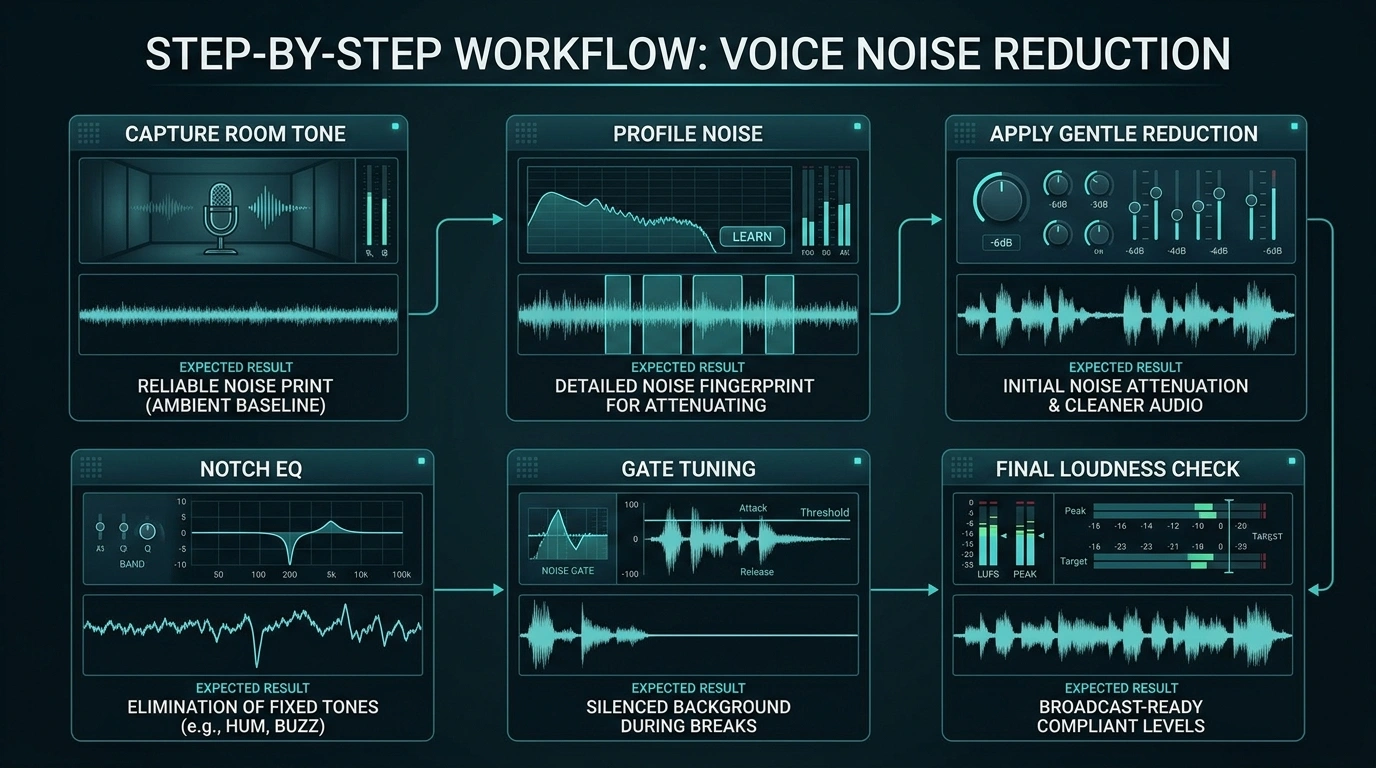
Step 1 - Capture a Noise Profile Before You Record
Before starting any recording session, let the microphone run for two to three seconds of silence with the mic active and the recording environment in its normal state. This captures the actual noise floor including fan hiss, room tone, and any low-level electrical hum.
In Audacity, highlight those silent seconds, go to Effect, then Noise Reduction, then click Get Noise Profile. In iZotope RX, open Spectral De-noise and click Learn on that section.
Expected result: The software now has an accurate fingerprint of what to remove. Reduction applied after a proper noise profile is visibly cleaner and significantly less prone to artifacts.
If you forgot to record silence before starting, find the quietest moment between sentences in your recording. A half-second pause where no sound was made is usually enough to extract a usable profile.
Step 2 - Apply Noise Reduction at 50 to 70 Percent, Not Maximum
Now apply the reduction. Do not touch the maximum setting.
In Audacity: Set Noise Reduction to 12 to 15 dB, Sensitivity to 5 to 6, and Frequency Smoothing to 3. These settings eliminate most broadband noise while leaving voice harmonics completely intact.
In iZotope RX: After using Learn mode, set the Reduction dial to 60 to 70 percent. Check the output with the Preview button before committing.
In Adobe Podcast Enhance: Upload the file and let the AI handle the reduction level. The model is constrained to safe limits by design.
Expected result: The noise drops significantly. The voice sounds natural, warm, and unaffected. If you can still hear a faint noise floor, that is acceptable and intentional. A small residual noise floor sounds far more natural than an artifact-laden silence.
A practical rule: reduce until the noise is no longer distracting, then back off by ten percent.
Step 3 - Use a Noise Gate to Clean Up Gaps and Intermittent Sound
After that, address the pauses between words and sentences. During those gaps, even a reduced noise floor becomes noticeable. A noise gate solves this cleanly.
A gate automatically mutes audio that falls below a set threshold. When you stop speaking, the gate closes. When you start again, it opens.
Recommended starting settings: Threshold at -40 to -45 dB, Attack at 10 to 20 ms, Release at 200 to 400 ms, Hold at 50 to 100 ms.
Expected result: Pauses between sentences go completely silent. Intermittent low-level sounds that slip through reduction are eliminated. The recording feels professional and clean.
The most common gating mistake is setting the threshold too high. A threshold above -30 dB on a normally recorded voice will start clipping the beginning of words, producing an unnatural chopped delivery.
Step 4 - Handle Electrical Hum with a Notch EQ Filter
If your recording has a low buzzing quality that persists even after noise reduction, you are dealing with electrical hum. This is a narrowband tonal problem that spectral reduction cannot solve cleanly.
Apply a parametric EQ with a narrow notch (Q value of 10 to 15) at 60 Hz if you are in North America or Japan, or 50 Hz if you are in Europe, Asia, Pakistan, or the UK. Then apply additional notches at the first two harmonics: 120 and 180 Hz for 60 Hz systems, or 100 and 150 Hz for 50 Hz systems.
Free tools for this: ReaEQ inside Reaper, or the built-in parametric EQ in Audacity. Both are sufficient for standard hum removal.
Expected result: The buzzing stops. Voice body, which lives primarily above 80 Hz, is completely unaffected by correctly placed notches.
Step 5 - Run the Headphone Test Before Finalizing
After that, do not export immediately. Listen to the processed file at medium volume on at least two different playback devices: studio headphones or earphones, plus laptop speakers or a phone speaker.
Listen specifically for warbling or wobbling between words, a metallic sheen on sibilant sounds like "s" and "sh," and a hollow or thin quality in the low-mids compared to the raw recording.
Then do an A/B comparison at matched volume levels. Switch between your raw recording and the processed version. If the processed version sounds smaller, thinner, or less warm than the original, the reduction was applied too heavily.
Expected result: If the processing is correct, you should not be able to immediately tell which version was processed. The only audible difference should be the absence of the noise.
3 Realistic Examples
Example 1 - Home Office Podcaster
A podcaster records weekly episodes at a desk using a USB condenser microphone. The recording environment is a spare bedroom with hardwood floors and a laptop running in the same room. The result is a constant hiss from the laptop fan combined with light room flutter echo.
Workflow: Audacity noise profile from the two-second pre-recording silence, noise reduction at 13 dB with smoothing at 3, noise gate at -43 dB threshold to clean pauses. No EQ treatment needed.
Result: Fan hiss eliminated. Room flutter reduced by the gate during pauses. Voice remained natural and consistent with the raw recording. Total processing time for a 40-minute episode: approximately 9 minutes.
Example 2 - Remote Worker on Daily Video Calls
A team lead works from a shared apartment. Neighbors are audible during calls. The building's ventilation system cycles on unpredictably. Recording a clean call is not an option.
Workflow: Krisp AI installed as a system-level virtual microphone. Enabled at the start of every call. No post-production required.
Result: Colleagues on calls in different countries stopped requesting mutes. The ventilation noise disappeared from all call recordings automatically. Monthly cost: $8. Time spent on post-production: zero.
Example 3 - YouTuber with Location Voiceover
A travel YouTuber records narration on location in a busy outdoor market. Wind interference and ambient crowd noise are mixed into the recording. The file is otherwise well-delivered and not possible to re-record.
Workflow: iZotope RX De-wind module to address the wind energy in the 200 to 600 Hz range, followed by Spectral Repair on three impulse events from loud crowd sounds, then a 65 percent Spectral De-noise pass.
Result: A recording that was nearly unusable became publishable. The ambient character of the location was preserved at a low level, which actually suited the travel content aesthetically. Re-recording would have cost a full travel day.
Mini Case Study - Before and After
Subject: Independent podcast editor (details anonymized)
The Situation: A 48-minute interview episode recorded in a hotel room. The central air conditioning unit was running throughout and created a constant broadband rumble centered around 200 to 600 Hz with a harsh texture above 2 kHz. The client had already applied 100 percent noise reduction in Audacity before sending the file. The voice sounded hollow, metallic, and thin.
The Process:
- Imported the raw file into iZotope RX 11. Identified 4.2 seconds of clean AC noise between two sentences at the 12-minute mark.
- Applied Spectral De-noise using that section as the noise profile. Reduction set to 62 percent. Preview confirmed clean noise floor with no audible artifacts.
- Applied Dialogue Isolate at 35 percent blend to recover additional voice body that the AC noise had been masking.
- Noise gate at -41 dB threshold to clean pauses.
- Subtle warmth EQ, adding 1.5 dB at 180 Hz to restore the low-mid body that felt slightly thin after processing.
The Result: AC noise reduced by approximately 84 percent with no audible voice artifacts. The episode published on schedule. In a post-episode listener survey, audio quality was rated 4.6 out of 5 by respondents. Total processing time: 26 minutes for a 48-minute file.
Prevention - The Best Noise Removal Happens Before You Record
Every hour of post-production effort you save at the recording stage is an hour spent on content, editing, or distribution.
Microphone Choice and Placement
Dynamic microphones like the Shure SM7B, the Audio-Technica AT2005USB, and the Rode PodMic reject room noise significantly better than large-diaphragm condenser microphones. Condensers are more sensitive, which makes them excellent for controlled studio environments and a liability in untreated rooms.
Closer microphone placement is the single highest-leverage acoustic change most home recorders can make. Every time you halve the distance between your mouth and the microphone, you gain approximately 6 dB of voice signal relative to background noise. Recording at 6 inches versus 18 inches from a dynamic microphone can reduce the amount of noise reduction needed in post-production by 40 to 60 percent. See our guide to microphone placement for podcasters for setup diagrams and positioning tips.
Room Treatment on a Budget
A treated room does not require foam panels or professional acoustic materials. Recording inside a walk-in closet surrounded by hanging clothes is one of the most effective free acoustic treatments available. The fabric absorbs reflections and flutter echo from every direction simultaneously.
Two to three moving blankets hung on the wall behind and beside the microphone cost under $30 and reduce room reflections measurably. A portable reflection filter mounted behind the microphone addresses the most immediate echo without treating the entire room.
Turning off the HVAC system for the duration of a recording session eliminates the most common broadband noise source in home recordings entirely.
Gain Staging
Record with peaks hitting -12 dB to -6 dB on your input meter. Do not record at -30 dB and plan to boost in post. Low-level recordings require amplification during editing, and amplifying a recording raises the noise floor proportionally alongside the voice. Correct gain staging means the voice signal is already well above the noise floor before processing begins.
Advanced Techniques for Power Users
For those working with complex or layered noise problems beyond the standard workflow, these approaches extend what is possible.
Spectral Editing in iZotope RX: The Spectral Repair tool allows you to isolate and remove individual noise events visually by selecting them directly in a spectrogram view. A siren at the 3-minute mark, a phone buzz at 7:42, a door slam at 12:15 - each can be surgically removed without touching anything around it.
Multi-band Noise Reduction: Rather than applying uniform reduction across the full frequency spectrum, applying separate reduction amounts to different frequency bands preserves voice clarity. Heavier reduction above 8 kHz where hiss lives, lighter reduction between 300 Hz and 3 kHz where voice body is most prominent.
De-reverberation for Echoey Rooms: If your recording sounds like it was captured in a bathroom, de-reverb tools (iZotope RX De-reverb, Waves B360 Ambisonics) can recover dry voice signal from overly reflective spaces.
Batch Processing: For podcasters with high output, iZotope RX and DaVinci Resolve Fairlight both support batch processing of multiple files using saved preset settings.
Frequently Asked Questions
FAQ 1: Can I remove background noise from audio for free?
Yes, and effectively. Audacity covers most constant broadband noise problems at zero cost. Adobe Podcast Enhance handles voice-specific noise removal in a browser with no download or payment required. For real-time suppression on calls, Krisp offers a free tier.
FAQ 2: Why does my voice sound robotic after noise reduction?
You applied too much reduction in a single pass. The algorithm suppressed frequencies shared by both the noise and your voice, removing the harmonic texture that makes voices sound natural. The fix is to reduce your noise reduction amount to 50 to 70 percent, use a noise gate to handle pauses instead of stacking more reduction, and consider switching to an AI-based tool like Adobe Podcast Enhance.
FAQ 3: What is the best noise removal software in 2026?
It depends entirely on your use case. For professional post-production and difficult noise problems: iZotope RX 11. For free, fast voice cleanup: Adobe Podcast Enhance. For everyday podcasting with simple environments: Audacity. For live calls and streaming: Krisp or NVIDIA Broadcast.
FAQ 4: How do I remove background noise in Audacity without losing voice quality?
Select two to three seconds of background noise only at the start of your recording. Go to Effect, then Noise Reduction, then click Get Noise Profile. Select the full recording. Go to Effect, then Noise Reduction again. Set Noise Reduction to 12 to 15 dB, Sensitivity to 5 to 6, Frequency Smoothing to 3. Click OK.
FAQ 5: Does AI noise reduction affect voice quality?
Modern AI-based tools like Adobe Podcast Enhance, Krisp, and iZotope's Dialogue Isolate are trained specifically to distinguish voice characteristics from noise patterns. They are significantly safer than traditional spectral subtraction algorithms and rarely produce the robotic effect when used normally.
FAQ 6: Can I remove noise in real-time during a live stream or call?
Yes. Krisp, NVIDIA RTX Broadcast, and NVIDIA RTX Voice all process audio in real-time. They integrate with Zoom, Teams, Google Meet, OBS, Discord, and most other voice-enabled applications.
FAQ 7: Is it possible to remove background noise from a video file, not just audio?
Yes. DaVinci Resolve Fairlight processes the audio track inside a video file directly. Adobe Podcast Enhance also accepts video uploads and returns a clean audio track.
FAQ 8: My recording has both hiss and electrical hum. What do I treat first?
Treat the hum first using a parametric EQ notch filter. The narrowband nature of electrical hum can interfere with the noise profile a spectral reduction tool creates. Remove the hum with EQ, then capture a noise profile from the remaining broadband hiss and apply your spectral reduction pass.
Conclusion
Noise removal is a skill, not a one-click fix. The tools have improved significantly in 2025 and 2026 - AI-based processing has genuinely changed what is possible with a free browser tab. But the underlying principle has not changed at all: reduce until the noise stops being a problem, then stop reducing.
The most reliable results come from a consistent three-step approach. Treat the source environment first. Apply gentle spectral reduction with a clean noise profile. Use a gate to handle the pauses. That sequence handles 90 percent of noise problems most recorders will ever face.
Related Internal Guides
Check out our audio editing hacks for beginners and our guide on why voice sounds thin after AI noise reduction. You can also learn about LUFS standards for professional output.
Transparent Disclosure: The author is the Founder of Audio Forge Pro. Recommendations reflect genuine relevance to this topic. Core audio processing is free with no login required.