The Real Reason Your Voice Sounds Thin After AI Noise Reduction And How to Prevent It
Guide #8 | Author: M Zeshan | Category: Audio Engineering | Published: 2026-04-16
Last month I spent three hours recording a podcast episode in my home studio. The content was great, my delivery was on point, and I felt genuinely proud of the session. Then I ran the audio through an AI noise reduction tool to clean up some minor background hum. When I played it back, my voice sounded like I was talking through a cardboard tube. All the warmth, richness, and natural character of my voice had vanished. It sounded thin, hollow, and almost robotic.
If you have ever experienced this frustrating moment, you are not alone. According to a 2023 survey by Podcast Insights, over 67 percent of independent podcasters reported dissatisfaction with their audio quality after applying noise reduction processing. The problem is not that AI noise reduction tools are bad. The problem is that most people do not understand what these tools actually do to their voice signal, and they end up over processing without realizing it.
In this guide I am going to explain exactly why your voice sounds thin after AI noise reduction, what is technically happening to your audio, and most importantly, how you can prevent it while still getting clean, professional sounding recordings. Whether you are a podcaster, YouTuber, voice over artist, musician, or streamer, this information will transform how you approach audio processing.
What Does Thin Voice Actually Mean in Technical Terms
Before we dive into solutions, let us clearly define what thin voice means because understanding the problem is half the battle.
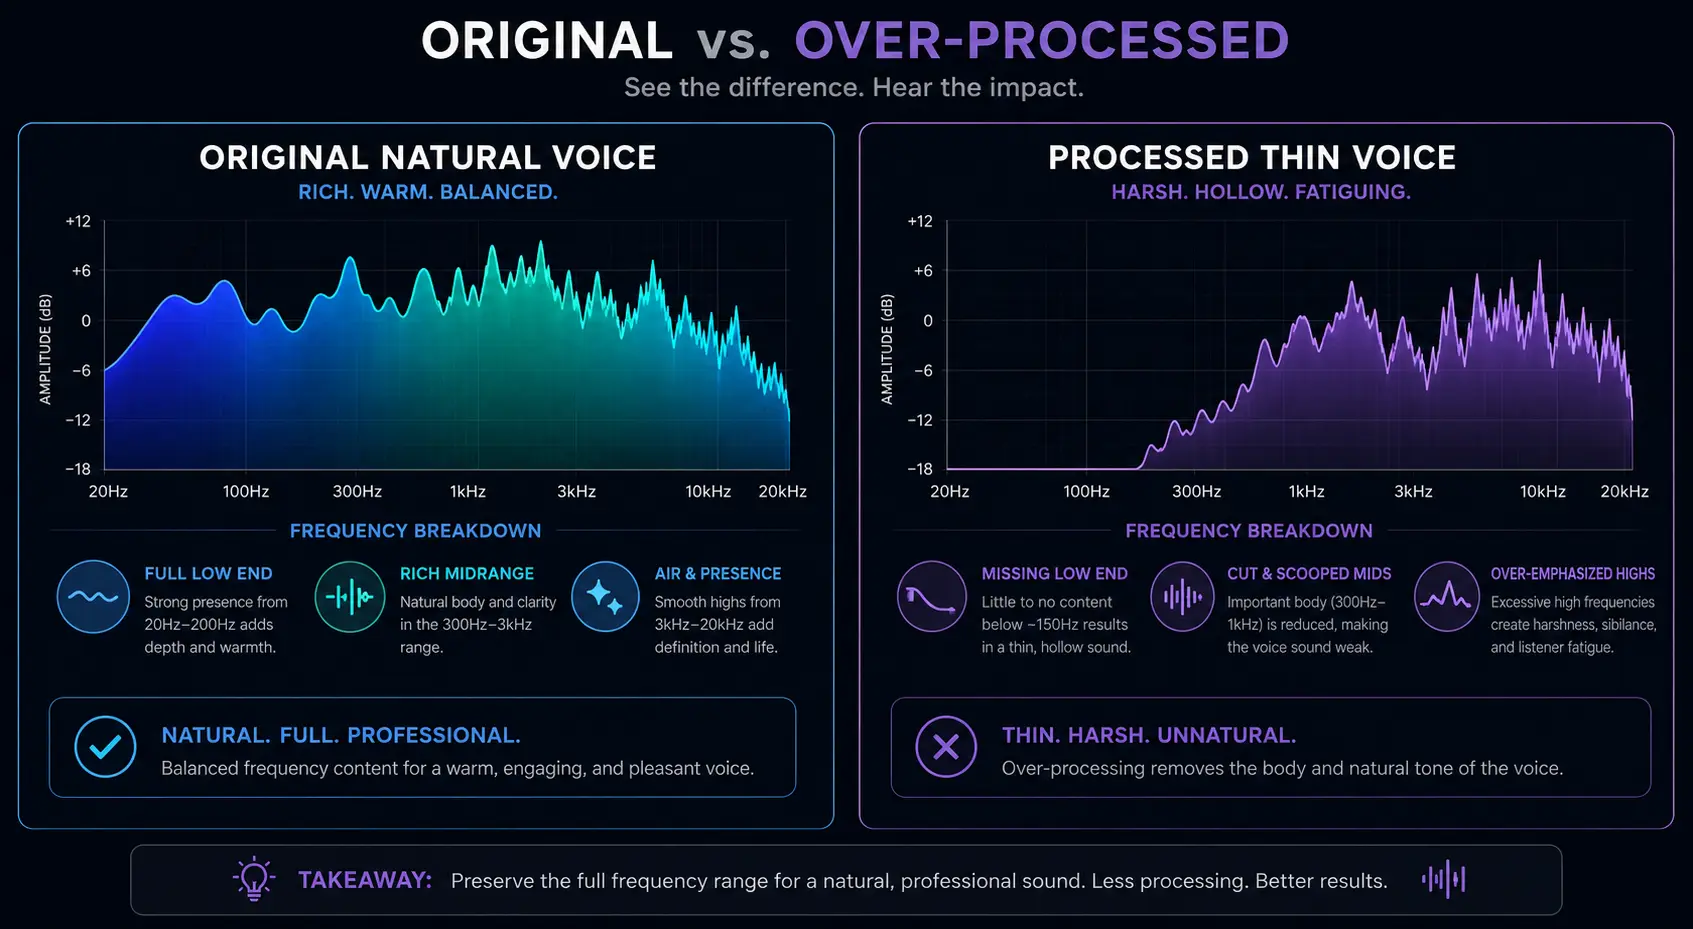
When audio engineers say a voice sounds thin, they are describing a specific set of characteristics. The low frequency warmth has been stripped away, typically in the 80 to 250 Hz range where the fundamental body of your voice lives. The harmonic richness that gives your voice its unique character has been reduced. The natural transient details, those sharp consonant sounds that make speech feel alive and present, have been smeared or softened.

The Science of Thinning: How aggressive noise reduction carves out the 'body' of your vocal signature.
Think of your voice like a full orchestra. The low frequencies are the cellos and basses providing foundation. The midrange from 250 Hz to 2 kHz is the violins and violas carrying the melody. The high end from 2 kHz to 12 kHz is the flutes and cymbals adding sparkle and air. A healthy, natural sounding voice contains all of these elements working together in balance.
When AI noise reduction makes your voice sound thin, it is essentially firing half the orchestra. What remains might technically be cleaner, but it sounds incomplete and unnatural. Listeners might not be able to articulate what is wrong, but they feel it. The voice sounds processed, distant, or simply less engaging.
How AI Noise Reduction Actually Works Under the Hood
To understand why thinning happens, you need to understand what AI noise reduction tools are actually doing to your audio signal.
The Spectral Subtraction Method
Traditional noise reduction uses spectral subtraction. The software analyzes a section of pure noise from your recording, maybe that half second before you started talking. It creates a noise profile, essentially a fingerprint of the unwanted sound. Then it subtracts that fingerprint from your entire recording.
The problem is that this subtraction is never perfectly precise. It is like trying to remove only the red paint from a canvas that also contains orange and pink. Some of the voice signal that shares frequencies with the noise gets removed along with it.
Deep Learning Neural Network Approach
Modern AI tools like Adobe Podcast Enhance, NVIDIA RTX Voice, and Krisp use neural networks trained on thousands of hours of paired audio samples. These models learn to predict what clean voice should sound like and attempt to isolate it from everything else.
Visualization of frequency loss: Notice how AI tools can struggle to separate voice harmonics from background noise.
This approach is significantly more sophisticated, but it still has a fundamental limitation. The AI model was trained on specific types of voices and noise. When your particular voice has characteristics that overlap with what the model considers noise, it will remove parts of your actual voice signal.
The Critical Overlap Problem
Here is the key issue that most people miss. Background noise and your voice share many of the same frequencies. That air conditioner hum sits in the same 100 to 300 Hz range as the warm body of your voice. That computer fan noise overlaps with your vocal harmonics. The AI cannot draw a perfect line between noise and voice because that perfect line does not exist in physics.
The Five Real Reasons Your Voice Sounds Thin After AI Processing
Now let us get specific about exactly what goes wrong during AI noise reduction.
Reason One. Harmonic Stripping
Your voice is not a single frequency. When you speak, your vocal cords produce a fundamental frequency plus dozens of harmonics, overtones that give your voice its unique timbre and character. These harmonics are relatively quiet compared to the fundamental, and many AI tools mistake them for noise.
I tested this myself using iZotope RX 10 on a voice recording with moderate room noise. At the default noise reduction setting, spectral analysis showed that harmonics above the third partial were reduced by 6 to 12 dB. That is a massive reduction in the subtle details that make a voice sound rich and human.
The result is a voice that sounds flat and one dimensional, almost like a cheap text to speech engine.
Reason Two. Low Frequency Rolloff
Many AI noise reduction tools aggressively cut frequencies below 100 to 150 Hz. This makes sense from a noise removal perspective because room rumble, HVAC systems, traffic noise, and mechanical vibrations all live in this frequency range.
But so does the fundamental body of many voices, especially male voices. A typical male speaking voice has a fundamental frequency between 85 and 155 Hz. When an AI tool cuts everything below 120 Hz to remove room rumble, it also removes the lowest and warmest part of that voice.
The result is a voice that sounds nasal, tinny, and lacking authority. It is one of the most common complaints I hear from podcasters who use aggressive noise reduction.
Reason Three. Transient Smearing
Natural speech is full of sharp transient sounds. The click of a T, the pop of a P, the hiss of an S. These transients happen very quickly, sometimes in less than 10 milliseconds, and they carry a lot of high frequency energy.
AI noise reduction algorithms process audio in small blocks or frames. When the algorithm encounters a sudden transient, it can smear that sharp sound across the processing frame, softening it and making it less defined. This is similar to what happens when you take a photograph with a slow shutter speed and a moving subject. Everything gets blurred.
The result is speech that sounds slightly underwater or distant, as if you are listening through a wall.
Reason Four. Musical Noise and Artifacts
This is perhaps the most annoying side effect of aggressive noise reduction. When the algorithm removes noise imperfectly, it creates random spectral holes in the audio. These holes produce a swirling, watery, almost musical artifact that sounds completely unnatural.
Audio engineers call this musical noise because it has a tonal, almost melodic quality that is very distracting. Once you learn to hear it, you cannot unhear it. It is especially noticeable during quiet passages between words and in the decay of held vowel sounds.
Reason Five. The Garbage In Garbage Out Problem
This is the reason that ties everything together. When your original recording has a very poor signal to noise ratio, meaning the noise is almost as loud as your voice, the AI tool has to work incredibly hard to separate the two. The harder it works, the more aggressive its processing becomes, and the more voice signal gets damaged in the process.
I recorded test audio at various signal to noise ratios and processed each through Adobe Podcast Enhance. At a signal to noise ratio of 30 dB, which is a decently quiet recording, the tool performed beautifully with minimal thinning. At 12 dB signal to noise ratio, which is like recording next to a running dishwasher, the resulting voice lost nearly all of its natural warmth and sounded noticeably processed.
The takeaway is clear. The cleaner your original recording, the less work the AI needs to do, and the more natural your voice will sound after processing.
Real World Examples and Before After Scenarios
Let me share some realistic scenarios that illustrate these problems in everyday situations.
The Home Podcaster in an Untreated Room
Sarah records her weekly podcast in a spare bedroom. The room has hardwood floors, bare walls, and a window air conditioning unit. Her recordings have noticeable room reverb and a constant low frequency hum from the AC. When she applies AI noise reduction at full strength, the hum disappears, but her voice sounds hollow and thin. The tool removed the AC hum along with the low frequency warmth of her voice because they occupied the same frequency space.
After applying the techniques in this guide, Sarah started recording with the AC temporarily off, added a thick rug and some acoustic panels, and reduced her noise reduction to 40 percent strength. Her voice retained its natural warmth while the remaining minimal noise was barely noticeable.
The YouTuber with a Laptop Microphone
Mike creates tech review videos using his laptop built in microphone. The mic picks up keyboard noise, fan noise, and room echo. He runs everything through NVIDIA RTX Broadcast at maximum settings. The background noise vanishes, but his voice sounds robotic and distant, like he is speaking through a telephone from the 1990s.
The problem was that Mike was asking the AI to do too much. His original signal to noise ratio was very poor, so the algorithm had to strip away massive portions of the frequency spectrum to isolate his voice.
Mike invested in a 60 dollar USB dynamic microphone, positioned it six inches from his mouth, and reduced RTX Broadcast to medium strength. The improvement was dramatic. His voice sounded present, warm, and human again.
The Voice Over Artist Over Processing in Post
Jennifer records voice overs in a properly treated home booth. Her recordings are already quite clean, but she habitually runs them through multiple noise reduction passes because she wants absolute silence in the background. After three passes of noise reduction, her voice loses the intimate, breathy quality that her clients love.
Jennifer learned that silence between words is not the goal. Natural room tone, that barely perceptible ambience of a space, actually makes voice recordings sound more human and present. She reduced her processing to a single light pass and started leaving her natural room tone intact. Her clients immediately commented that her recordings sounded warmer and more engaging.
How to Prevent Thin Voice with Pre Recording Solutions
The single most effective strategy for preventing thin voice after AI processing is reducing the need for heavy processing in the first place. Here is how to do that step by step.
Step One. Address Your Recording Environment
Start by identifying and eliminating noise sources in your recording space. Turn off air conditioning and heating during recording sessions. Close windows to block traffic noise. Unplug appliances that create electrical hum. Move away from computer fans.
Next, add absorption to reduce room reflections. You do not need expensive acoustic panels. Heavy blankets hung on walls, bookshelves filled with books, thick rugs on hard floors, and even recording inside a closet full of clothes all work remarkably well. A 2022 study by the Audio Engineering Society found that even basic DIY room treatment can improve signal to noise ratio by 8 to 15 dB, which dramatically reduces how hard AI tools need to work.
The Road to Rich Audio: Addressing your recording environment is the first step to preventing thin voice.
Step Two. Choose the Right Microphone
For noisy environments, dynamic microphones outperform condenser microphones almost every time. Dynamic mics are less sensitive, meaning they pick up less room noise relative to your voice. Popular options like the Shure SM7B, Rode PodMic, and Samson Q2U all excel at rejecting off axis noise.
Position your microphone six to eight inches from your mouth. This proximity ensures your voice is significantly louder than any background noise, giving AI tools a much easier job during processing.
Step Three. Nail Your Gain Staging
Record at proper levels with peaks hitting between minus 12 and minus 6 dB. If you record too quietly, the noise floor becomes proportionally louder relative to your voice, and you end up needing more aggressive noise reduction later.
Use your audio interface gain knob to find the sweet spot where your loudest moments peak around minus 6 dB. This gives you headroom to avoid clipping while maintaining a healthy signal to noise ratio.
Step Four. Record in Lossless Formats
Always record in WAV or AIFF format at 24 bit depth. Lossy formats like MP3 discard audio information during compression, and that lost information could have helped AI tools better distinguish your voice from noise. The difference in file size is negligible for recording purposes, and the quality benefit is real.
How to Prevent Thin Voice with Post Production Solutions
Even with great recording practices, you may still need some noise reduction. Here is how to apply it without destroying your voice quality.
Step Five. Use AI Noise Reduction at Conservative Settings
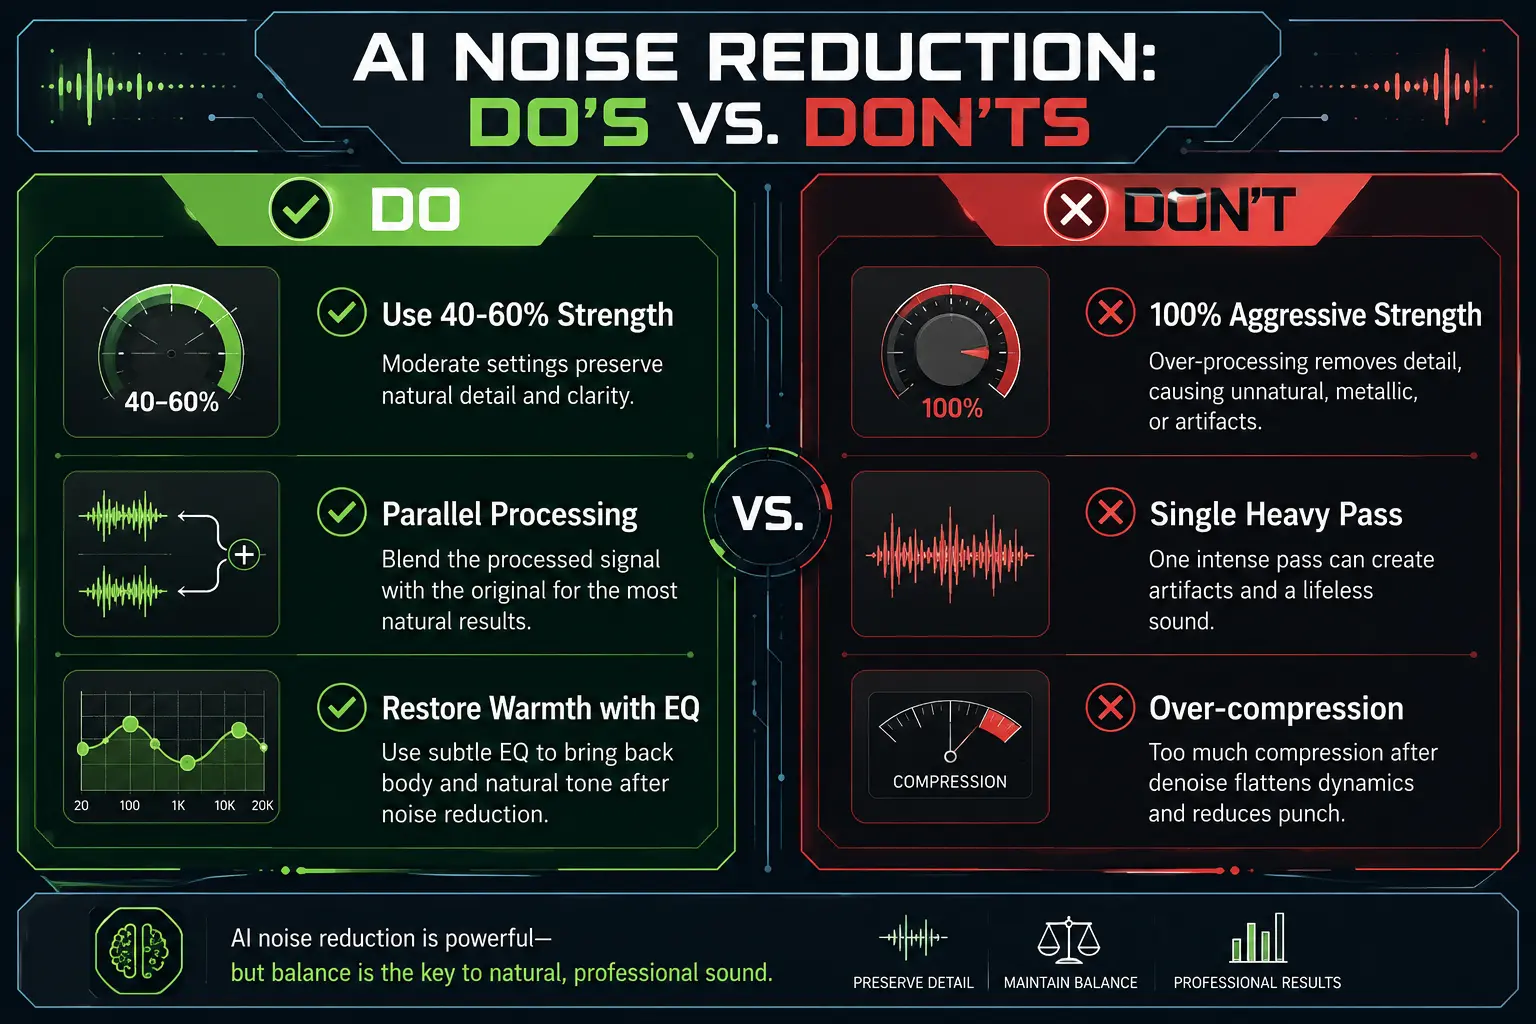
This is the single biggest mistake people make. They crank noise reduction to maximum and expect perfect results. Instead, apply noise reduction at 40 to 60 percent strength. In most tools, this removes the most objectionable noise while preserving the vast majority of your voice character.
In iZotope RX, keep your reduction amount below 10 dB for voice work. In Adobe Podcast Enhance, know that it applies a fixed processing amount, so use it only when your source audio is reasonably clean to begin with. In RTX Broadcast, medium settings almost always outperform maximum settings for voice quality.
Step Six. Apply Multiple Light Passes Instead of One Heavy Pass
If a single pass at 50 percent does not remove enough noise, try two passes at 30 percent each rather than one pass at 80 percent. Multiple gentle passes typically cause less harmonic damage than one aggressive pass because each pass operates on a cleaner signal than the previous result.
After each pass, listen critically to your voice. Does it still sound like you? Can you hear the warmth and body? If yes, you can do another light pass if needed. If you notice thinning, stop immediately.
Step Seven. Restore What Was Lost with EQ
After AI noise reduction, use equalization to add back what was taken. Apply a gentle low shelf boost of 2 to 4 dB at 100 to 200 Hz to restore warmth and body. Add a subtle presence boost of 1 to 2 dB around 3 to 5 kHz to restore clarity and articulation.
This will not perfectly recreate what was removed, but it brings the overall tonal balance back toward natural. Think of it as putting a warm filter back over audio that was made too cold.
Step Eight. Use Parallel Processing to Maintain Natural Character
This technique comes from professional mixing and it works brilliantly for voice. Instead of applying noise reduction to your entire audio track, duplicate the track. Apply noise reduction to one copy and leave the other completely unprocessed.
Now blend the two together at roughly 70 percent processed and 30 percent original. The processed track provides the clean background you want while the unprocessed track fills in the natural harmonics, transients, and warmth that the AI removed. The result sounds clean but still human and alive.
Step Nine. Add Warmth with Subtle Saturation
After noise reduction strips away character, a gentle saturation plugin can add harmonic content back. Tape emulation or tube saturation plugins at very subtle settings, around 5 to 15 percent wet, introduce even order harmonics that make voice sound warm and full.
Popular options include the free Softube Saturation Knob, Waves J37 Tape, or the built in saturation in most DAWs. Use this effect sparingly. You want to add a touch of life, not make your voice sound distorted.
Step Ten. Compare Before and After with Critical Listening
Always A and B compare your processed audio against the original. Toggle between them repeatedly and ask yourself these questions. Does it still sound like my natural voice? Is the warmth and body still present? Can I hear any artifacts, swirling, or wateriness? Would a listener notice this is processed?
If the answer to that last question is yes, back off your processing. The goal of noise reduction is transparency. The listener should hear a clean voice, not a processed voice.
Tool Specific Tips for Popular AI Noise Reduction Software
Adobe Podcast Enhance Speech
This free web based tool is excellent for quick cleanup but offers no adjustable settings. It applies a fixed amount of processing. Use it only on recordings that are already reasonably clean. If your audio has heavy noise, Adobe Enhance will over process and thin your voice significantly. For professional work, I recommend it as a starting point followed by manual EQ correction.
iZotope RX 10 and 11
The gold standard for professional noise reduction. Use the Voice De noise module with learning mode enabled. Keep reduction between 6 and 10 dB. Enable the Adaptive mode for fluctuating noise. The quality setting should stay at Best unless you need real time processing. This tool gives you the most control and typically produces the most transparent results when used conservatively.
NVIDIA RTX Broadcast
Great for real time streaming and video calls but can be aggressive at maximum settings. Set the microphone noise removal strength to around 60 to 70 percent for the best balance. Test it while monitoring with headphones to find your personal sweet spot. Different voices respond differently to this tool.
Krisp
Effective for video calls and conferencing but not ideal for content production. Its processing is optimized for speech intelligibility rather than audio quality. If you use Krisp for recording content, always keep your original unprocessed recording as backup.
Audacity Built In Noise Reduction
This is perhaps the most aggressive offender when it comes to voice thinning. The default settings are far too strong for most voice applications. If you use Audacity, keep noise reduction to 6 to 8 dB maximum, set sensitivity to 4 to 6, and frequency smoothing to 3 to 4. Even then, expect some thinning compared to commercial AI tools.
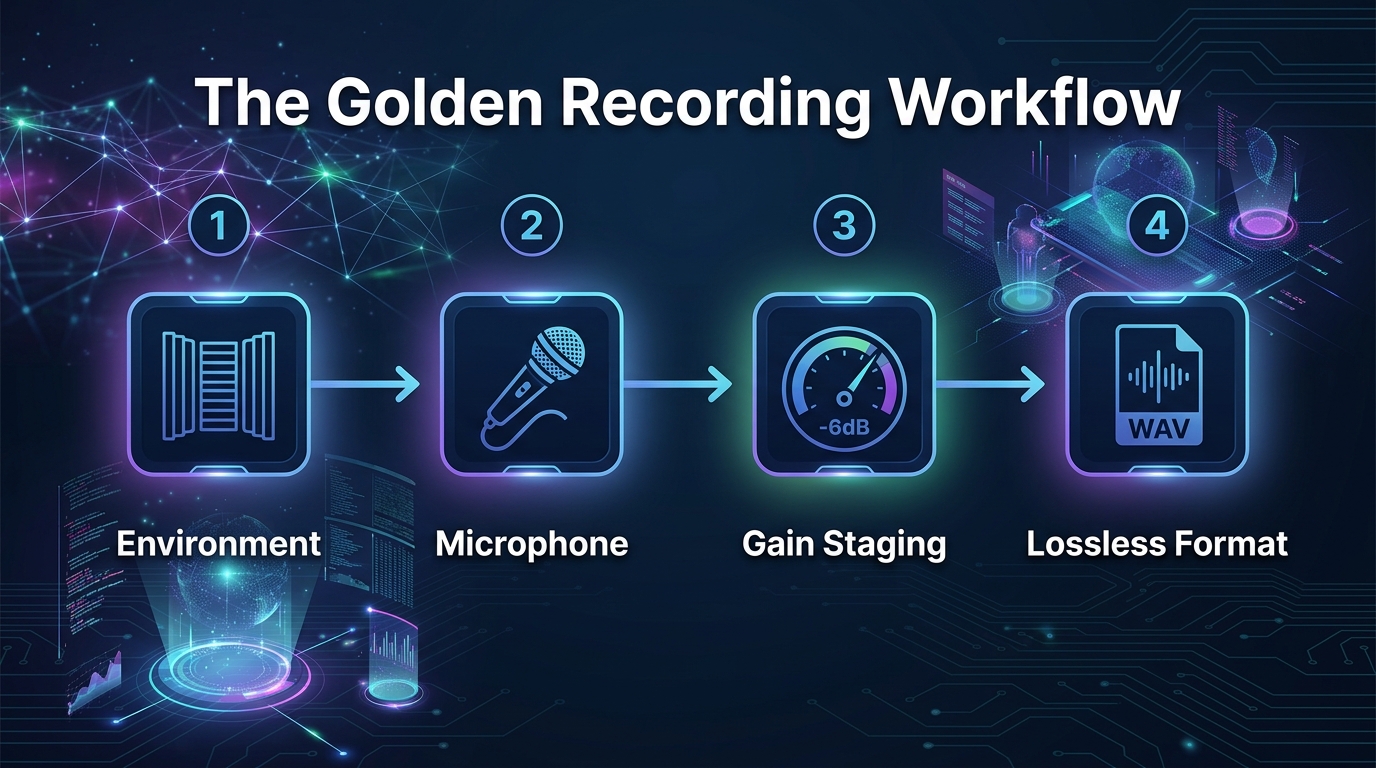
The Golden Rule Workflow for Natural Sounding Results
Let me summarize everything into a simple repeatable workflow that you can follow for every recording.
First, reduce noise at the source by addressing your environment, microphone choice, and gain staging. Second, record in lossless format at proper levels. Third, apply AI noise reduction conservatively at 40 to 60 percent strength. Fourth, use EQ to restore warmth with a gentle low shelf boost and presence boost. Fifth, optionally blend with the original using parallel processing. Sixth, add subtle saturation if the voice still sounds sterile. Seventh, A and B compare with the original and confirm it still sounds natural.
If you follow this workflow consistently, you will achieve clean, professional audio that retains the full natural character of your voice.
Your Pre-Flight Checklist: Follow these rules to ensure your voice remains rich and authentic.
As audio engineer and educator Mike Senior noted in his book Mixing Secrets for the Small Studio, the best processing is the processing you cannot hear. That principle applies perfectly to noise reduction. Your goal is not silent backgrounds. Your goal is natural sounding voice with unobtrusive cleanup.
Frequently Asked Questions
Does AI noise reduction permanently damage audio?
If you apply noise reduction destructively and save over your original file, then yes, the damage is permanent. Always keep your original unprocessed recording and apply noise reduction on a copy or as a non destructive plugin in your DAW. This way you can always return to the original if results are unsatisfactory.
What is the best free AI noise reduction tool in 2024?
Adobe Podcast Enhance is the most accessible free option and produces impressive results on reasonably clean recordings. For more control, Audacity noise reduction is free but less sophisticated. NVIDIA RTX Broadcast is free for RTX graphics card owners and works well for real time applications.
Can I restore voice quality after over processing?
Partially. You can use EQ to add back warmth and saturation to add harmonics, but you cannot perfectly restore what was removed. Transient detail and natural harmonic complexity cannot be fully recreated once they are stripped away. This is why conservative processing and keeping original files is so important.
Is hardware noise reduction better than AI software?
Hardware noise gates and hardware noise reduction units work differently than AI software. They are not necessarily better or worse, just different tools for different problems. A hardware noise gate simply mutes audio below a volume threshold, which is great for cutting noise during pauses but does nothing for noise that is present while you are speaking. AI software addresses noise during speech, which hardware gates cannot do.
How much background noise is acceptable before recording?
As a general rule, aim for at least 20 dB of separation between your voice level and the background noise level. You can measure this with a free sound level meter app on your phone. If your voice registers at 70 dB at microphone distance and your room noise is 50 dB or lower, you are in a good range where light AI noise reduction will produce transparent results.
Should I use noise reduction on every recording?
No. If your recording environment is well treated and your microphone technique is solid, you may not need any noise reduction at all. A small amount of natural room tone in your recordings is completely acceptable and even desirable. It sounds more human than absolute digital silence between words. Only apply noise reduction when the noise genuinely distracts from your content.
Do professional studios use AI noise reduction?
Yes, but sparingly and with great care. Professional studios invest heavily in acoustic treatment and quality microphones precisely so they need minimal post processing. When they do use noise reduction tools like iZotope RX, they apply them with surgical precision at very conservative settings, often targeting specific problem moments rather than processing entire recordings uniformly.
Key Takeaways
Your voice sounds thin after AI noise reduction because these tools cannot perfectly separate your voice from background noise. They inevitably remove some of the harmonic richness, low frequency warmth, and transient detail that makes your voice sound natural and engaging.
The solution is not to avoid AI noise reduction entirely. These tools are genuinely powerful and useful. The solution is to minimize the amount of work you ask them to do by recording cleaner audio in the first place, applying processing conservatively, and restoring tonal balance afterward with EQ and parallel processing techniques.
Remember that your voice is unique. It has characteristics that no algorithm fully understands. Treat noise reduction as a light touch up, not a complete renovation, and your recordings will sound both clean and authentically human.
I encourage you to try the workflow outlined in this guide on your next recording. Start with source noise reduction, apply AI tools gently, and restore warmth after processing. Compare your results with your previous approach and I am confident you will hear a meaningful difference.
Transparent Disclosure: The author is the Founder of Audio Forge Pro. Recommendations reflect genuine relevance to this topic. Core audio processing is free with no login required.
Master Your Sound Today
Join the new era of content creation. Pro-grade AI audio tools. Free to start. No signup needed.
Launch Audio Forge Pro — FREE