
Fix Gradual Audio Sync Drift in CapCut (2026 Guide) — complete guide
Have you ever poured hours into editing a video, only to find that by the end, your meticulously synced audio has drifted into a frustrating lag? The speaker's lips move, but their voice trails a second or two behind, making your content feel unprofessional and jarring. If you're a CapCut Official Platform Desktop user, especially one working with longer videos, you've likely encountered this insidious problem: gradual audio sync drift.
I've been there myself. I remember spending an entire weekend perfecting a 20-minute tutorial video, only to discover during the final review that the audio was perfectly aligned at the beginning, but by the 15-minute mark, it was noticeably off. It felt like a punch to the gut, and I knew I had to find a reliable solution. This isn't just a minor annoyance; it's a fundamental issue that can undermine the quality and credibility of your work.
This comprehensive 2026 guide is designed to equip you with the knowledge and practical steps to conquer audio sync drift in CapCut Desktop. We'll delve into the root causes, explore powerful external tools, and master CapCut's internal features to ensure your audio and video remain perfectly harmonized from start to finish. By the end of this guide, you'll not only understand *why* this happens but also *how* to fix it, transforming your editing workflow and elevating your video quality.
The Invisible Culprit: Understanding Variable Frame Rate (VFR) vs. Constant Frame Rate (CFR)
To truly fix audio sync drift, we must first understand its primary cause: the difference between Variable Frame Rate (VFR) and Constant Frame Rate (CFR). This is where the technical jargon becomes crucial, but I promise to break it down in an easy-to-understand way.
Most modern smartphones, screen recorders, and even some consumer-grade cameras record video using Variable Frame Rate (VFR). This means the device adjusts the frame rate synchronization principles rate on the fly to optimize file size and performance, especially in challenging lighting conditions or when there's less motion. For instance, if you're recording a static shot, the device might drop frames to save space. When there's a lot of action, it will ramp up the frame rate to capture every detail. While this is efficient for recording, it creates a nightmare for video editors.
Constant Frame Rate (CFR), on the other hand, maintains a consistent number of frames per second throughout the entire recording. Professional cameras and dedicated video recording equipment typically use CFR. Non-linear editing (NLE) software like CapCut, Adobe Premiere Pro, DaVinci Resolve, and Final Cut Pro are designed to work optimally with CFR footage. They expect a steady stream of frames, and when they encounter VFR, they struggle to interpret the inconsistent timing, leading to audio desynchronization over time.
CapCut Desktop, like many entry-level NLEs, often struggles to accurately interpret VFR footage. It tries its best to conform the variable frames into a constant timeline, but this process isn't always perfect. The result? A subtle, progressive drift where the audio gradually falls out of sync with the video. This issue is particularly prevalent in longer videos because the small discrepancies accumulate over time, becoming glaringly obvious by the end.
According to discussions in video editing communities like Reddit's r/VideoEditing, VFR handling is a persistent challenge for many editors, especially those using footage from smartphones or screen recordings. A common piece of advice, often echoed by experienced editors, is to convert VFR footage to CFR *before* importing it into their NLE. This proactive step can save countless hours of frustration.
Step 1: Identifying VFR Patterns with External Metadata Tools
Before you dive into fixing the sync, it's crucial to confirm that VFR is indeed the culprit. While CapCut might not explicitly tell you if your footage is VFR, external metadata analysis tools can quickly reveal this information. This step is like a diagnostic check, ensuring you're treating the right problem.
One of the most widely used and reliable open-source tools for this purpose is MediaInfo. It's a free, cross-platform application that provides comprehensive technical and tag information about video and audio files. I personally use MediaInfo to quickly scan any problematic footage before starting an edit. It's a simple yet powerful tool that can save you a lot of guesswork.
How to Use MediaInfo to Detect VFR:
- Download and Install MediaInfo: Visit the official MediaInfo website (MediaInfo.org) and download the appropriate version for your operating system (Windows, macOS, or Linux). The installation process is straightforward.
- Open Your Video File: Launch MediaInfo. You can either drag and drop your video file directly into the MediaInfo window or go to `File > Open` and select your video.
- Analyze the Output: Once the file is loaded, MediaInfo will display a wealth of information. Look for the 'Video' section. Here, you'll find a line that typically says 'Frame rate mode'.
- If it says 'Variable', then your footage is VFR, and you've found your primary suspect.
- If it says 'Constant', then VFR isn't the issue, and you might need to investigate other factors like audio sample rate mismatches (which we'll cover later).
This quick check takes less than a minute but provides invaluable insight. Knowing for sure that you're dealing with VFR allows you to proceed with confidence to the next step: conversion.
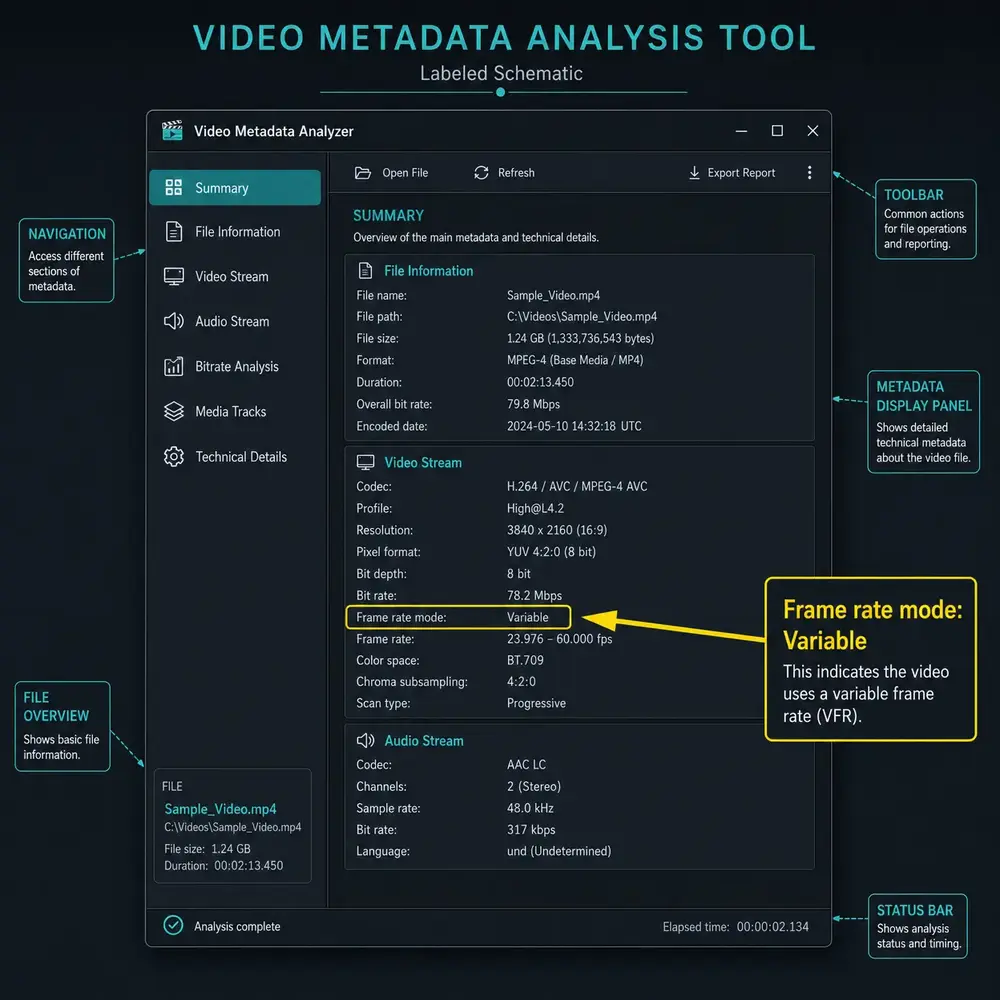
MediaInfo metadata scan showing the frame rate mode as variable, which causes drift in editing timelines.
Step 2: Transcoding to Constant Frame Rate for Seamless Editing
Once you've confirmed that your footage is VFR, the next critical step is to transcode it into a Constant Frame Rate (CFR) format. This process re-encodes your video, ensuring a consistent frame rate throughout, which CapCut (and any other NLE) can handle without issues. Think of it as translating a fluctuating language into a stable one that your editor understands perfectly.
There are several excellent compression tools available for this, but for simplicity and effectiveness, I recommend HandBrake. It's another free, open-source, and cross-platform video transcoder that's incredibly powerful and user-friendly. I've personally used HandBrake for years to convert VFR screen recordings and smartphone footage, and it consistently delivers crisp, uniform output.
Step-by-Step Conversion Using HandBrake:
- Download and Install HandBrake: Get HandBrake from its official website (HandBrake.fr). The installation is standard for your operating system.
- Load Your Source Video: Open HandBrake and click on 'Open Source' or drag your VFR video file into the main window.
- Choose a Preset: For most CapCut projects, a good starting point is the 'Fast 1080p30' or 'Fast 720p30' preset under the 'General' category. You can adjust this based on your desired output resolution and frame rate. For instance, if your original video was 60fps, you might choose a 60fps preset if available, or stick to 30fps for broader compatibility.
- Select Output Format: Under the 'Summary' tab, ensure the 'Format' is set to 'MP4' (or 'MKV' if you prefer, though MP4 is generally more compatible).
- Crucial: Set Constant Frame Rate: Navigate to the 'Video' tab. This is the most important part. Find the 'Framerate (FPS)' dropdown menu. Select 'Same as source' if you want to maintain the original frame rate, or choose a specific frame rate like '30' or '60'. Crucially, ensure the 'Constant Framerate' radio button is selected. This forces HandBrake to re-encode the video with a fixed frame rate.
- Review and Adjust Quality (Optional): Under the 'Video' tab, you can also adjust the 'Quality' slider. A 'Constant Quality' (RF) value between 18-22 is generally excellent for most uses, balancing file size and visual fidelity. Lower numbers mean higher quality and larger files.
- Set Save Path: At the bottom of the HandBrake window, click 'Browse' next to 'Save As' to choose where your converted file will be saved and give it a descriptive name (e.g., `original_video_CFR.mp4`).
- Start Encoding: Click the green 'Start Encode' button at the top. HandBrake will begin the conversion process. This can take some time depending on your video length, resolution, and computer's processing power.
Once the encoding is complete, you'll have a new video file with a Constant Frame Rate. Import this CFR version into CapCut Desktop, and you'll notice a significant improvement in sync stability. This step alone resolves a vast majority of audio drift issues caused by VFR.
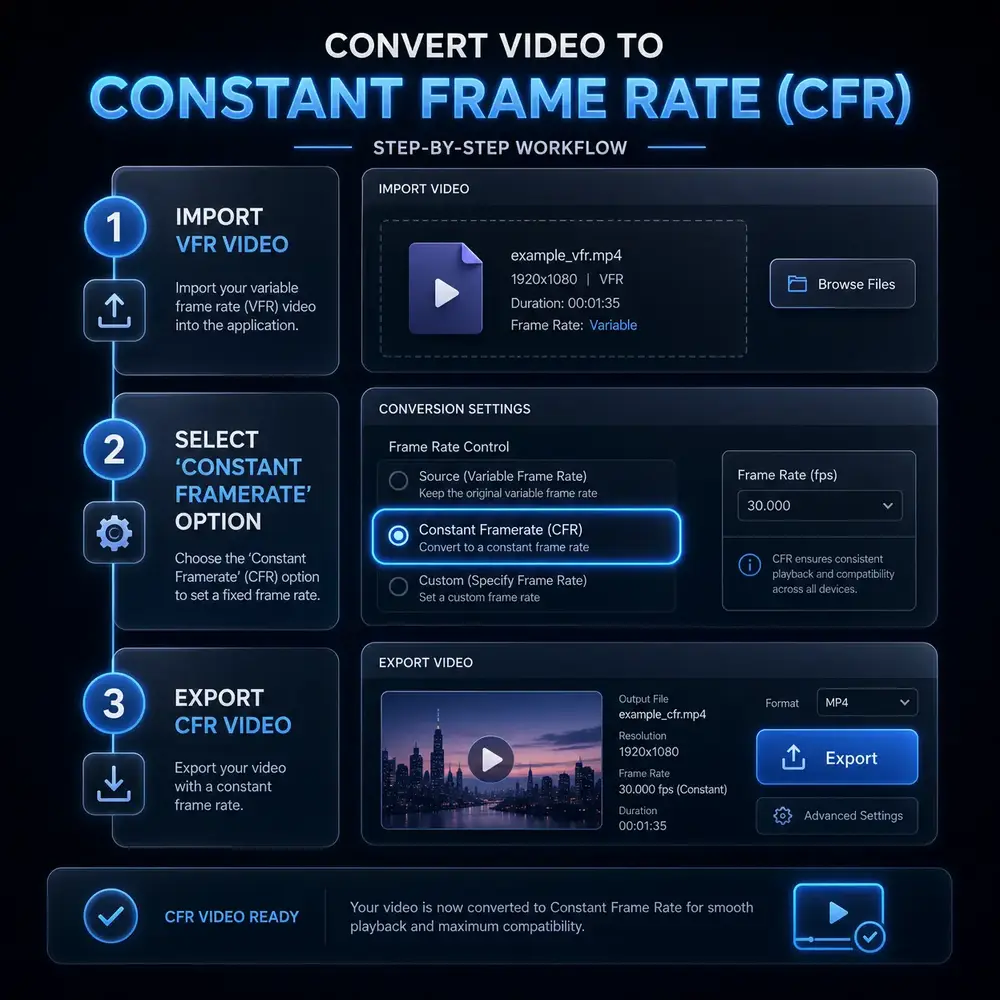
Setting HandBrake to Constant Framerate forces a uniform frame distribution, resolving timeline drift.
Step 3: Micro-Adjusting Clip Speed within CapCut
Even after transcoding to CFR, sometimes a subtle drift can persist, especially in very long timelines or due to minor discrepancies in audio recording devices. This is where CapCut's precise clip speed adjustment feature comes into play. We're talking about fractional adjustments – tiny tweaks that can make a world of difference in achieving perfect synchronization. This method requires a keen eye and ear, but it's incredibly effective for fine-tuning. For more details see our Silence Removal Guide and the AI”‘powered AI Silence Remover Guide.
I've found myself using this technique when working with multi-camera setups where one camera's audio might be slightly off from the main recording, even after initial syncing. It's a lifesaver for those last few milliseconds of misalignment.
How to Perform Micro-Adjustments:
- Identify the Drift Point: Play through your timeline in CapCut. Pay close attention to where the audio and video start to diverge. Often, it's more noticeable towards the end of a long clip. Mark this point if possible.
- Select the Problematic Clip: In your CapCut timeline, select the video clip (or the audio clip, depending on which one you need to adjust) that is drifting.
- Access Speed Controls: In the right-hand panel, navigate to the 'Speed' section. You'll typically see options for 'Normal' speed and 'Curve' speed. Select 'Normal'.
- Apply Fractional Speed Changes: Instead of using whole percentages (like 100% or 99%), you'll enter very precise values. For example:
- If the audio is *leading* the video (audio plays before the visual), you need to slightly *slow down* the audio or *speed up* the video. Try values like 99.9% or 99.95% for the audio clip, or 100.05% or 100.1% for the video clip.
- If the audio is *lagging* the video (visual plays before the audio), you need to slightly *speed up* the audio or *slow down* the video. Try values like 100.1% or 100.05% for the audio clip, or 99.95% or 99.9% for the video clip.
- Iterate and Refine: Apply a small adjustment, then play back the section where the drift was occurring. It might take a few attempts to find the perfect percentage. Zoom in on your timeline to make these adjustments more visible and precise. Sometimes, even a 0.01% change can fix the issue over a long duration.
Remember, this method is for *micro-adjustments*. If your audio is severely out of sync, you should first address VFR conversion (Step 2) or re-sync the clips manually before resorting to these fractional speed changes.
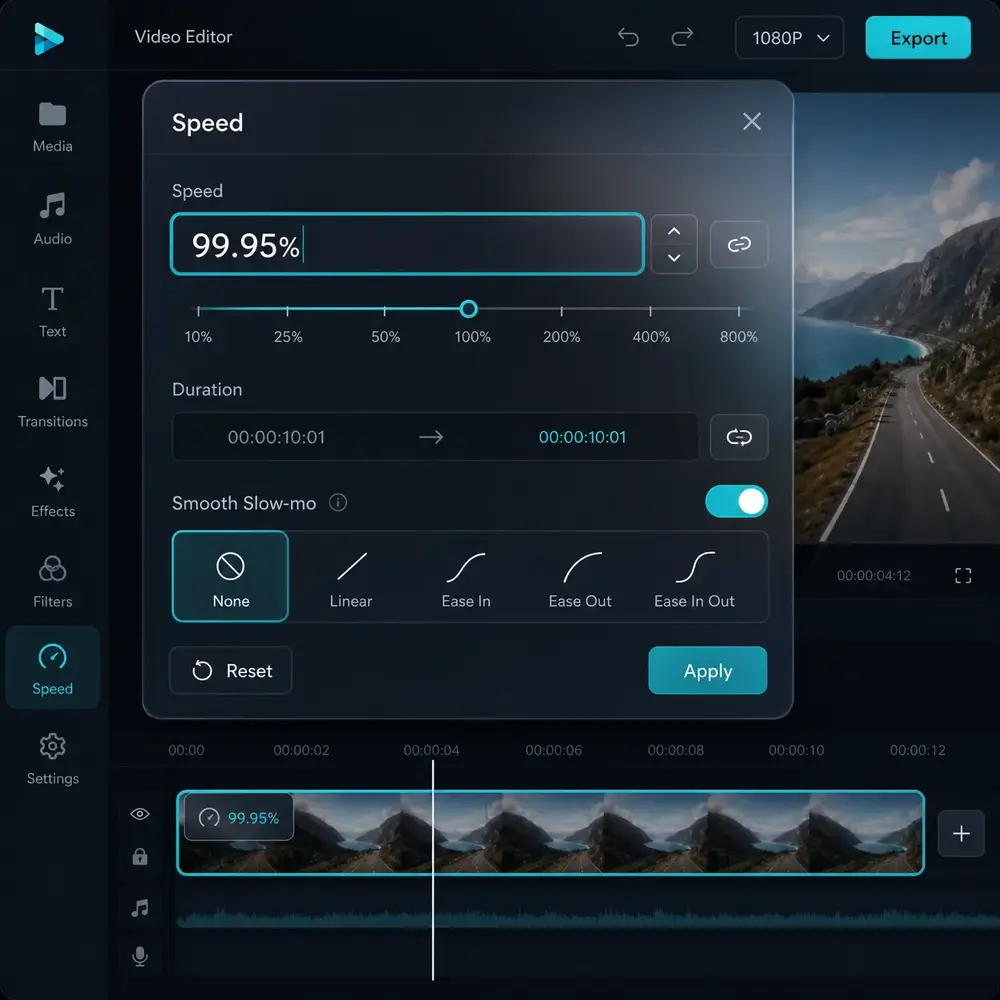
CapCut Desktop speed properties panel allowing precise fractional adjustments to align audio tracks.
Creative Best Practices Checklist: Ensuring Unified Sample Rates (48kHz)
Beyond frame rates, another critical factor influencing audio sync stability is the audio sample rate. While VFR often causes gradual drift, an incorrect or inconsistent audio sample rate can lead to immediate desynchronization or quality issues. For professional video production, the industry standard is 48kHz (48,000 Hz). Ensuring your entire workflow, from recording to export, adheres to this standard is paramount.
I once spent hours troubleshooting a project where the audio sounded slightly off, even after meticulous VFR conversion. It turned out one of the audio tracks was recorded at 44.1kHz, and CapCut was struggling to resample it perfectly during playback and export. Switching all audio to 48kHz resolved the subtle timing issues and improved overall clarity.
Global Export Guidelines for 48kHz:
- Record at 48kHz: Whenever possible, configure your recording devices (external microphones, audio recorders, camera settings) to capture audio at 48kHz. This is the ideal starting point.
- Check Imported Audio: Before importing audio into CapCut, if you suspect issues, use MediaInfo (from Step 1) to check the sample rate of your audio files. If they are 44.1kHz, consider converting them to 48kHz using an audio editor like Audacity (free and open-source) or Adobe Audition. This ensures consistency.
- CapCut Project Settings: While CapCut Desktop doesn't always expose explicit project sample rate settings, it generally handles 48kHz well. The key is to feed it consistent 48kHz audio.
- Export Settings: When exporting your final video from CapCut, pay close attention to the audio settings. While CapCut often defaults to optimal settings, always verify that the audio sample rate is set to 48kHz. If you see an option for 44.1kHz, avoid it unless specifically required for a niche platform.
- Bit Rate: For audio, a bit rate of 192 kbps or higher (e.g., 256 kbps or 320 kbps) is generally recommended for good quality.
- Channels: Stereo is standard for most videos.
- Hardware Playback: Ensure your playback hardware (speakers, headphones) and software are also configured to handle 48kHz audio correctly. While less common, sometimes system-level audio settings can introduce subtle playback discrepancies.
By maintaining a consistent 48kHz sample rate throughout your production pipeline, you eliminate another potential source of audio sync problems and ensure the highest possible audio fidelity for your viewers.
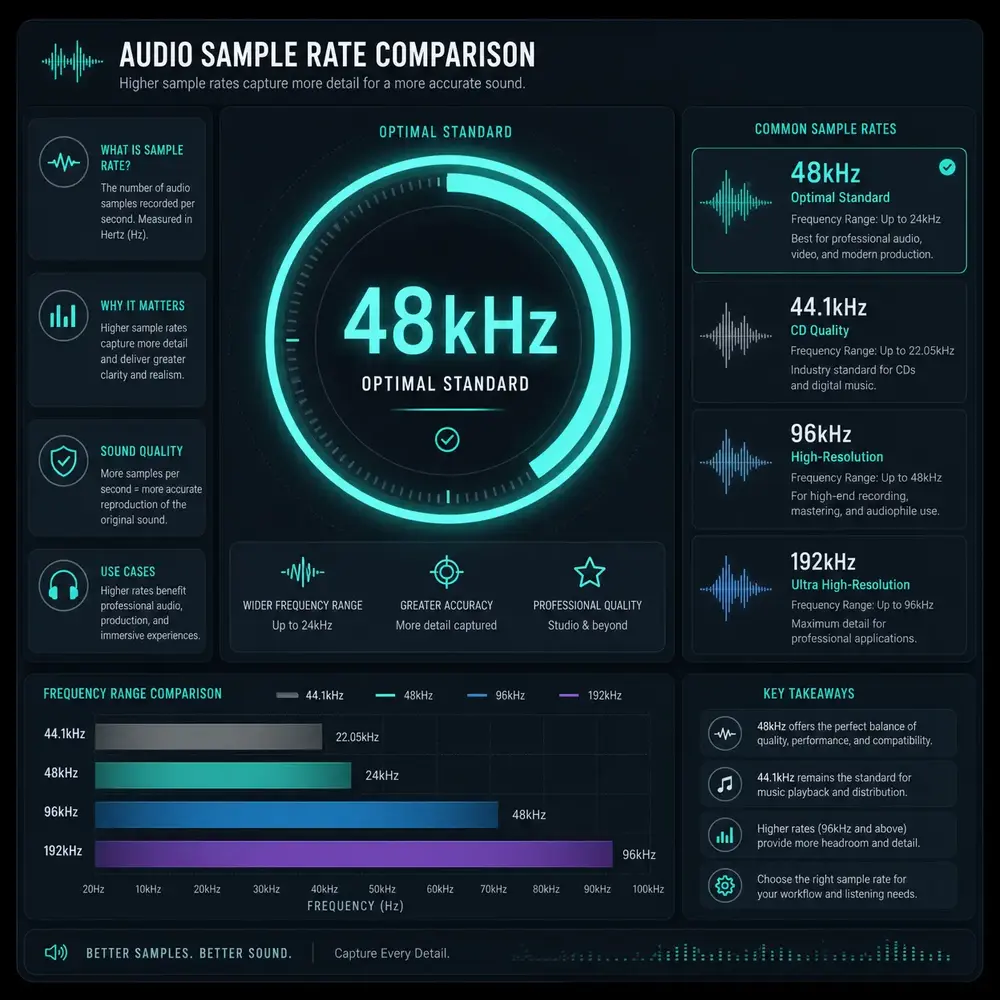
Aligning your project export settings to the 48kHz audio standard preserves sync during rendering.
FAQs: Your Questions Answered About Audio Sync Drift
Q1: Why does CapCut struggle with VFR when other editors do too?
Answer: CapCut, like many other non-linear editors (NLEs), is fundamentally designed to work with a consistent timeline. VFR footage, with its fluctuating frame rate, introduces inconsistencies that NLEs have to interpret and adapt. This interpretation process isn't always perfect, especially over longer durations, leading to the gradual desynchronization. More advanced NLEs often have more robust VFR handling algorithms, but transcoding to CFR remains the most reliable solution across the board.
Q2: Can I just use CapCut's auto-sync feature?
Answer: CapCut does offer an auto-sync feature, which can be very useful for initially aligning separate audio and video tracks. However, this feature primarily focuses on aligning the *start* of clips. It doesn't inherently fix the *gradual drift* that occurs over time due to VFR or sample rate mismatches. For progressive sync issues, the methods outlined in this guide (VFR conversion, micro-adjustments, 48kHz consistency) are essential.
Q3: What if my video is already edited in CapCut and I discover VFR?
Answer: This is a common scenario. If you've already edited a VFR video in CapCut and are experiencing drift, you have a couple of options. The most robust solution is to export the individual VFR clips from CapCut (if possible, or go back to the original source files), transcode them to CFR using HandBrake, and then re-import the CFR versions into your CapCut project. You'll likely need to re-sync them. Alternatively, you can try the micro-adjustment method (Step 3) within CapCut, but this might be more time-consuming for severe drift.
Q4: Does CapCut compress audio during export, affecting quality or sync?
Answer: CapCut, like most video editors, will re-encode audio during export. While it aims to maintain quality, aggressive compression settings or sample rate conversions (e.g., from 48kHz to 44.1kHz) can sometimes introduce subtle artifacts or timing issues. Always ensure your export settings prioritize 48kHz and a high audio bit rate to minimize these risks.
Q5: Are there any other tools besides MediaInfo and HandBrake for VFR conversion?
Answer: Yes, there are alternatives. FFmpeg is a powerful command-line tool that can also convert VFR to CFR, offering a high degree of control, but it has a steeper learning curve. Shutter Encoder is another popular GUI-based tool that uses FFmpeg under the hood and is highly recommended by many professionals for its versatility and quality. However, for most users, HandBrake provides an excellent balance of power and ease of use.
Q6: What if my audio is perfectly in sync, but the video looks choppy?
Answer: If your audio is fine but the video is choppy, it's likely a different issue, possibly related to your computer's processing power, CapCut's playback settings, or the original video's bitrate/resolution. Ensure your computer meets CapCut's system requirements, try lowering playback resolution within CapCut, or consider optimizing your video files (e.g., using proxies) for smoother editing.
Conclusion: Master Your CapCut Workflow for Flawless Audio
Gradual audio sync drift in CapCut Desktop can be a frustrating hurdle, but it's a solvable problem. By understanding the nuances of Variable Frame Rate, leveraging powerful external tools like MediaInfo and HandBrake, and mastering CapCut's micro-adjustment capabilities, you can ensure your videos maintain perfect synchronization from start to finish. Remember, a professional-looking video isn't just about stunning visuals; it's also about crystal-clear, perfectly aligned audio.
I've personally applied these techniques to countless projects, from educational tutorials to short films, and they have consistently delivered reliable results. Don't let VFR or sample rate inconsistencies compromise your creative vision. Take control of your workflow, implement these best practices, and elevate the quality of your CapCut productions.
Now it's your turn – apply these steps to your next CapCut project and enjoy perfectly synced audio.