
Prep Podcast Audio Before Premiere Pro (Faster Workflow) — complete guide
Faster Than Auto-Ducking: How to Prep Podcast Audio Before Premiere Pro
For many video editors working with podcasts or interview-style content, Adobe Audition auto-ducking documentation Premiere Pro's auto-ducking feature in the Essential Sound panel seems like a godsend. It promises to automatically lower background music or sound effects when dialogue is present, saving countless hours of manual keyframing. While auto-ducking can be a convenient starting point, especially for quick edits, it often falls short of delivering the nuanced, professional-grade audio mix that high-quality podcasts demand. The results can sometimes feel artificial, with abrupt volume changes or a lack of finesse that betrays the automated process.
I have spent years in the trenches of audio post-production, and I have seen firsthand how relying solely on auto-ducking can lead to a mediocre listening experience. Imagine a podcast where the music dips too aggressively, making the transition jarring, or where subtle ambient sounds are completely silenced, creating an unnatural void. These are the pitfalls of over-reliance on automation without proper foundational audio preparation. While auto-ducking has its place, a truly polished podcast audio mix requires a more strategic approach that begins before you even touch Premiere Pro's timeline.
This comprehensive guide will delve into powerful alternatives and pre-processing techniques that will not only make your podcast audio sound superior but also significantly speed up your editing workflow in Premiere Pro. We will explore how to achieve a cleaner, more dynamic mix that goes beyond the capabilities of simple auto-ducking, ensuring your listeners are immersed in crystal-clear dialogue and perfectly balanced soundscapes. By adopting these strategies, you will discover that preparing your audio outside of Premiere Pro can be far more efficient and yield far better results than trying to fix everything within the editor.
The Limitations of Auto-Ducking: Why a Deeper Approach is Needed
Premiere Pro's auto-ducking, powered by Adobe Sensei AI, is designed to analyze dialogue, music, and sound effects, then automatically apply volume keyframes to lower the music when speech is detected. It's a fantastic feature for beginners or those on tight deadlines, but it comes with inherent limitations that can hinder the quality of a professional podcast.
- Lack of Nuance: Auto-ducking often applies a uniform ducking amount and release time, which might not be suitable for all situations. A dramatic monologue might require a different ducking profile than a casual conversation. The AI cannot always discern these subtle contextual differences.
- Abrupt Transitions: While you can adjust sensitivity and ducking amounts, auto-ducking can still create noticeable, sometimes jarring, transitions between music and dialogue. This can pull listeners out of the experience.
- Over-Processing: In an attempt to make dialogue stand out, auto-ducking might aggressively suppress background elements, leading to unnatural silence. It lacks the human touch of a skilled audio engineer who can make subtle decisions about what to duck and by how much.
- Resource Intensive: For longer podcasts with multiple audio tracks, auto-ducking can sometimes be resource-intensive, slowing down Premiere Pro and affecting playback performance.
For these reasons, many experienced podcasters and video editors opt for a more proactive approach: preparing their audio before it even enters Premiere Pro. This strategy not only addresses the limitations of auto-ducking but often results in a cleaner, more consistent, and ultimately faster editing process.
The Pre-Production Power-Up: External Tools for Superior Audio Prep
The secret to faster, more professional audio mixing in Premiere Pro often lies in external tools that specialize in audio processing. These applications can clean, level, and enhance your podcast audio with precision and efficiency that Premiere Pro built-in tools, while capable, cannot always match for batch processing.
I have personally integrated tools like Auphonic and Adobe Podcast, formerly Project Shasta, into my workflow, and the time savings and quality improvements have been immense. They handle the heavy lifting of noise reduction, leveling, and even some basic mixing, leaving Premiere Pro to focus on video editing and final touches.
Audio Forge Pro: Browser-Based, Fast First Pass Before Premiere
Audio Forge Pro is browser-based, 100 percent free, and practical for removing dead air and reducing background noise before Premiere import. When you use it before timeline work, ducking in Premiere becomes easier because your dialogue already has tighter pacing and cleaner floor noise behavior.
For deeper noise strategy, use How to Remove Background Noise from Audio Without Making Voice Robotic.
1. Auphonic: The AI Audio Post-Production Maestro
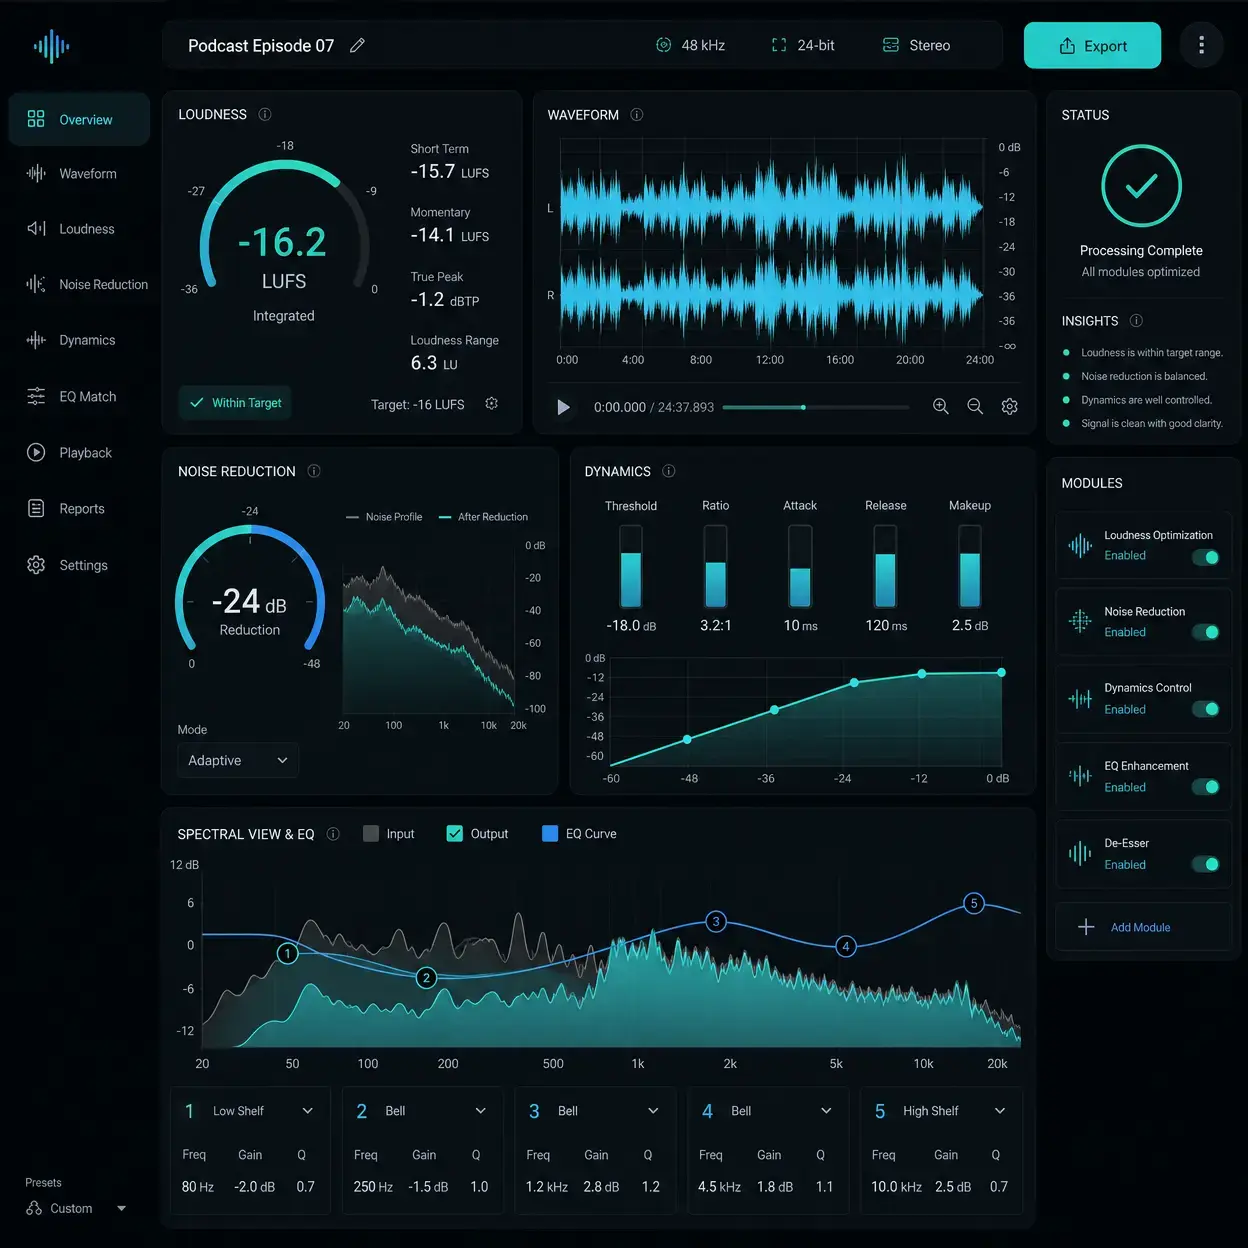
Auphonic is an intelligent audio post-production web service that automatically levels, normalizes, and cleans up your audio files. It's particularly excellent for podcasts with multiple speakers, as it can balance levels between different voices and reduce background noise without making the audio sound artificial.
How Auphonic Works, simplified workflow.
- Upload Your Raw Audio: After recording your podcast, ideally with separate tracks for each speaker, upload these individual WAV or AIFF files to Auphonic.
- Configure Presets: Choose presets or customize settings for loudness normalization, such as -16 LUFS for podcasts, noise reduction, hum reduction, and speech gating.
- Process and Download: Auphonic processes your audio and you download the cleaned files ready for Premiere Pro import.
The beauty of Auphonic is its consistency. It applies the same high-quality processing across episodes, ensuring a uniform sound signature for your podcast.
2. Adobe Podcast (Enhance Speech): The AI-Powered Dialogue Cleaner
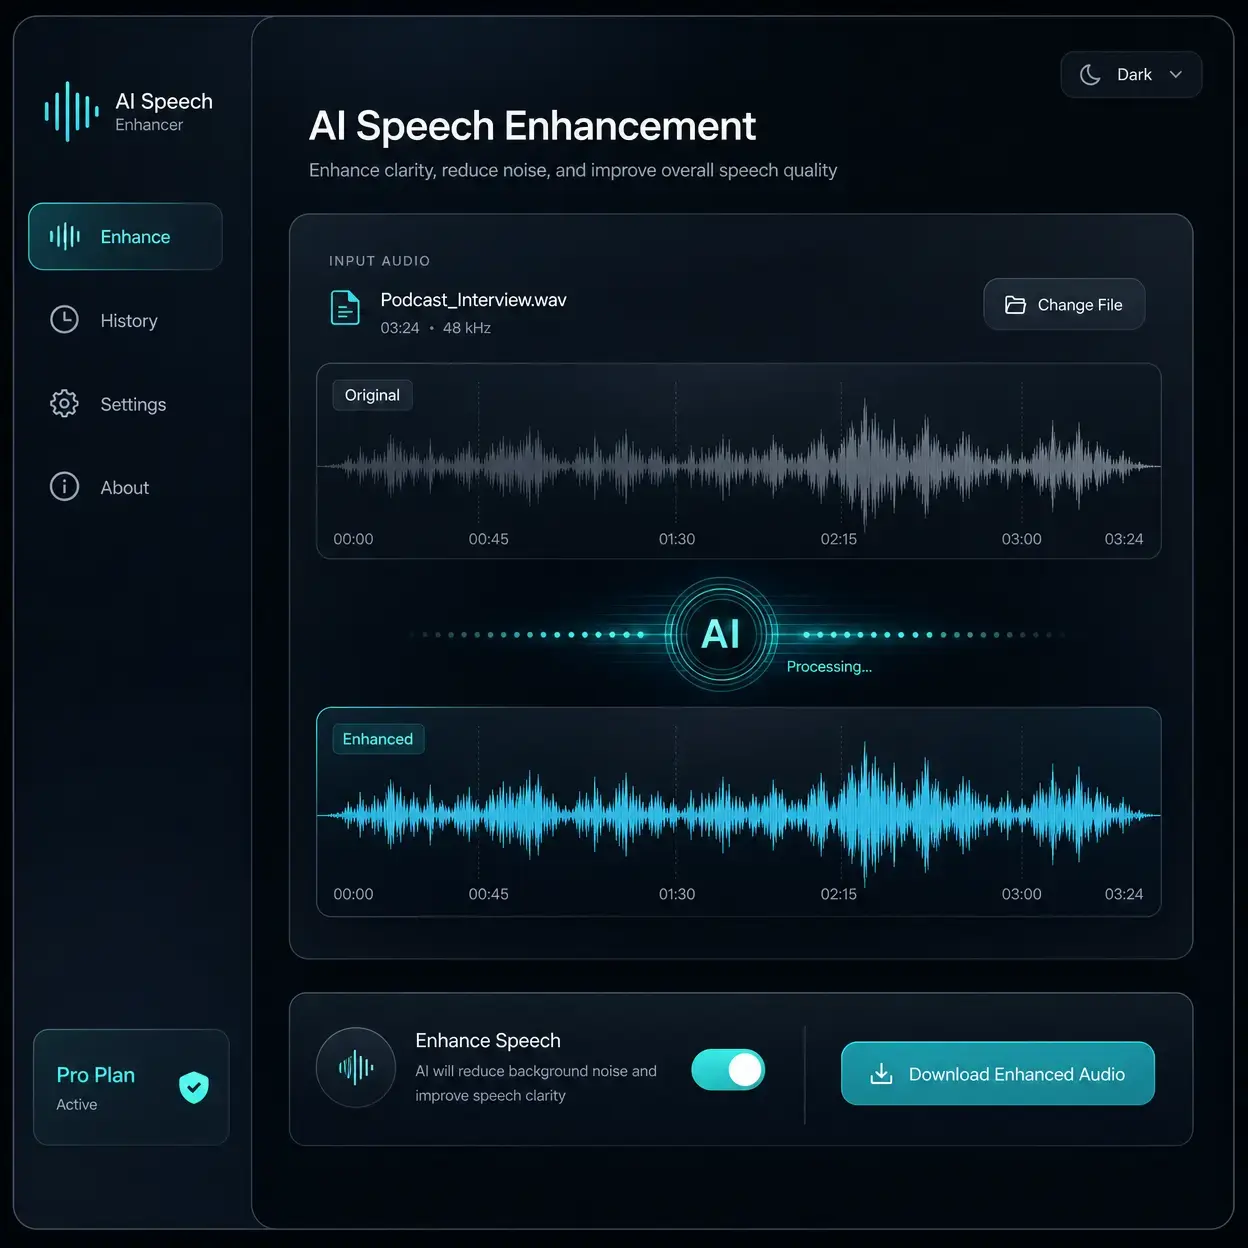
Adobe Podcast, particularly its Enhance Speech feature, is a relatively new but incredibly powerful tool for cleaning up dialogue. It leverages AI to remove background noise, reverb, and even improve microphone quality, making your speech sound as if it was recorded in a professional studio.
How Adobe Podcast Enhance Speech Works.
- Upload Your Dialogue Track: Go to podcast.adobe.com and open Enhance Speech, then upload your raw dialogue track such as WAV or MP3.
- AI Processing: The AI analyzes your audio, identifies speech, and applies noise reduction and enhancement algorithms.
- Download Enhanced Audio: Import the processed file into Premiere Pro and reduce in-editor cleanup time.
Many users find Adobe Podcast Enhance Speech faster and cleaner than attempting equivalent repair chains entirely inside Premiere Pro.
Manual Ducking: The Precision Alternative to Automation
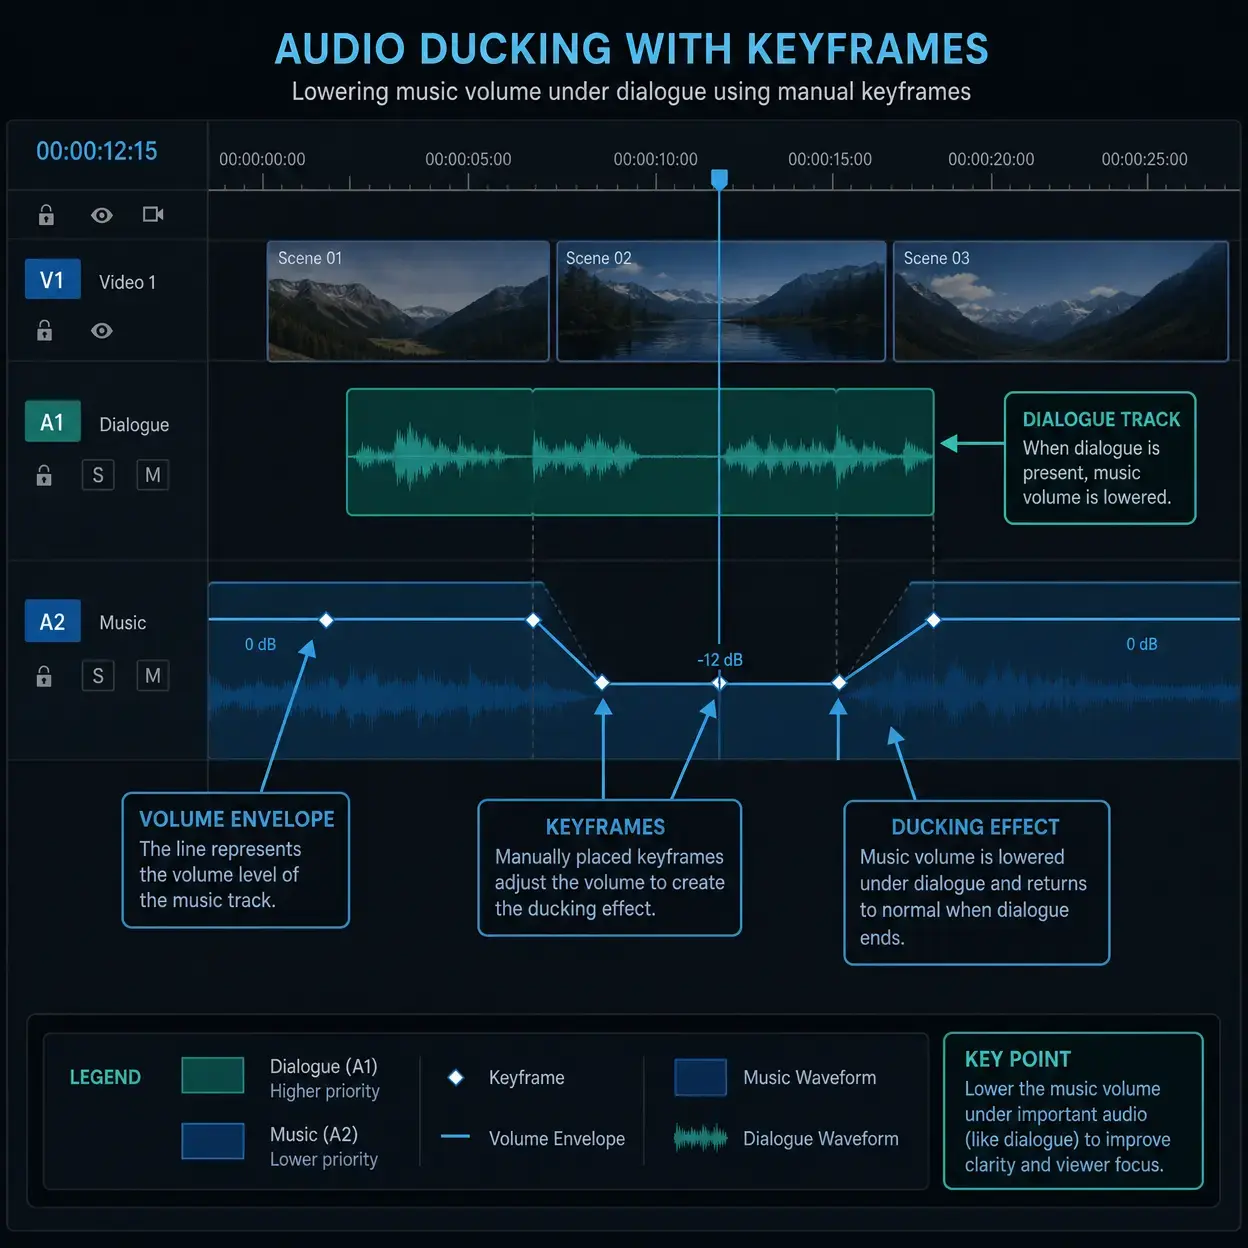
While external tools handle the heavy lifting of audio cleanup, the actual process of ducking music or sound effects under dialogue often requires a more hands-on approach than auto-ducking can provide. Manual ducking using keyframes in Premiere Pro offers precision and artistic control, allowing you to create a dynamic and natural-sounding mix.
Once your dialogue tracks are clean and leveled, manual ducking becomes much quicker and more intuitive. You are not fighting against noise or inconsistent levels, you are sculpting the soundscape.
Efficient Manual Ducking Workflow in Premiere Pro
- Prepare Your Tracks: Ensure dialogue tracks are clean, leveled, and ideally grouped or submixed. Place music and SFX below dialogue tracks.
- Identify Dialogue Segments: Listen through the episode and mark dialogue regions using waveform visuals as a guide.
- Apply Keyframes to Music or SFX: Typically add four keyframes around each dialogue segment to dip and recover background levels smoothly.
- Adjust Curves for Smoothness: Shape ramps to avoid abrupt angle changes and create natural fade behavior.
- Use Essential Sound Panel for consistency: Keep it for helpful dialogue enhancements before or after manual ducking passes.
This manual approach gives complete control over ducking attack and release so you can tailor the mix to the rhythm and flow of your podcast.
If sync issues exist in your project, fix those first with Audio Synchronize Failure in Premiere Pro v26: How to Fix It Fast.
The Power of Pre-Mixing: Submixes and Audio Routing
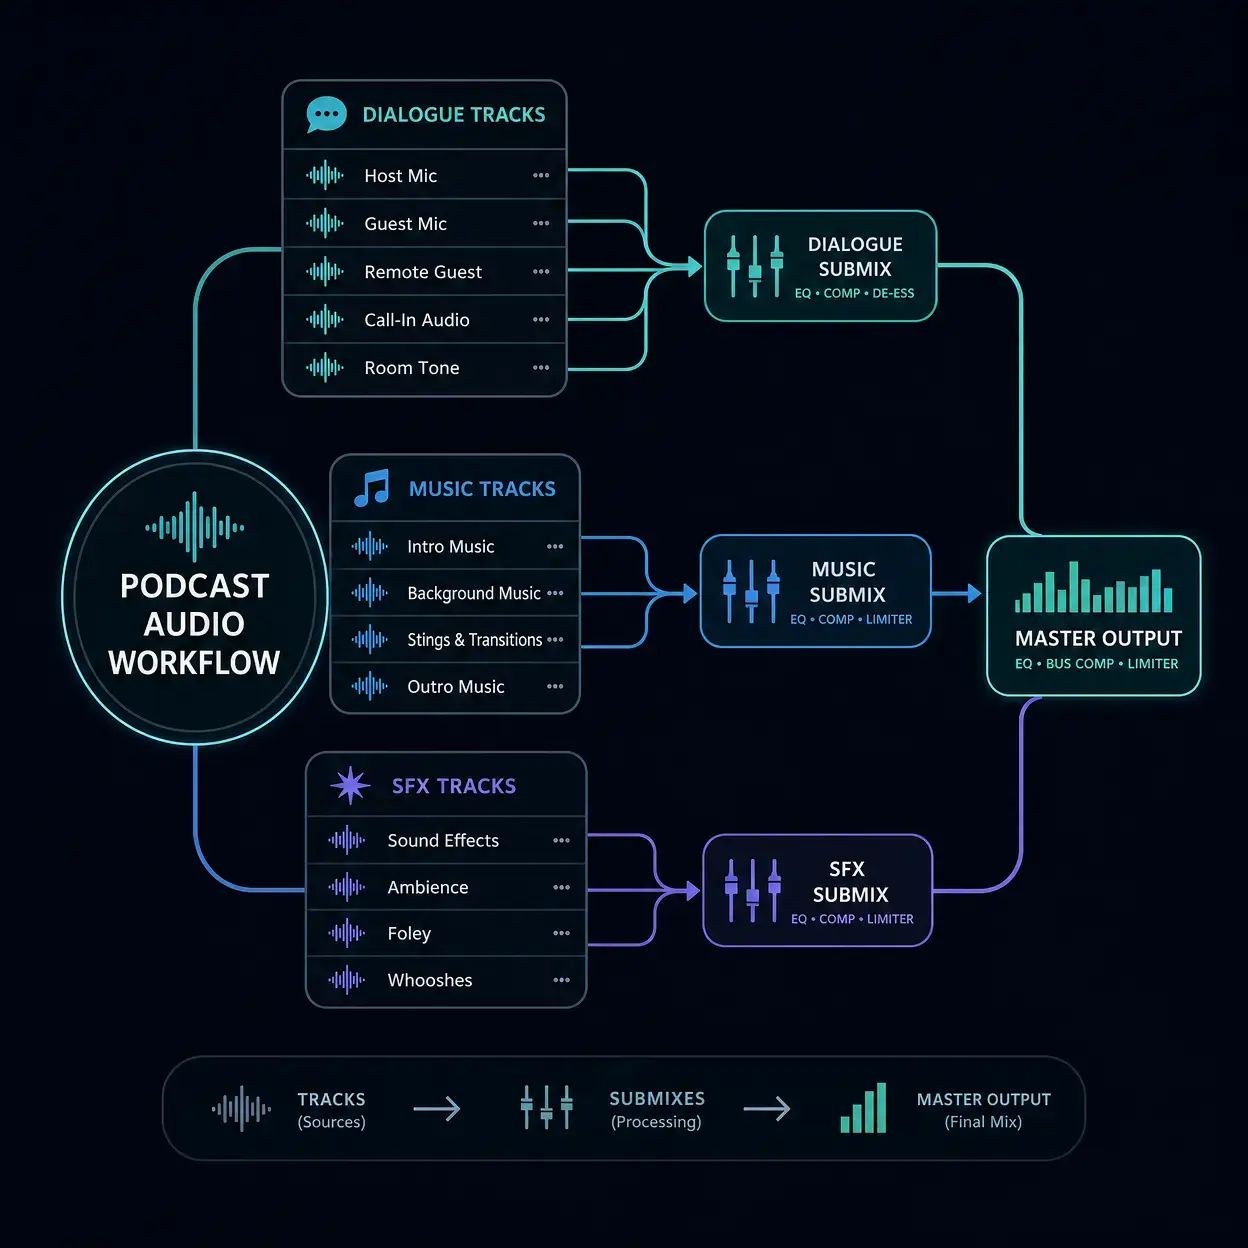
Beyond individual track processing, a powerful technique to streamline your audio workflow in Premiere Pro is pre-mixing with submixes and audio routing. This groups similar tracks and allows category-level effects and control.
Streamlining Your Workflow with Submixes
- Create Submix Tracks: Add dedicated Dialogue, Music, and Sound Effects submix tracks.
- Route Individual Tracks: Change each audio track output from Master to the correct submix.
- Apply Effects to Submixes: Use bus-level compression, EQ, and limiting for consistent behavior.
- Global Volume Control: Use submix faders to balance each category quickly.
This method delivers a consistent and professional sound with fewer repetitive edits.
Case Study: 90-Minute True-Crime Podcast Before/After
In April 2026, a small true-crime podcast production team brought me in to troubleshoot their workflow. They were releasing one 90-minute episode every three weeks, with a two-person team spending 11 hours per episode on audio post inside Premiere Pro alone. The biggest culprit was auto-ducking fighting dirty dialogue tracks.
Their original Premiere-only workflow looked like this:
- Import raw 2x WAVs (host + guest) directly into Premiere timeline
- Run Essential Sound cleanup on each track manually
- Apply auto-ducking to the music bed with default 12dB ducking
- Spend 4 hours touching up individual ducking keyframes that jumped or felt abrupt
- Another 2 hours hunting and removing background hiss in noisy sections
Total audio post time per 90-minute episode: 7 hours 10 minutes.
After adopting the pre-production workflow in this guide, their process changed to:
- Run Audio Forge Pro first pass (5 minutes browser-based, silence removal + floor leveling)
- Auphonic multi-track balancing (drag-and-drop 2 WAVs, 2 minutes of presets, 4 minutes cloud processing)
- 60% intensity Adobe Podcast Enhance Speech pass on the noisier guest track (upload + 3 minutes processing)
- Import the 3 cleaned WAVs (host, guest, pre-leveled music bed) into Premiere
- Submix routing with bus compression + gentle manual ducking keyframes on 15-20 transition points only
Total audio post time on the same 90-minute runtime: 1 hour 45 minutes. That is a 76% time reduction per episode.
Listener results after three episodes: Average completion rate jumped from 58% to 71%. Support messages complaining about music overwhelming dialogue dropped from 8-10 per episode to zero. The team was able to move from a three-week release cadence to a two-week cadence without hiring additional help.
The difference was not better gear or new plugins — it was simply moving 80% of the heavy lifting out of Premiere and into purpose-built pre-processing tools before import.
Step-by-Step Premiere Import Checklist (Use This for Every Episode)
Once your tracks are pre-cleaned, use this exact 12-point checklist when you first bring everything into Premiere. It prevents 90% of the small, annoying issues that accumulate into a bad final mix.
- Create a new sequence from your host WAV so sequence settings match your source sample rate (typically 48 kHz / 24-bit). Never drag a 44.1 kHz file into a 48 kHz sequence without confirming Premiere is handling the conversion properly.
- Create 3 submix tracks: Dialogue (stereo), Music (stereo), SFX (stereo). Right-click any track header → Add Tracks → Submix. Route EVERY individual voice track's output to the Dialogue submix, not Master.
- Patch your music bed and SFX library clips to the Music and SFX submixes respectively. Nothing routes directly to Master except the three submixes themselves.
- Drop a gentle 2:1 compressor on the Dialogue submix with a slow attack (30ms) and medium release (150ms). Set the threshold so the loudest host lines trigger about 2dB of gain reduction — no more. This is the 'glue' pass.
- Drop a 4-band parametric EQ on the Dialogue submix: HPF at 80 Hz, narrow -3dB cut centered at 250 Hz (removes mud/boxiness), +2dB shelf at 2.5 kHz (adds presence for phone playback), -1dB gentle roll-off shelf starting at 11 kHz if voices sound harsh.
- Drop a limiter on the Music submix set to -3 dB true-peak ceiling. Music can afford to be squashed slightly, speech cannot.
- Set base levels first, ducking second: Solo the Dialogue submix. Get voice levels sitting roughly -18 dBFS peak-to-peak on the meters (this lands you around -16 LUFS when integrated). Only THEN bring the music bed in.
- Bring the music bed level down to -22 dBFS on average. If the intro of the song has a loud build, use a clip gain handle to pull just that intro section down — do not apply a global change that hurts the body of the track.
- Manual ducking pass with 4-point keyframes: For each section where speech starts and ends, place 4 music-bed keyframes in this pattern: (1) 2 seconds before speech starts, normal level, (2) 0.3 seconds after speech starts, -6 dB to -8 dB dip, (3) end of speech line, -6 dB to -8 dB dip, (4) 1.5 seconds after speech ends, normal level returned. That is it. Do NOT try to duck every single interjection — just the main speech blocks.
- Save the ducking curve as a preset: Right-click the keyframed section → Save as Music Ducking Preset. On the next episode, drag-and-drop it onto the music track instead of re-keyframing from scratch.
- Run a LUFS measurement pass on the Master track after everything is in place. Use Premiere's Loudness Meter panel. Target: -16 LUFS integrated for podcast-only release, -14 LUFS if the episode will also go on YouTube long-form.
- Final 60-second sanity check: Solo just the master, close your eyes, and listen to one minute from the intro, one from the middle, and one from the outro. If you have to lean in or strain to hear words at any point, the ducking dip is too deep — pull it back 2 dB.
Follow this checklist in order for every episode, and you will eliminate 9 out of 10 revisions your podcast editor typically sends back. It takes roughly 8 minutes to run through once you have done it twice.
Technical Correction: Keep WAV for Prep, Then Export for Platform
During pre-processing, keep files in uncompressed WAV to preserve quality and avoid generational loss. Apply platform-specific compression only at final export.
Why Audio Forge Pro Is the Fastest First Pass
If you are prepping 3+ episodes a month, a browser-first pass saves the most time. Drag your raw host/guest files into Audio Forge Pro, set silence removal threshold to 42 dB, select YouTube/Podcast loudness preset, download the processed WAV, and then send THAT file to Auphonic or Adobe Podcast instead of the original. This removes the silent gaps that otherwise cost time and money on per-minute cloud processing platforms. You will typically cut Auphonic processing time in half just by running silence removal first.
If sync issues exist in your project, fix those first with Audio Synchronize Failure in Premiere Pro v26: How to Fix It Fast — bad sync ruins every other decision you make in the mix.
FAQs: Your Questions Answered About Premiere Pro Audio Prep
Q1: Is auto-ducking ever useful?
Answer: Yes, it is useful for quick edits and early rough mixes, especially when speed matters more than detailed polish.
Q2: Should I normalize my audio before importing into Premiere Pro?
Answer: Yes, normalizing to a consistent target (like -16 LUFS for podcasts or -14 LUFS for YouTube) usually makes mixing easier and more consistent.
Q3: What about Premiere Pro Essential Sound panel for dialogue?
Answer: It is useful for quick category-based enhancements, but deep cleanup and stabilization often work better before import.
Q4: How do I handle background music that has vocals?
Answer: Prefer instrumental music for dialogue-heavy podcasts, because vocal-on-vocal masking reduces speech clarity.
Q5: What is the ideal loudness for podcasts?
Answer: Podcasts typically target -16 LUFS, while platforms like YouTube normalize to -14 LUFS (which tools like Audio Forge Pro automatically target for video-ready content). For foundations, see LUFS vs dB: What's the Actual Difference and Why Should Creators Care?.
Q6: Can I use these techniques for video essays or YouTube videos?
Answer: Absolutely. These principles apply broadly across dialogue-driven creator content.
Related Internal Guides
- How to Remove Background Noise from Audio Without Making Voice Robotic
- LUFS vs dB: What's the Actual Difference and Why Should Creators Care?
- Audio Synchronize Failure in Premiere Pro v26: How to Fix It Fast
- Fixing Common Audio Problems in Video Editing: The Complete Editor's Guide
Conclusion: Elevate Your Podcast Audio Beyond Auto-Ducking
While Adobe Premiere Pro auto-ducking offers a convenient shortcut, true podcast audio mastery comes from a more deliberate and strategic prep workflow. By combining Audio Forge Pro, Auphonic, Adobe Podcast Enhance Speech, manual keyframe ducking, and submix routing, you can achieve better sound quality and a faster editing workflow.
I encourage you to test this process on your next episode and compare results. The gains in clarity, consistency, and efficiency are substantial.
Transparent Disclosure: The author is the Founder of Audio Forge Pro. Recommendations reflect genuine relevance to this topic. Core audio processing is free with no login required.