
Balance Two Speakers Volume in Podcast Interviews (2026) — complete guide
How to Make Two Speakers Sound the Same Volume in a Podcast Interview
One of the most common and jarring issues in podcasting is the volume seesaw. You are listening to a fascinating interview, but you have to constantly adjust your volume dial because the host is booming loud, while the guest sounds like they are whispering from across the room. This inconsistency not only frustrates listeners but also instantly degrades the perceived professionalism of your show. Achieving a balanced, consistent volume between two or more speakers is a fundamental skill in audio production, yet it remains a stumbling block for many creators.
The challenge arises from a multitude of factors: different microphones, varying distances from the mic, distinct natural speaking volumes, and disparate recording environments. When you bring these disparate audio sources together in post-production, they rarely align perfectly out of the box. Simply turning up the quieter track or turning down the louder one is rarely enough, as human speech is dynamic, constantly fluctuating in intensity.
This comprehensive guide will demystify the process of balancing speaker volumes in a podcast interview. We will move beyond basic volume faders and explore the professional techniques used by audio engineers to achieve a cohesive, broadcast-ready sound. From understanding the crucial difference between peak volume and perceived loudness (LUFS) to mastering the art of compression and vocal riding, you will learn how to ensure every voice on your podcast is heard clearly and consistently. Whether you are using Adobe Audition, Premiere Pro, Logic Pro, or free tools like Audacity, these principles apply universally.
The Foundation: Understanding Volume vs Perceived Loudness (LUFS)
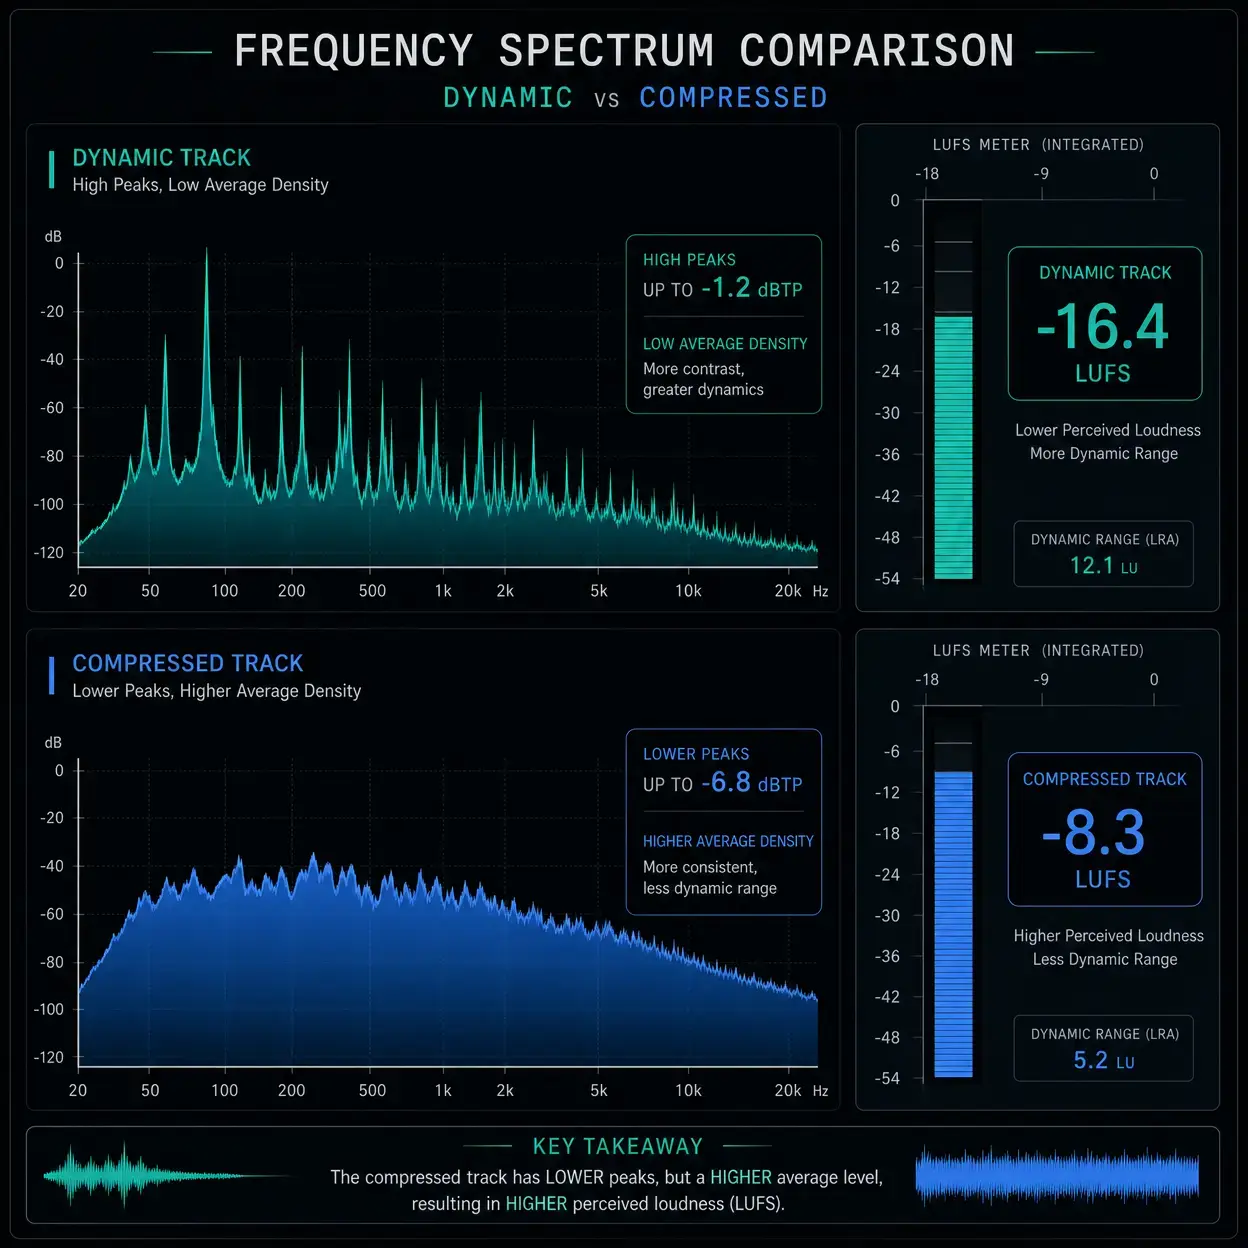
Before we dive into the tools, it is critical to understand what we are actually trying to balance. Many beginners make the mistake of only looking at the peak meters on their audio tracks. Peak meters show the absolute highest point of the audio signal, measured in decibels relative to full scale, or dBFS. While it is important to ensure your peaks are not clipping, hitting 0 dBFS and distorting, peak volume does not tell the whole story about how loud something actually sounds to the human ear.
This is where LUFS comes in. LUFS is a measurement standard designed to reflect human perception of loudness over time. It takes into account the frequency content and the duration of the sound. Two audio tracks might have the exact same peak volume, but if one is heavily compressed and dense, it will sound significantly louder than a dynamic, sparse track with the same peak.
When balancing two speakers, our goal is to match their perceived loudness, not just their peak levels. If the host averages -16 LUFS and the guest averages -24 LUFS, the guest will sound noticeably quieter, regardless of where their occasional peaks hit.
For deeper context, see LUFS vs dB: What's the Actual Difference and Why Should Creators Care?. For an external standard reference, see ITU-R BS.1770 loudness algorithm.
Step 1: The Pre-Mix Cleanup, Gating and EQ
Before you attempt to balance the volumes, you must ensure the tracks are clean. Balancing noisy tracks will only amplify the problems.
1) Noise Gating for Bleed Reduction
If your host and guest were recorded in the same room, or if one participant had significant background noise, you need to address microphone bleed. Bleed occurs when the host microphone picks up the guest voice, and vice versa. If you try to boost the guest volume, you also boost the host voice bleeding into the guest mic, creating a hollow, phasey sound.
Use a noise gate on each track.
- Threshold: set just above the background noise floor, but below the quietest words.
- Attack: fast, so the gate opens quickly when speech starts.
- Release: moderate to slow, so the gate closes naturally between phrases.
By gating the tracks, you isolate each speaker, making it much easier to adjust individual volumes without affecting the other.
2) Equalization for Clarity
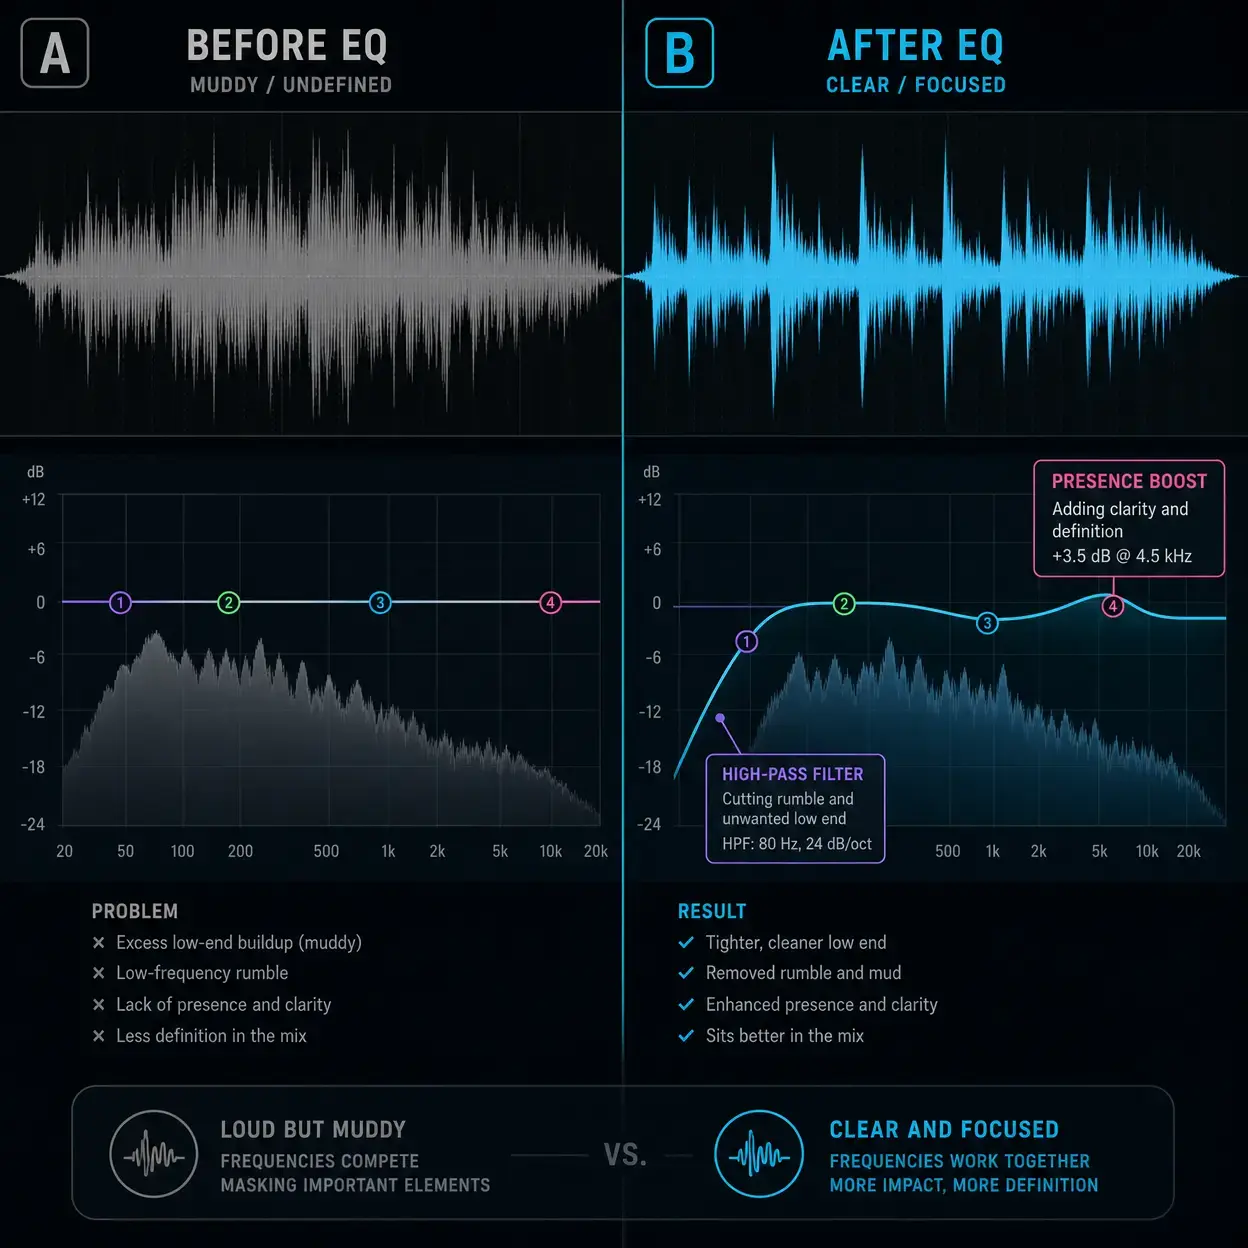
Sometimes a speaker sounds quieter not because they lack volume, but because their voice lacks clarity in the frequency spectrum. A muddy voice can get lost while a brighter voice cuts through.
Apply basic EQ to each track.
- High-pass filter: roll off below 80 to 100 Hz to remove rumble and plosives.
- Presence boost: a gentle lift around 3 kHz to 5 kHz can improve intelligibility.
This can make a voice sound more prominent without actually increasing overall volume too much.
Step 2: Leveling the Playing Field, Clip Gain and Vocal Riding
Once the tracks are clean, the first stage of actual volume balancing is manual leveling. This is about getting tracks into the same general ballpark before applying automated processing.
1) Clip Gain Adjustment
Look at the overall waveforms of your host and guest. If the guest waveform is visibly much smaller throughout the entire recording, use clip gain to boost that track. This is a static adjustment that raises the whole clip uniformly.
Aim to get the average visual thickness of both waveforms to look roughly similar. You do not need perfect precision at this stage, just a closer starting point.
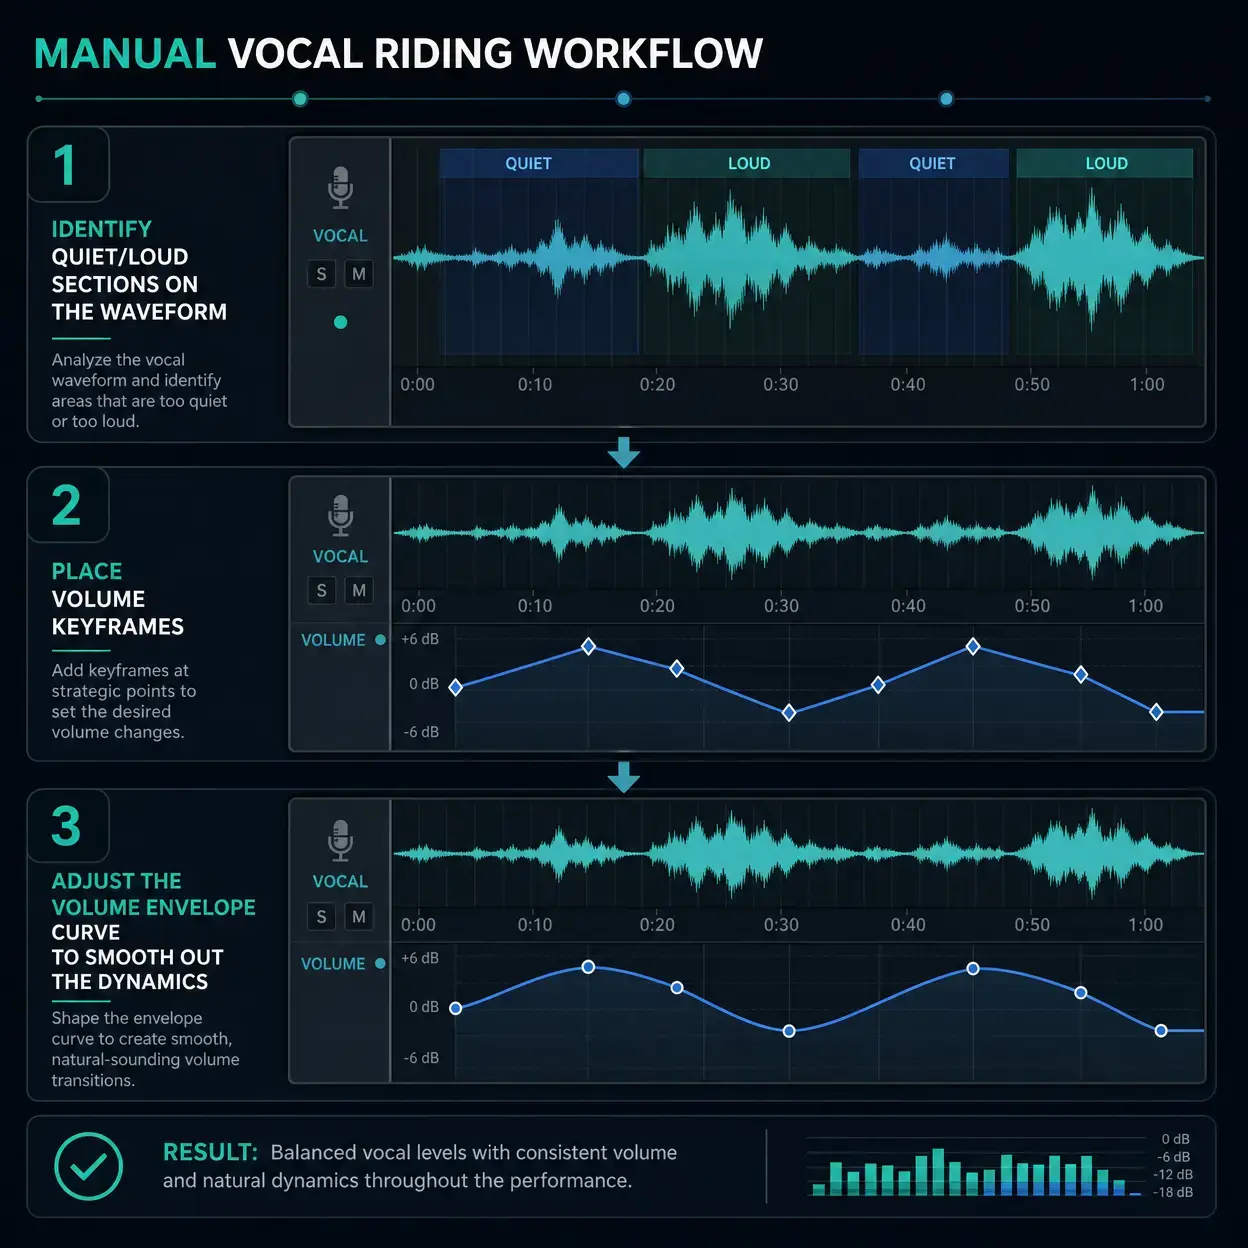
2) Manual Vocal Riding, Volume Automation
Human speech is dynamic. A speaker may lean back, whisper, and then laugh loudly. Static clip gain does not fix these internal fluctuations. Manual vocal riding uses automation keyframes to lift quiet passages and trim loud ones.
The goal is to create a more consistent performance before heavy compression. While time-consuming, manual vocal riding is one of the biggest quality upgrades you can make because it sounds more natural than relying only on heavy compression.
Step 3: The Glue, Compression
Compression is the most powerful tool for balancing spoken volume. It reduces dynamic range by controlling peaks so you can raise average loudness more safely.
Compression on Individual Speaker Tracks
Apply compression to host and guest separately because each voice has different dynamics.
- Threshold: set so compression engages on louder moments.
- Ratio: for spoken word, around 2:1 to 4:1 is common.
- Attack: medium-fast, often around 10 to 20 ms.
- Release: moderate, often around 100 to 250 ms.
- Makeup gain: raise average level after peak reduction.
Mix Bus Compression for Final Cohesion
After balancing individual tracks, route both voices to a mix bus and apply gentle glue compression with low ratio and light gain reduction. This helps both voices sit in the same sonic space.
Step 4: Loudness Normalization, Final Delivery Target
The final step is to ensure your balanced mix meets loudness standards. Most podcast platforms recommend around -16 LUFS for stereo files and -19 LUFS for mono files.
- Measure integrated LUFS on the full episode using a loudness meter.
- Adjust master gain up or down to hit your target.
- Place a true peak limiter at the end, often with a ceiling around -1.0 dBTP, to prevent clipping when loudness is raised.
Many modern tools can automate this normalization step, but manual verification is still recommended.
Automated Solutions: When Time Is Short
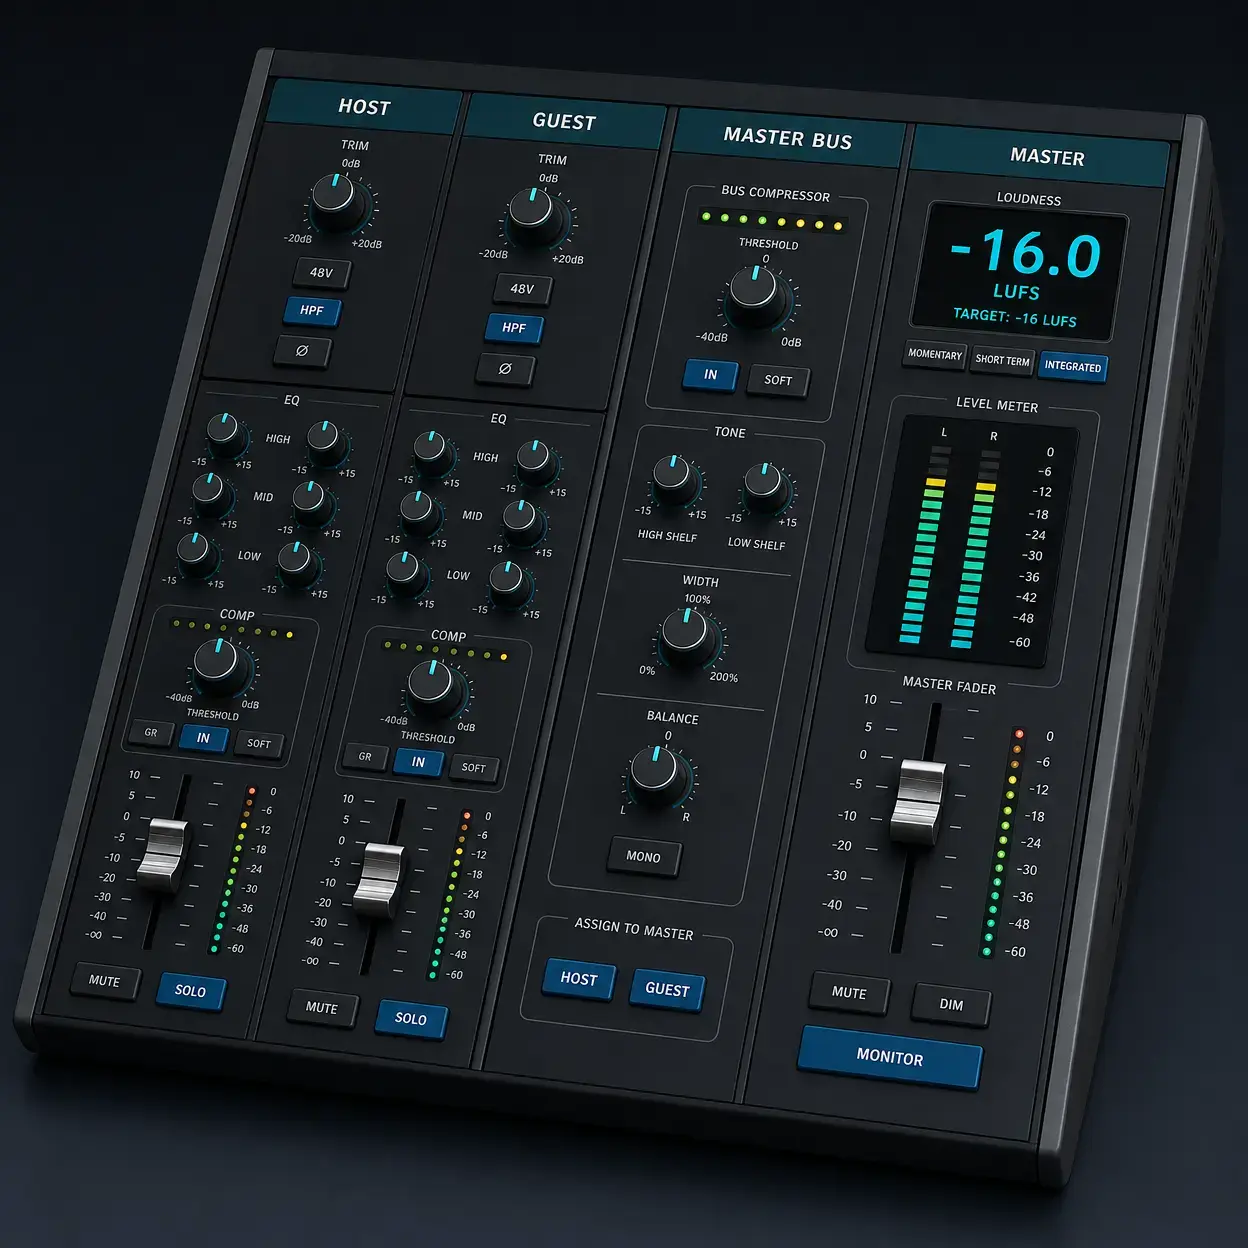
While the manual process yields the best, most natural results, it can be time-consuming. If you are producing frequently or working under tight deadlines, automated tools can handle much of the heavy lifting.
- Auphonic for automatic leveling and LUFS normalization.
- iZotope RX Leveler for automated voice leveling.
- Waves Vocal Rider for automated vocal riding behavior.
These tools are powerful, but they work best when fed relatively clean audio. Basic gating and EQ first will improve results.
Practical Settings Blueprint You Can Reuse
If you want a dependable template, start with this order and adjust by ear. First clean each speaker with gate and EQ. Then apply clip gain for rough alignment. After that, do light manual vocal riding. Then add individual compression on host and guest tracks. Finally, apply gentle bus compression and LUFS normalization on the master.
For host and guest compression, a safe spoken-word starting point is threshold where gain reduction averages around 3 to 6 dB during louder phrases, ratio near 3:1, medium-fast attack, and moderate release. Avoid crushing voices flat. The goal is consistency, not lifeless uniformity.
For the mix bus, keep it subtle. Low ratio, slow-ish release, and around 1 to 2 dB of reduction is often enough to glue both voices together without audible pumping.
Common Mistakes That Keep Volume Inconsistent
- Chasing peak meters only and ignoring integrated LUFS.
- Boosting noisy guest tracks before fixing bleed and room noise.
- Over-compressing one speaker while leaving the other dynamic.
- Skipping vocal riding and expecting compression to solve everything.
- Normalizing too early before final edits are locked.
- Forgetting true peak limiting at the end of the chain.
If your mix still feels unstable, re-check Step 1 and Step 2 first. Most problems come from weak prep and uneven source material, not from the loudness target itself.
Fast DAW-Agnostic Workflow
This flow works in Adobe Audition, Premiere Pro, Logic Pro, Reaper, or Audacity with equivalent tools.
- Split speakers to separate tracks.
- Clean each track with gate and corrective EQ.
- Use clip gain to get host and guest into the same rough loudness range.
- Add automation to smooth obvious phrase-level jumps.
- Compress each track for dynamic control.
- Route both to a dialogue bus and apply light glue compression.
- Normalize full episode to podcast LUFS target and limit true peaks.
- Listen on headphones and phone speaker before export sign-off.
Quick Quality Control Checklist Before Publishing
- Are both speakers equally understandable at low listening volume.
- Does the guest remain clear even during energetic host moments.
- Do breaths and pauses feel natural, not aggressively gated.
- Is integrated loudness near your chosen standard target.
- Are true peaks safely below clipping with limiter engaged.
- Does the episode sound consistent across earbuds, speakers, and mobile playback.
Use this checklist every episode and your podcast will feel reliably professional even when guests record in imperfect environments.
Internal and External Resource Links
- Internal: How to Remove Background Noise from Audio Without Making Voice Robotic
- Internal: Best USB Microphones for Podcasting in 2026
- Internal: Fixing Common Audio Problems in Video Editing
- External: ITU-R BS.1770 loudness recommendation
Conclusion: Consistency Is Key
Making two speakers sound the same volume is not about finding a magic button. It is a systematic process of cleaning, leveling, compressing, and normalizing. When done properly, listeners stop noticing technical distractions and focus on the conversation.
If you want your podcast to sound professional, treat loudness consistency as a core production standard, not optional polish.
Transparent Disclosure: The author is the Founder of Audio Forge Pro. Recommendations reflect genuine relevance to this topic. Core audio processing is free with no login required.