Instagram Reels vs YouTube Shorts: Why the Same Audio File Performs Differently
Guide #7 | Author: M Zeshan | Category: Audio Processing | Published: 2026-04-13
You spent three hours perfecting your audio mix. The bass hits just right, the vocals are crisp, and the overall loudness feels professional. You export the file, upload it to Instagram Reels and YouTube Shorts at the same time, and then you hit play on both.
The YouTube Shorts version sounds exactly like you intended. But on Instagram Reels, the bass is thin, the highs feel harsh, and the whole mix sounds like it was recorded inside a tin can.
You did not change a single thing. Same file. Same video. Two completely different audio experiences.
If this has happened to you, you are not alone. Thousands of creators, music producers, and social media marketers face this exact problem every day. And the worst part is most people blame their own mix, when the real culprit is hiding inside the platform itself.
In this guide, we are going to break down exactly why this happens, what each platform does to your audio behind the scenes, and most importantly, what you can do to fix it. Whether you are a beginner just starting out or an experienced creator looking to level up your content quality, this blog will give you practical, actionable steps you can apply right after reading.
How Each Platform Actually Handles Your Audio
Before we talk about solutions, we need to understand what happens to your audio file the moment you press upload. Both Instagram and YouTube do not simply store your file as is. They process it, compress it, and re-encode it according to their own internal rules.
Instagram Reels Audio Processing
Instagram is a mobile-first platform. Its entire infrastructure is built to deliver content as fast as possible to smartphones around the world. Speed is the priority, and audio quality often takes a back seat.
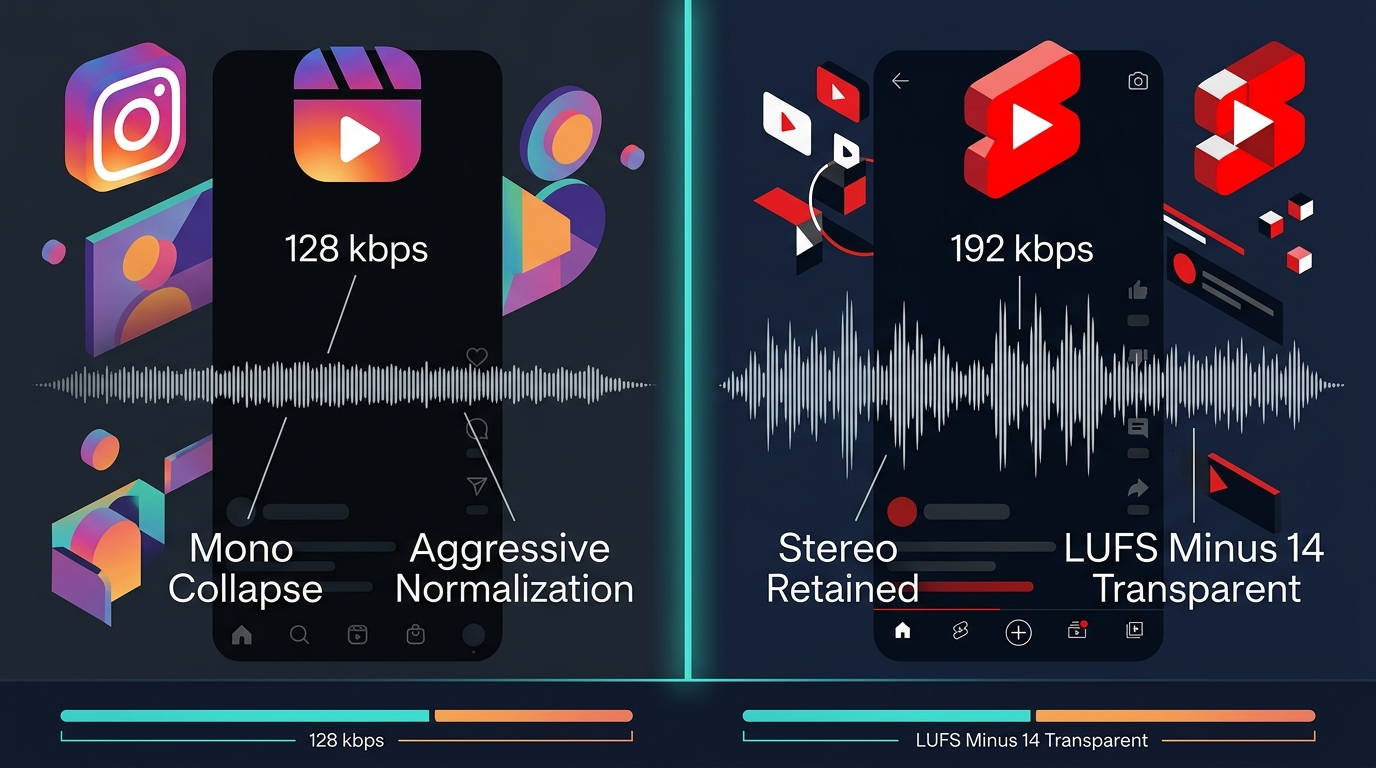
When you upload a video to Instagram Reels, the platform re-encodes your audio using the AAC codec. The bitrate after compression typically lands around 128 kbps, which is considered moderate quality. More importantly, Instagram applies aggressive loudness normalization, meaning it automatically adjusts your audio volume to match a target level across all Reels content.
Instagram also has a tendency to fold stereo audio into mono on many mobile devices, especially when played through the phone speaker. This means all your careful stereo panning and wide mix effects simply disappear for a large portion of your audience.
The recommended specs if you want the best starting quality before Instagram re-encodes are AAC codec, 44.1 kHz sample rate, stereo output, and a bitrate of at least 192 kbps before upload.
YouTube Shorts Audio Processing
YouTube has a fundamentally different approach. As a platform that grew from long-form video content where audio quality is taken seriously, YouTube invests significantly more in preserving your audio fidelity.
YouTube Shorts supports both AAC and Opus codecs. The Opus codec in particular is excellent for voice clarity and music, and it retains more detail at lower bitrates compared to AAC. YouTube's bitrate after re-encoding can go up to 192 kbps and sometimes higher depending on the content type. Stereo audio is fully supported and maintained for most playback scenarios.
YouTube also applies loudness normalization, targeting approximately minus 14 LUFS, which is an industry-recognized standard also used by Spotify and Apple Music. This is a more transparent normalization process compared to Instagram's more aggressive handling.
Quick Platform Comparison at a Glance
Instagram Reels uses AAC codec, compresses to around 128 kbps, applies aggressive normalization, often collapses stereo to mono, and has a trending audio matching system that can sometimes replace or mute your original audio.
YouTube Shorts uses AAC or Opus codec, retains up to 192 kbps, applies minus 14 LUFS normalization more cleanly, maintains stereo audio, and connects to the YouTube Music ecosystem for licensed content handling.
The Science Behind the Difference, Explained Simply
You do not need an audio engineering degree to understand this. Let us break it down in plain terms.
What Is Audio Compression and Why Does It Matter
When you upload an audio or video file to any platform, that platform converts your file into a format that is fast to stream. This process is called lossy compression, meaning some audio data is permanently removed to make the file smaller.
Think of it like packing a suitcase. If you have too much stuff and the suitcase is too small, you have to leave some things behind. Lossy compression leaves behind some audio information, and which information gets removed depends on the codec and the bitrate setting.
At 128 kbps, Instagram removes more audio data than YouTube does at 192 kbps. This is the core technical reason why your audio sounds noticeably worse on Instagram.
What Is LUFS and Why Should You Care
LUFS stands for Loudness Units relative to Full Scale. It is the modern standard for measuring how loud audio sounds to the human ear, not just how loud the peak volume is.
Both Instagram and YouTube target approximately minus 14 LUFS as their normalization point. However, the way they apply this normalization is different.
Instagram's normalization is more aggressive. If your audio is louder than minus 14 LUFS, Instagram will push it down significantly. If your audio is quieter, it will push it up. This up-and-down processing affects the character of your sound, sometimes making voices harsh or bass frequencies disappear.
YouTube's normalization is more transparent. It primarily turns down audio that is too loud without dramatically altering the character of the sound. This is why a well-mixed track often survives YouTube's processing much better.
7 Real Reasons Your Audio Sounds Different on Each Platform
Let us get specific. Here are the seven actual factors that cause your audio to behave differently.
Reason 1: Bitrate Reduction on Upload
Instagram re-encodes your audio at approximately 128 kbps regardless of what you upload. YouTube retains up to 192 kbps. That 64 kbps difference is enormous for music and anything with complex audio. You lose clarity, warmth, and detail on Instagram.
Reason 2: Aggressive Loudness Normalization
Instagram's normalization algorithm can pump up quiet sounds and crush loud sounds in ways that alter the tonal balance of your mix. A bass-heavy track gets hit hard because low frequencies carry a lot of loudness energy.
Reason 3: Stereo to Mono Conversion
This one surprises most people. Instagram collapses stereo audio to mono on many devices and in many situations. If you have a wide stereo mix with instruments panned left and right, on Instagram that entire spatial dimension disappears. Your mix can sound hollow and flat as a result.
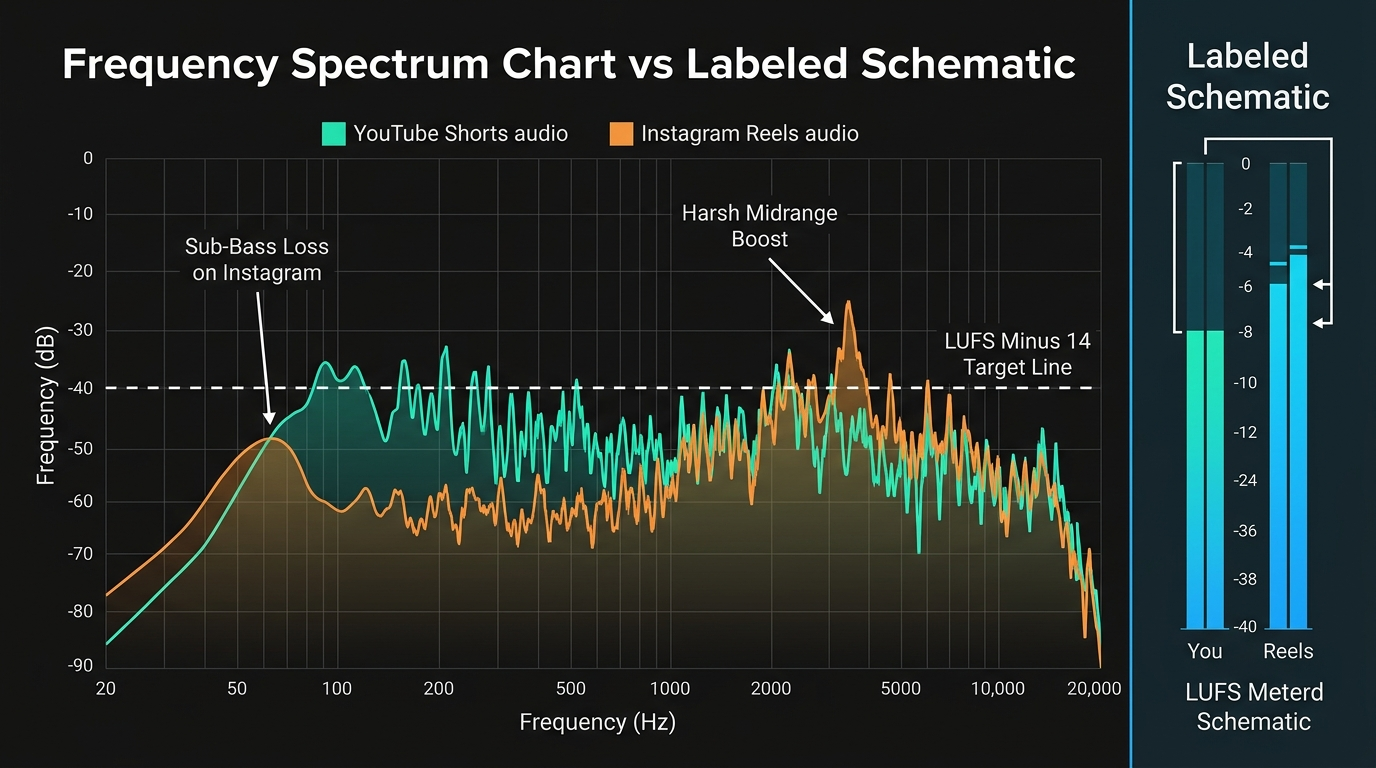
Reason 4: Frequency Response Changes
The combination of compression and normalization on Instagram tends to roll off sub-bass frequencies below 80 Hz and sometimes makes upper midrange frequencies around 3 to 6 kHz feel sharper and more fatiguing. YouTube preserves the full frequency spectrum far better.
Reason 5: Audio-Video Sync Algorithm Differences
Instagram has been known to experience audio drift over the length of a video, where the audio gradually falls out of sync with the video frames. YouTube Shorts has a more stable audio-video synchronization process, particularly for clips under 60 seconds.
Reason 6: Instagram's Trending Audio Matching System
Instagram has a built-in system that identifies audio in your video and links it to trending sounds. Sometimes this system flags your original audio and replaces or mutes it if it detects a similarity to a copyrighted track. YouTube's Content ID system handles this differently. Instead of muting content immediately, it often allows the video to stay up while the rights holder earns revenue from ads.
Reason 7: In-App Player Differences
The actual audio player built into Instagram's app applies a different equalization curve compared to YouTube's player. Instagram's player emphasizes midrange frequencies for voice intelligibility on small speakers. YouTube's player is more neutral, respecting your original mix more faithfully.
Step-by-Step Guide to Optimize Audio for Instagram Reels
Now that you know what the problem is, here is exactly what to do about it. Follow these steps before every Reels upload and you will hear a noticeable improvement.
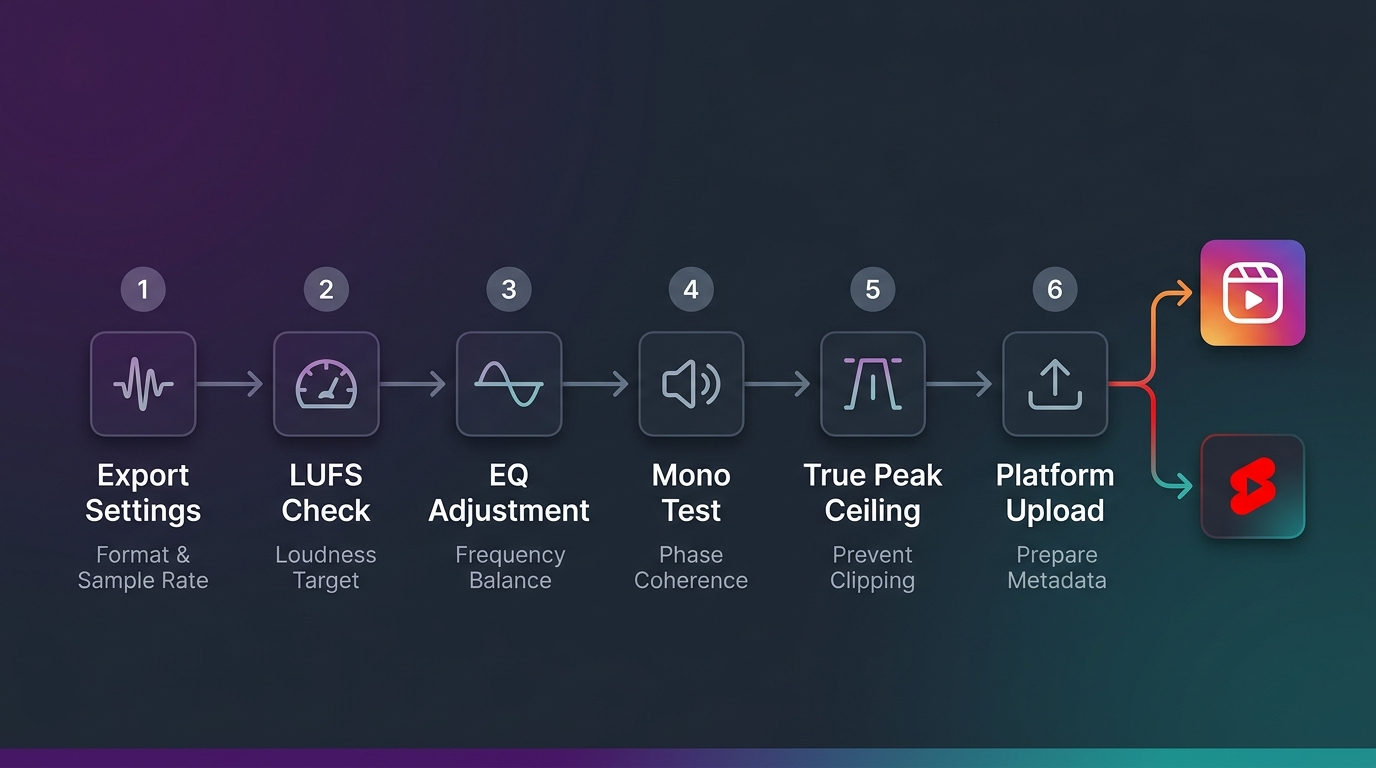
Step 1: Export at the Right Settings
Export your video with audio at 44.1 kHz sample rate, 16-bit depth, stereo, and at the highest bitrate your software allows, ideally 320 kbps MP3 or lossless WAV. Instagram will compress it anyway, but starting from a higher quality source means the final output quality is better.
Step 2: Target Minus 14 LUFS Before Upload
Use a free loudness meter like Youlean Loudness Meter to check your integrated LUFS before uploading. Bring your audio to minus 14 LUFS. This way Instagram's normalization has less work to do and will alter your mix less dramatically.
Step 3: Boost Low End to Compensate for Bass Loss
Before exporting, add a subtle low-shelf EQ boost of about 2 to 3 dB at 80 to 100 Hz. Instagram will partially roll off the sub-bass, and this pre-compensation helps your bass survive the processing and still feel present in the final output.
Step 4: Make Your Mix Mono Compatible
This is important. Press the mono button in your DAW or audio software and listen to how your mix sounds. If it becomes thin, hollow, or if some elements disappear, your mix is not mono compatible. Reduce your stereo widening effects and make sure your low frequencies are centered. What sounds good in mono will always sound better on Instagram than a wide stereo mix that collapses badly.
Step 5: Use a Limiter with a Ceiling of Minus 1 dBTP
Set your limiter's true peak ceiling to minus 1 dBTP. This prevents any digital clipping during Instagram's re-encoding process, which can add distortion to your audio.
Step 6: Test on a Phone Speaker Before Publishing
Play your exported file through your phone's built-in speaker, not headphones. This simulates how the majority of Instagram users will hear your content. If it sounds good on a small phone speaker, it will sound good to your audience.
Step 7: Use Meta's Licensed Sound Collection for Music
If you are using background music, choose tracks from Meta's Sound Collection inside the Instagram app. These tracks are pre-cleared and will not get muted or flagged by the audio matching system.
Step-by-Step Guide to Optimize Audio for YouTube Shorts
YouTube is more forgiving, but that does not mean you should upload without optimization. Here is the correct process.
Step 1: Export at 48 kHz for Best Results
YouTube's preferred sample rate is 48 kHz, which is the broadcast standard. Export your audio at 48 kHz, 16-bit or 24-bit, stereo. This gives YouTube the cleanest possible source material to work with.
Step 2: Target Minus 14 LUFS
Just like Instagram, target minus 14 LUFS. YouTube's loudness normalization will reduce audio that is louder than this target, which can reduce your perceived energy and punch. Matching the target beforehand avoids this problem.
Step 3: Preserve Your Stereo Mix
Unlike Instagram, YouTube supports and respects stereo audio. You do not need to mono-check your mix as aggressively. Keep your stereo imaging and use it to create a spacious, professional sound that rewards viewers using headphones or good speakers.
Step 4: Keep Your True Peak Below Minus 1 dBTP
Same rule as Instagram. A limiter at minus 1 dBTP protects against clipping during YouTube's re-encoding.
Step 5: Add Subtle Room Character for Voice Content
If your content includes spoken word or voiceover, a very light room reverb, just enough to remove that dry, lifeless quality, sounds natural through YouTube's player. It gives your voice a sense of presence and professionalism.
Step 6: Check Audio in YouTube Studio After Upload
After uploading, go to YouTube Studio and check your video's audio levels in the editor. YouTube Studio gives you a visual confirmation of your loudness levels and will flag any issues. This is a free quality control step that takes 30 seconds.
Real Case Studies From Real Creators
Case Study 1: The Music Producer With the Disappearing Bass
A music producer based in Lahore was uploading 30-second beat previews to both Instagram Reels and YouTube Shorts as part of a marketing strategy. His beats were bass-heavy trap instrumentals with a lot of sub-bass energy below 60 Hz.
On YouTube Shorts, the previews sounded great. Clients were reaching out and saving the videos. On Instagram Reels, the same previews sounded thin and amateur. The bass was almost completely gone. Comments were saying things like it sounds flat, which was the opposite of what his style represented.
The problem was a combination of Instagram's sub-bass rolloff during compression and his wide stereo mix collapsing to mono. He was losing both the low-end energy and the spatial width simultaneously.
The solution was a dedicated Reels export chain. He added a 3 dB boost at 90 Hz, reduced stereo width to 30 percent, and targeted minus 14 LUFS. He also bumped his export bitrate to 320 kbps MP3 before upload.
The result after applying these changes was immediate. His Reels engagement increased significantly, saves went up by roughly 40 percent over the following month, and he stopped getting comments about poor audio quality. One optimization process, one set of export settings, and the problem was solved.
Case Study 2: The Podcaster With the Harsh Voice
A podcast host was repurposing 60-second clips from her English language interview podcast onto both platforms. On YouTube Shorts, her voice sounded warm, clear, and professional. On Instagram Reels, she noticed her voice had a harsh, almost painful quality in the upper frequencies, what audio engineers call excessive sibilance, the sharp S and T sounds.
The analysis revealed that Instagram's normalization was boosting her audio, which was recorded slightly below minus 14 LUFS. When Instagram pushed the volume up, it also amplified the harsh frequencies in her voice.
The solution was a two-step fix. First, she added a de-esser plugin in Audacity to reduce the harshness of her S sounds before export. Second, she raised her recording levels so her integrated LUFS hit minus 14 before upload, eliminating the need for Instagram to boost her audio at all.
The result was that her average watch time on Reels improved noticeably. Fewer listeners were dropping off in the first five seconds, which the platform algorithm interpreted as better content and began distributing her clips more widely.
Case Study 3: The Fitness Creator With the Muted Music
A fitness content creator was using a popular licensed song as background music in her workout videos. On YouTube Shorts, the video played without issues. YouTube's Content ID recognized the track and placed an ad on it, allowing her video to remain fully visible and monetizable for the rights holder.
On Instagram, her video audio was muted entirely within hours of posting. Instagram's audio matching system detected the copyrighted track and applied an automatic mute, leaving her video silent and her engagement collapsing.
The solution was platform-specific audio sourcing. For Instagram Reels, she began using tracks exclusively from Meta's Sound Collection. For YouTube Shorts, she continued using commercial music, knowing Content ID would handle it without muting. She created two versions of each video, one for Instagram and one for YouTube, with different background music for each.
The result was consistent reach restoration on Instagram and zero further muting incidents. The additional three minutes of effort to source a separate track for Reels paid off significantly in terms of audience growth.
Tools You Should Be Using Right Now
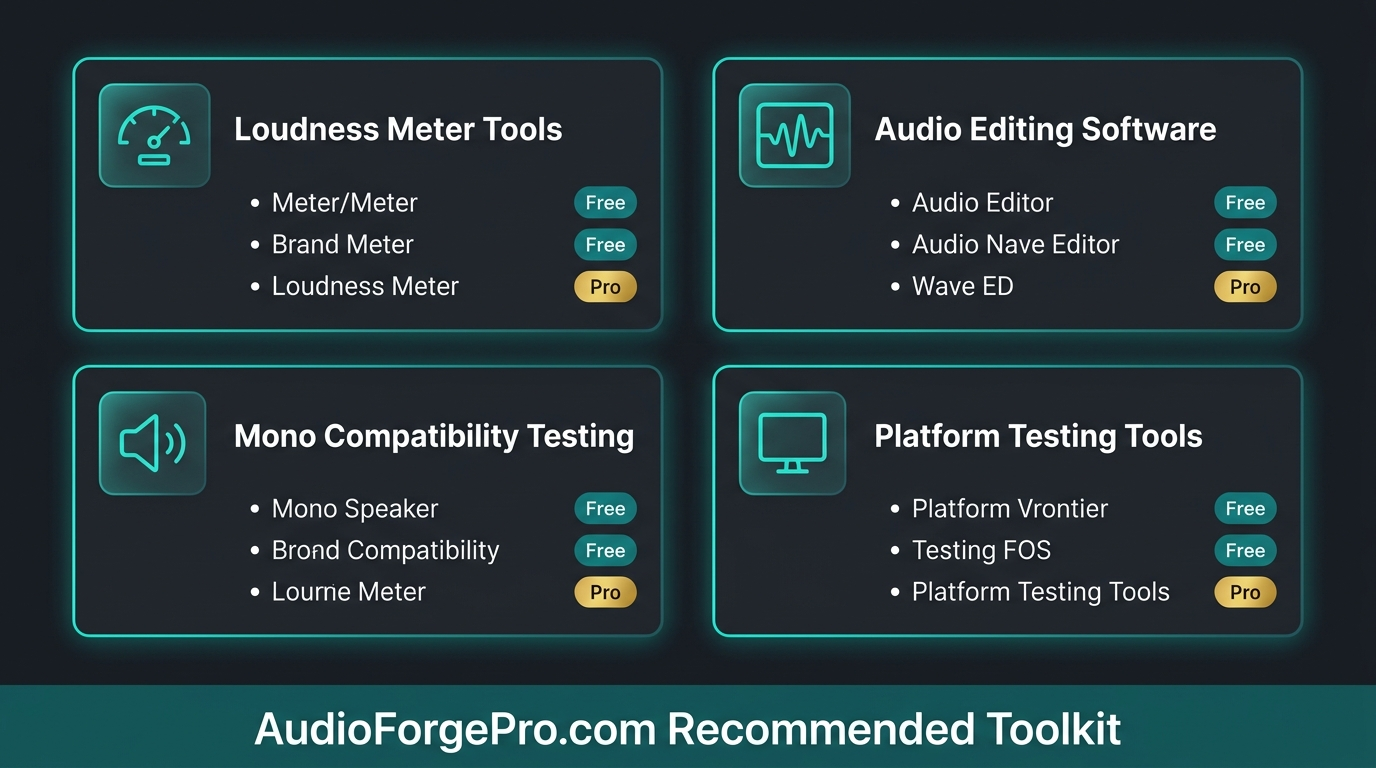
For Measuring Loudness, Youlean Loudness Meter is completely free and available as both a standalone app and a DAW plugin. It gives you real-time LUFS readings and shows you your integrated loudness so you can hit minus 14 precisely before uploading.
For Audio Editing, Audacity is free and powerful enough for most creators to handle EQ, de-essing, compression, and export formatting. For more advanced work, Adobe Audition and Logic Pro offer professional-grade tools.
For Mono Compatibility Testing, simply press the Mono button in your DAW's master channel and listen. Every DAW including GarageBand, Audacity, and Audition has this feature.
For Platform Testing, Instagram Creator Studio lets you preview your Reel before publishing. YouTube Studio shows you audio levels and flags potential issues after upload. Use both before your content goes live.
You can explore more recommended audio tools and in-depth reviews at AudioForgePro.com, where we test and review audio production resources specifically for content creators and producers.
Expert Opinion Worth Knowing
According to audio mastering engineer Ian Shepard, who has written extensively on loudness normalization for streaming platforms, the key principle is that you cannot control what a platform does to your audio after upload. What you can control is how well you prepare your audio before upload. Giving the platform clean, correctly leveled, mono-compatible audio is the single most effective thing a creator can do to protect their sound quality across any platform.
This principle applies directly to the Instagram and YouTube problem. The platforms will always process your audio. Your job is to prepare it so the processing causes the least possible damage.
Frequently Asked Questions
Why does my audio sound muffled on Instagram Reels but clear on YouTube Shorts?
Instagram compresses your audio more aggressively, typically to around 128 kbps using AAC codec. This process removes audio detail, particularly in the high frequencies, which creates a muffled or dull sound. YouTube retains up to 192 kbps and uses a more transparent processing chain, preserving clarity better.
What is the best audio format to upload for Instagram Reels?
Start with the highest quality you can provide. A 320 kbps MP3 or a WAV file at 44.1 kHz and 16-bit stereo are both excellent starting points. Instagram will re-compress your audio, so the cleaner your source, the better the final result after compression.
Does YouTube Shorts compress audio?
Yes, YouTube Shorts does compress audio during processing. However, it uses a more generous bitrate, up to 192 kbps, and supports the Opus codec which is more efficient and retains more clarity at the same bitrate compared to AAC. The normalization process is also less aggressive than Instagram's.
What LUFS level should I target for social media videos?
Target minus 14 LUFS integrated loudness for both Instagram and YouTube. This is the industry standard for streaming platforms and social media. It aligns with the normalization targets of both platforms, which means neither platform needs to dramatically alter your audio levels during processing.
Why does Instagram mute my audio?
Instagram's audio matching system continuously scans uploaded content for copyrighted music. If it detects a match with a track not licensed for use on the platform, it will automatically mute the audio. To avoid this, use tracks from Meta's licensed Sound Collection or ensure you have the proper commercial license for any music you use on Reels.
Can I upload the exact same video file to both platforms without any audio editing?
Technically yes, but the results will be inconsistent. For casual content, the difference may be acceptable. For professional content, music production, branded videos, or anything where audio quality is central to your message, you should create platform-specific exports with the optimization steps outlined in this guide.
Will using headphones help my audience hear better audio quality on Instagram?
Yes, headphone listening bypasses many of the issues caused by Instagram collapsing stereo to mono on phone speakers. However, you cannot control how your audience listens. Optimizing for mono compatibility and correct LUFS ensures your audio sounds good for everyone, whether they use headphones, earbuds, or a phone speaker.
Conclusion and Key Takeaways
The same audio file performs differently on Instagram Reels and YouTube Shorts because both platforms have fundamentally different audio processing systems, codecs, bitrate standards, normalization approaches, and playback environments.
Instagram compresses more aggressively, collapses stereo, and applies normalization that can alter your mix's tonal character. YouTube retains more quality, respects stereo audio, and applies a more transparent normalization process.
The fix is not complicated. Export at the right settings, target minus 14 LUFS, check mono compatibility for Instagram, compensate for bass loss on Reels, and use platform-appropriate licensed music. These steps take an extra few minutes per upload and the quality difference is significant.
The creators who grow fastest on both platforms are not necessarily the ones with the best cameras or the most expensive equipment. They are the ones who understand the technical environment their content lives in and prepare for it properly.
Start applying these steps to your next upload and experience the difference for yourself.
For more in-depth guides on audio production, tools reviews, and platform-specific optimization tips, visit AudioForgePro.com.
Related Internal Guides
Check out our comprehensive audio mixing guide for more production tips. You can also learn more about audio formats for video and our latest free audio tools review.
Transparent Disclosure: The author is the Founder of Audio Forge Pro. Recommendations reflect genuine relevance to this topic. Core audio processing is free with no login required.
Master Your Sound Today
Join the new era of content creation. Pro-grade AI audio tools. Free to start. No signup needed.
Launch Audio Forge Pro — FREE